

About M7
Product Introduction
M7 is the latest half-body general-purpose humanoid robot developed by Robotera, featuring 42 degrees of freedom, the industry's top-notch motors with a maximum peak torque of 95 Nm and a peak speed of 4.20 rad/s, paired with a pair of dexterous hands with 12 active degrees of freedom, and combined with a powerful 275 TOPS platform computing power, it can implement multiple algorithms such as teleoperation, imitation learning, and large robot models, supporting AGI-oriented applications in research, industrial, commercial, and home scenarios.
Overview
the overall appearance of the robot is shown below.
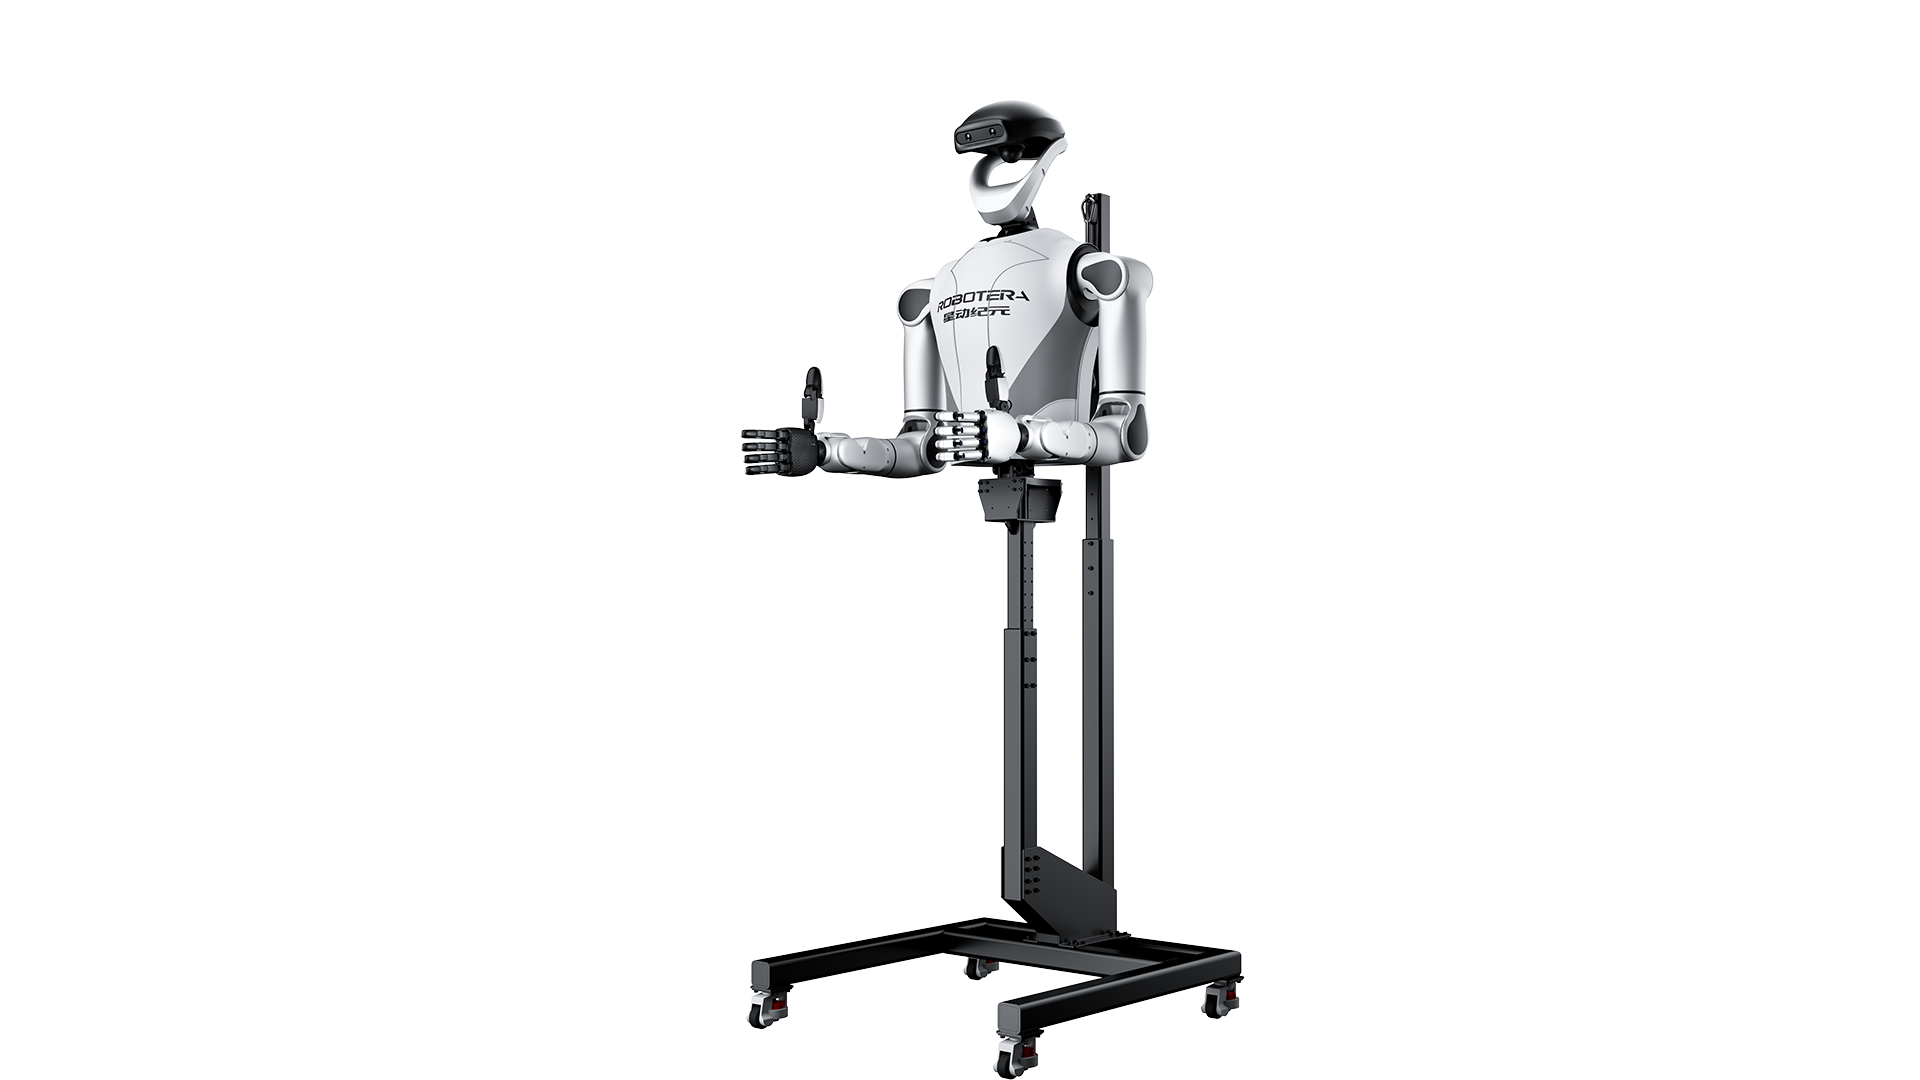
Overall Robot Parameters
Technical Specifications
| M7 Specification Parameters | |
|---|---|
| Size | Upright Dimensions: Base Dimensions 650*675mm, Height Adjustable from 1585 to 1810mm |
| Total Arm Length | 717mm x 2 |
| Single-arm load: | 10Kg |
| Degree of Freedom | 43 (7 degrees of freedom for each arm x 2, 3 degrees of freedom for the waist, 2 degrees of freedom for the neck, 12 degrees of freedom for each dexterous hand x 2) |
| Overall Robot Weight | Approximately 70kg |
| End-of-arm velocity | 3m/s |
| Arm End Accuracy | 0.02mm |
| Battery | 57.6V 15Ah 864Wh |
| Control and perception capabilities | 80 TOPS(x86)+275 TOPS(Orin AGX) |
| Perception Sensor Configuration | Depth Camera Voice Module |
| Dexterous Hand | It has a human hand-like shape with 12 active degrees of freedom in a single hand |
| Communication Interface | Ethernet、USB 4.0、Wi-Fi 6、USB-C |
Joints and Motors
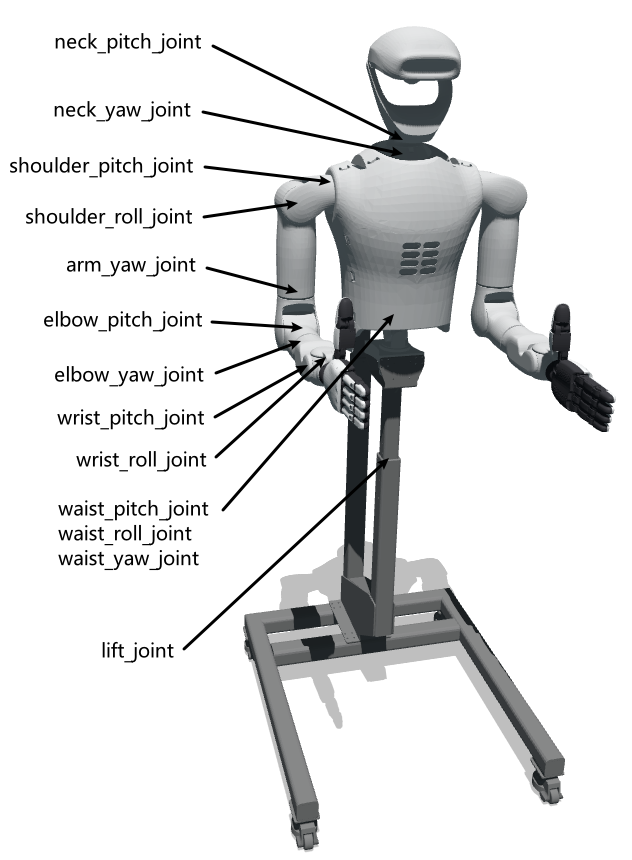
Joint Peak Torque and Speed Specifications:
| position | Peak torque (Nm) | speed (rad/s) |
|---|---|---|
| shoulder pitch | 95 | 4 |
| shoulder roll | ||
| shoulder yaw | ||
| elbow pitch | ||
| wrist yaw | 35 | 4 |
| wrist roll | ||
| wrist pitch | ||
| neck pitch | 35 | 4 |
| neck yaw | ||
| waist pitch | 95 | 4 |
| waist roll | ||
| waist yaw |
Range of robot for each joint:
| Robot Parts | Corresponding joint angle range |
|---|---|
| arm | Shoulder pitch: ±160° Shoulder roll: -32°~145° Shoulder yaw: -250°~70° Elbow: -135°~40° Wrist yaw: ±160° Wrist pitch: ±45° Wrist roll: ±90° |
| Neck | Neck pitch: -10°~31° Neck yaw: -60°~60° |
| waist | Waist pitch: -70°~5° Waist roll: -15°~15° Waist yaw: -90°~90° |
Onboard Computing Resource Connection Diagram
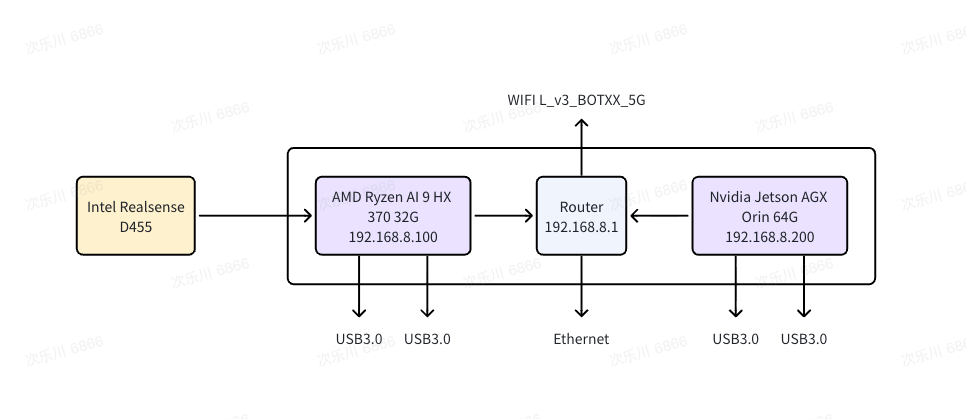 The hardware and system specifications of the onboard computing resources are listed below:
| Computing Unit Name: | AMD Ryzen AI 9 HX 370 |
|---|---|
| CPU | 12-core |
| Memory | 32GB |
| Storage | 1TB SSD |
(Optional Jetson Orin AGX Module)
| Computing Unit Name: | Jetson Orin AGX 64GB |
|---|---|
| AI Performance | 275 TOPS |
| GPU | NVIDIA Ampere architecture GPU with 2,048 CUDA cores and 64 Tensor Cores |
| GPU Maximum Frequency | 1.3 GHz |
| CPU | 12-core Arm® Cortex®-A78AE v8.2 64-bit CPU, 3 MB L2 + 6 MB L3 |
| CPU Maximum Frequency | 2.2 GHz |
| System Memory | 64GB 256-bit LPDDR5 204.8GB/s |
Operation Guide
Unboxing and Power-On
Unboxing
The robot unboxing procedure typically includes the following steps:
- Check the packaging: Before opening the box, first check whether the packaging box is damaged to ensure that the product has not been damaged during transportation.
- Remove the items: Open the packaging case and remove the robot and its accessories one by one according to the instructions in this manual, including the power supply, tools, fixtures, and other accessories.
Install the battery and power on the robot.
Connect to the robot
Locate the robot’s Wi-Fi SSID under the hip roll joint. The SSID is in the format: L_v3_BOTXX.
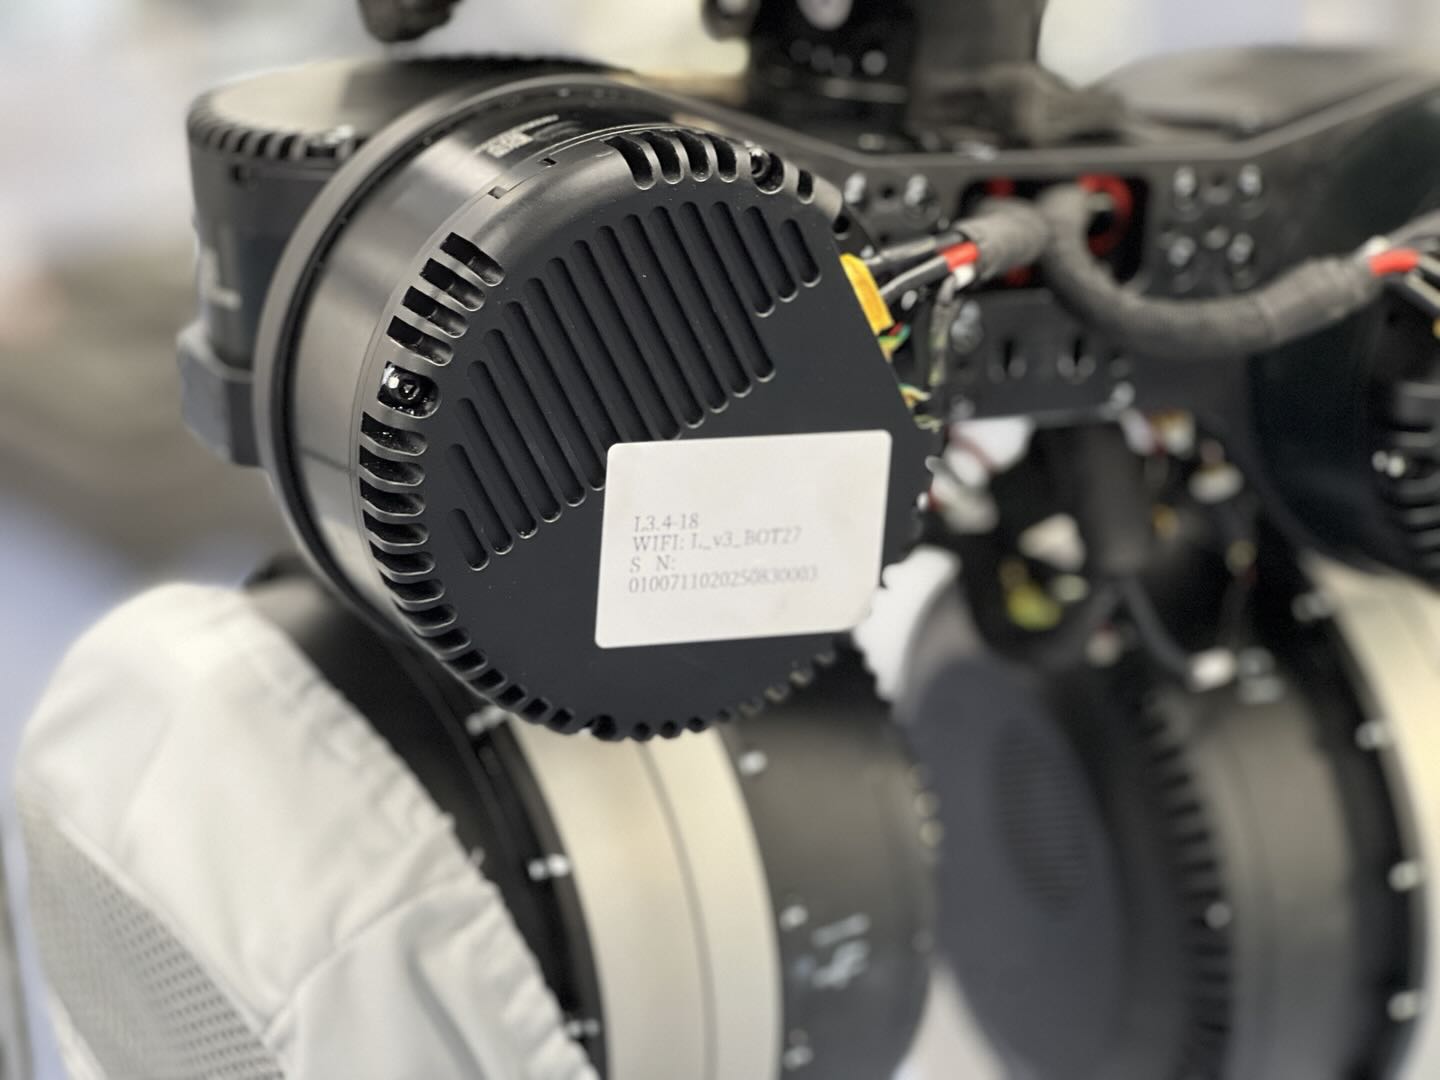
Search for “L_v3_BOTXX” in the available Wi-Fi networks and connect to the router inside the robot body.
Note: The 5G Wi-Fi network may take longer to appear.
The default Wi-Fi password is xbot123456.
Internal Fixed Address Modification Restriction: 192.168.8.100 is the internal fixed communication address of the robot, where the "8.100" segment is a preset fixed configuration and modification is prohibited; modification will result in abnormal robot communication and malfunction of functions.
Access the Robot Management Console
Open a browser and enter the following address: http://192.168.8.100:1888. This will open the robot control console, where you can view robot status, system information, and other related information.
Set an Access Password
Create a Password
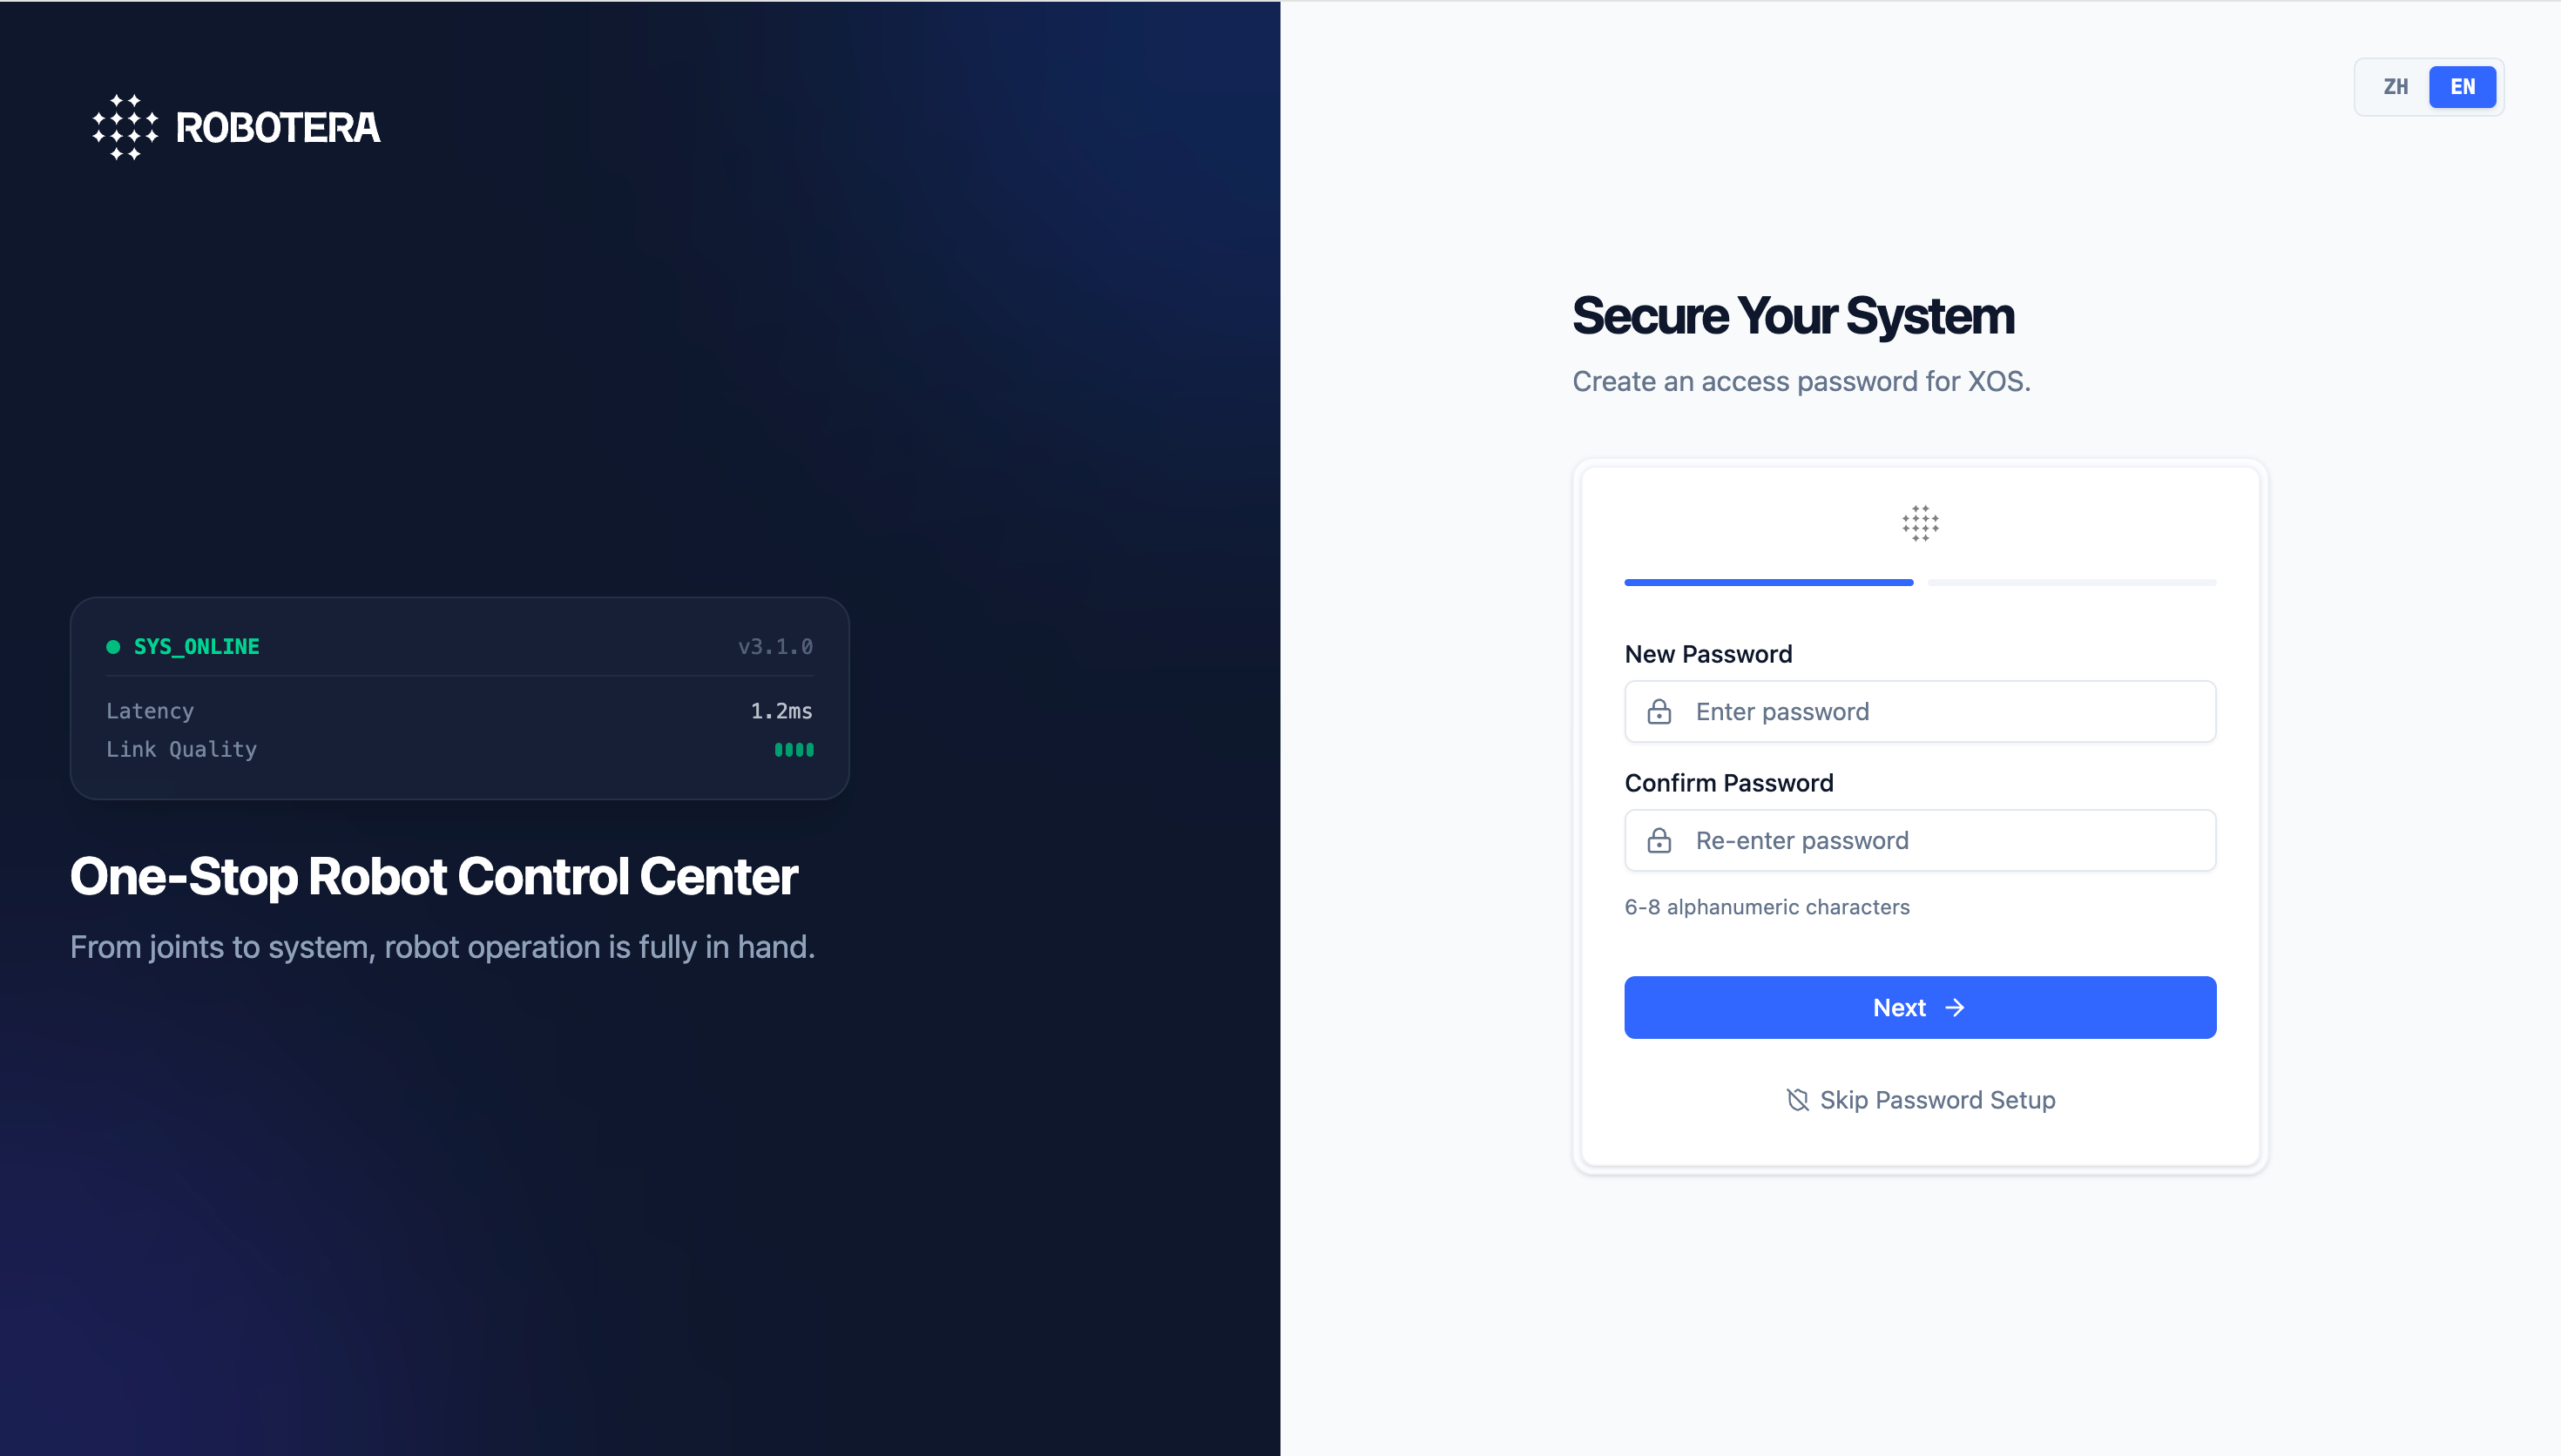
This is the initial security setup interface of XOS. It is used to configure the access password for the one-stop robot control center and ensure the security of system and device permissions.
Two-Factor Authentication
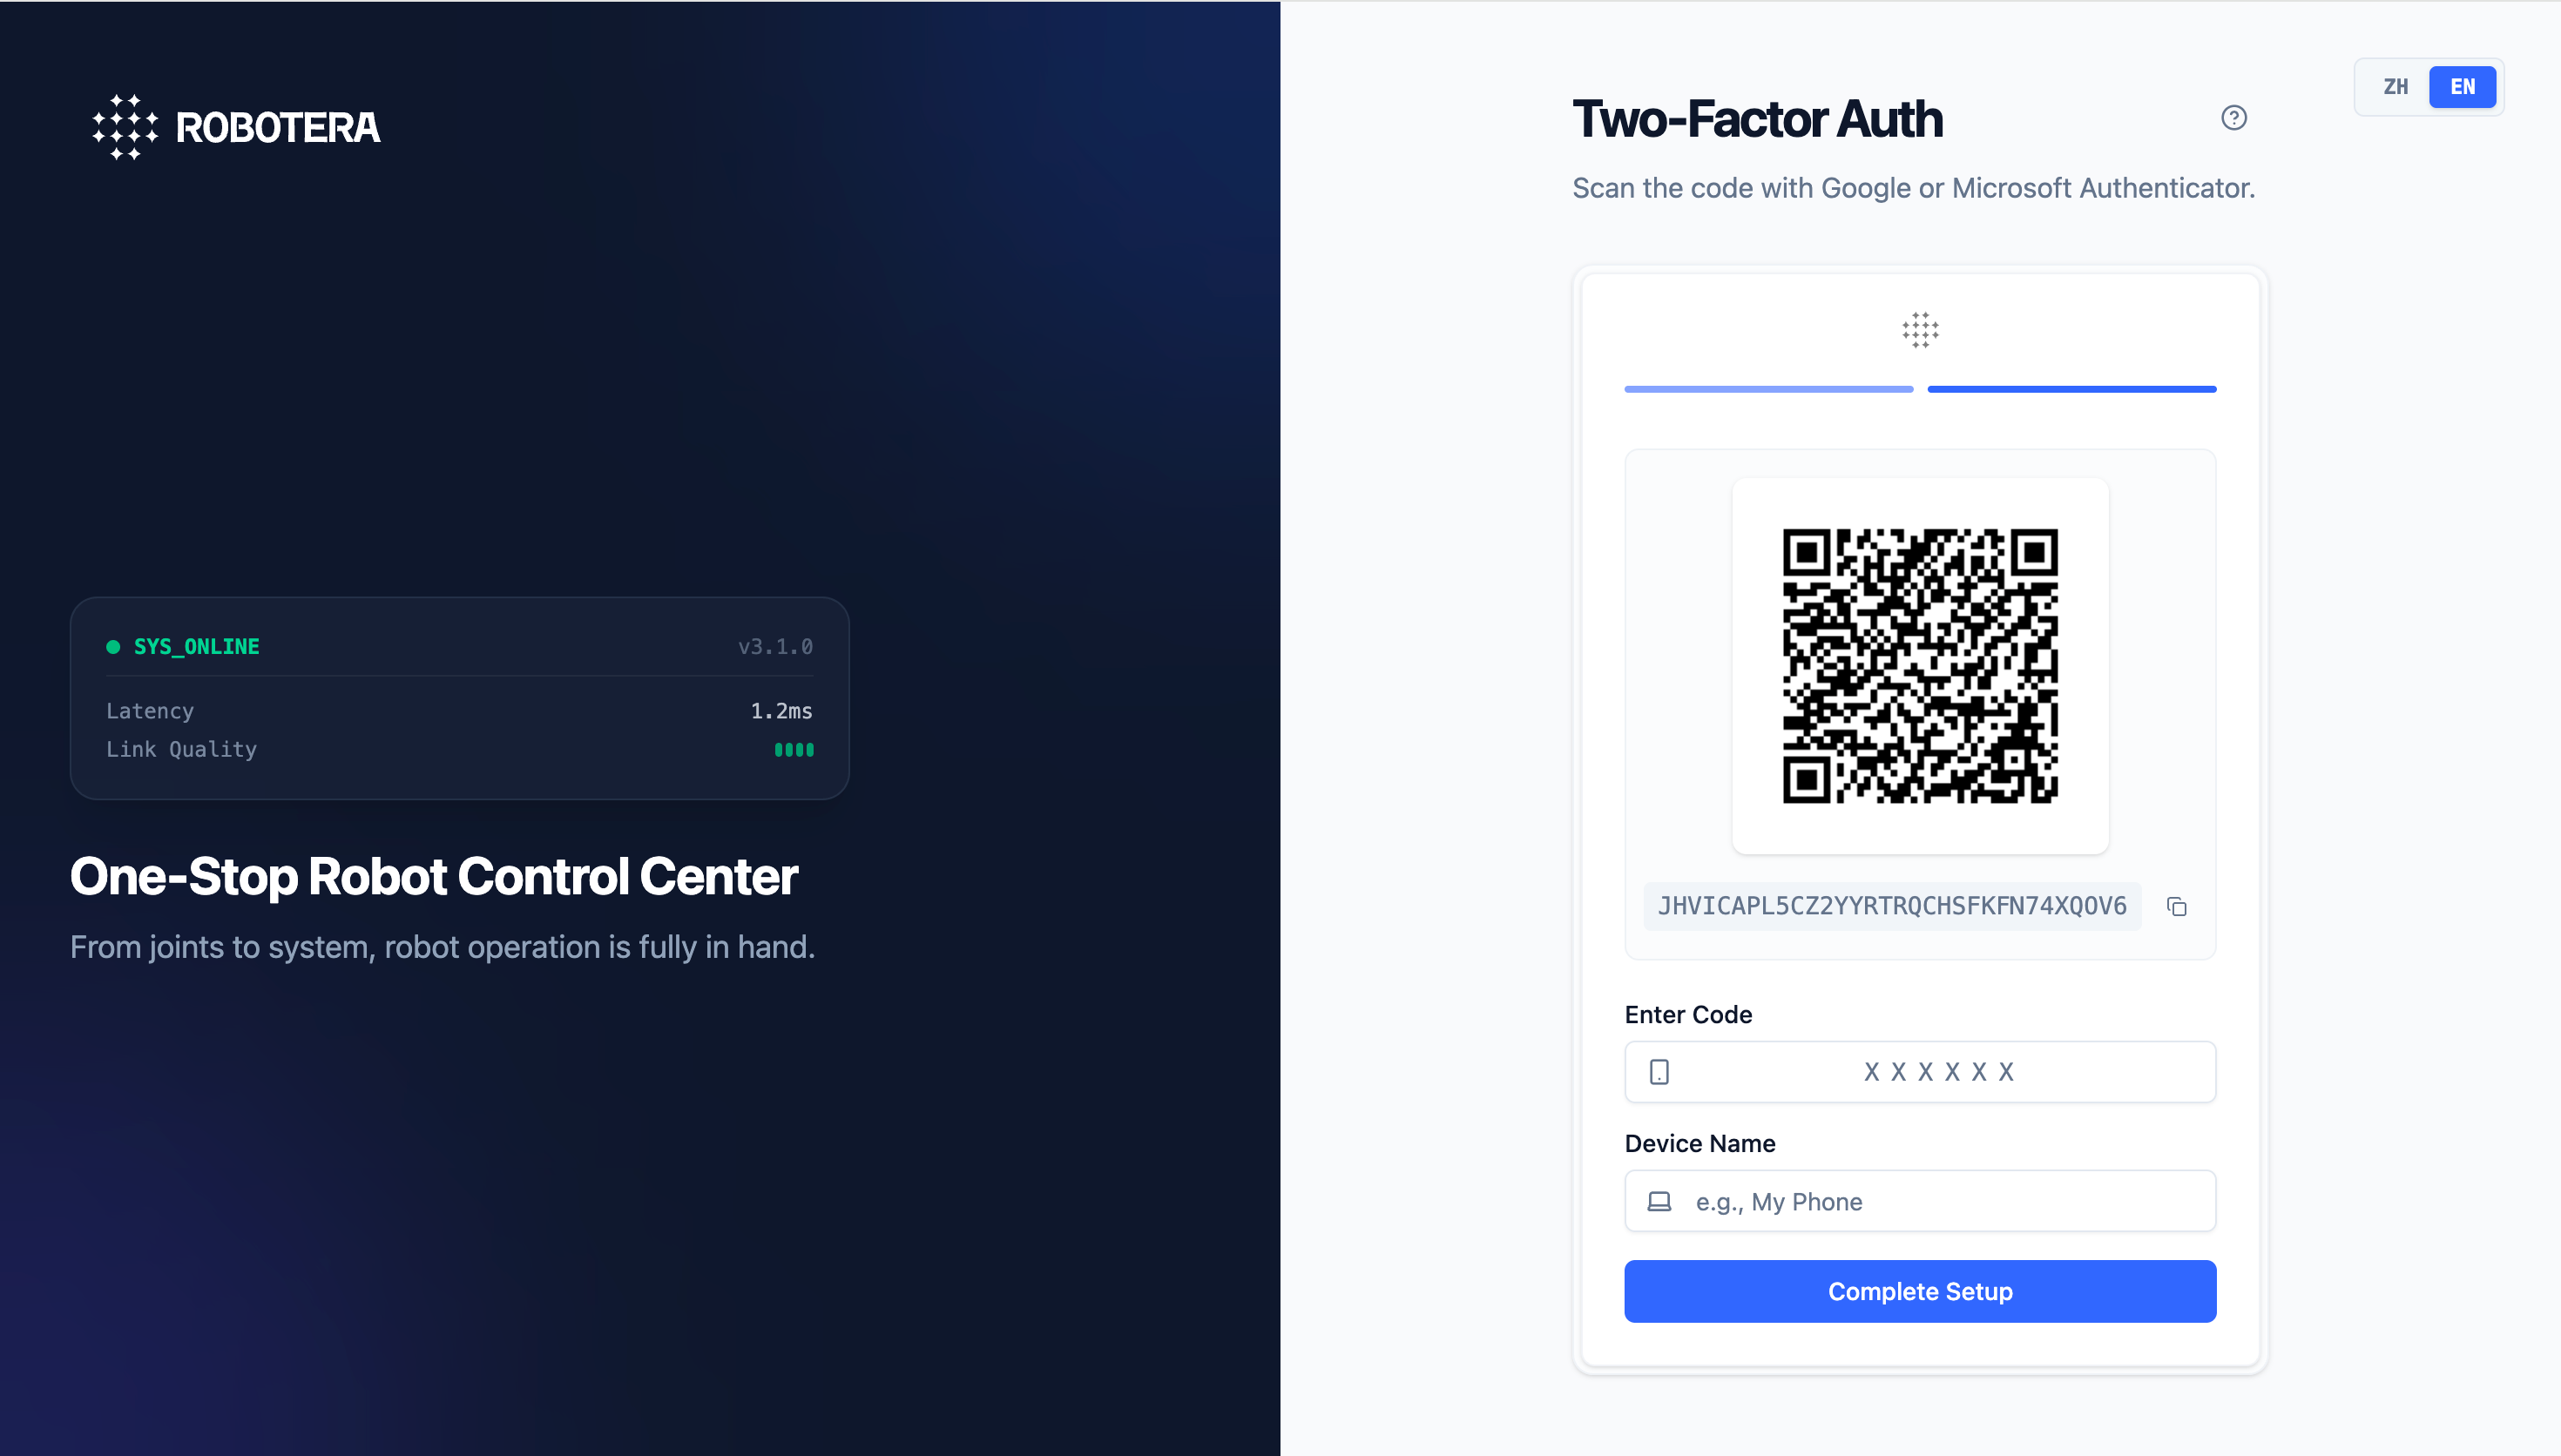
The two-factor authentication settings interface of XOS further strengthens the access security of the robot control center, providing a second layer of protection for the system beyond passwords.
Homepage
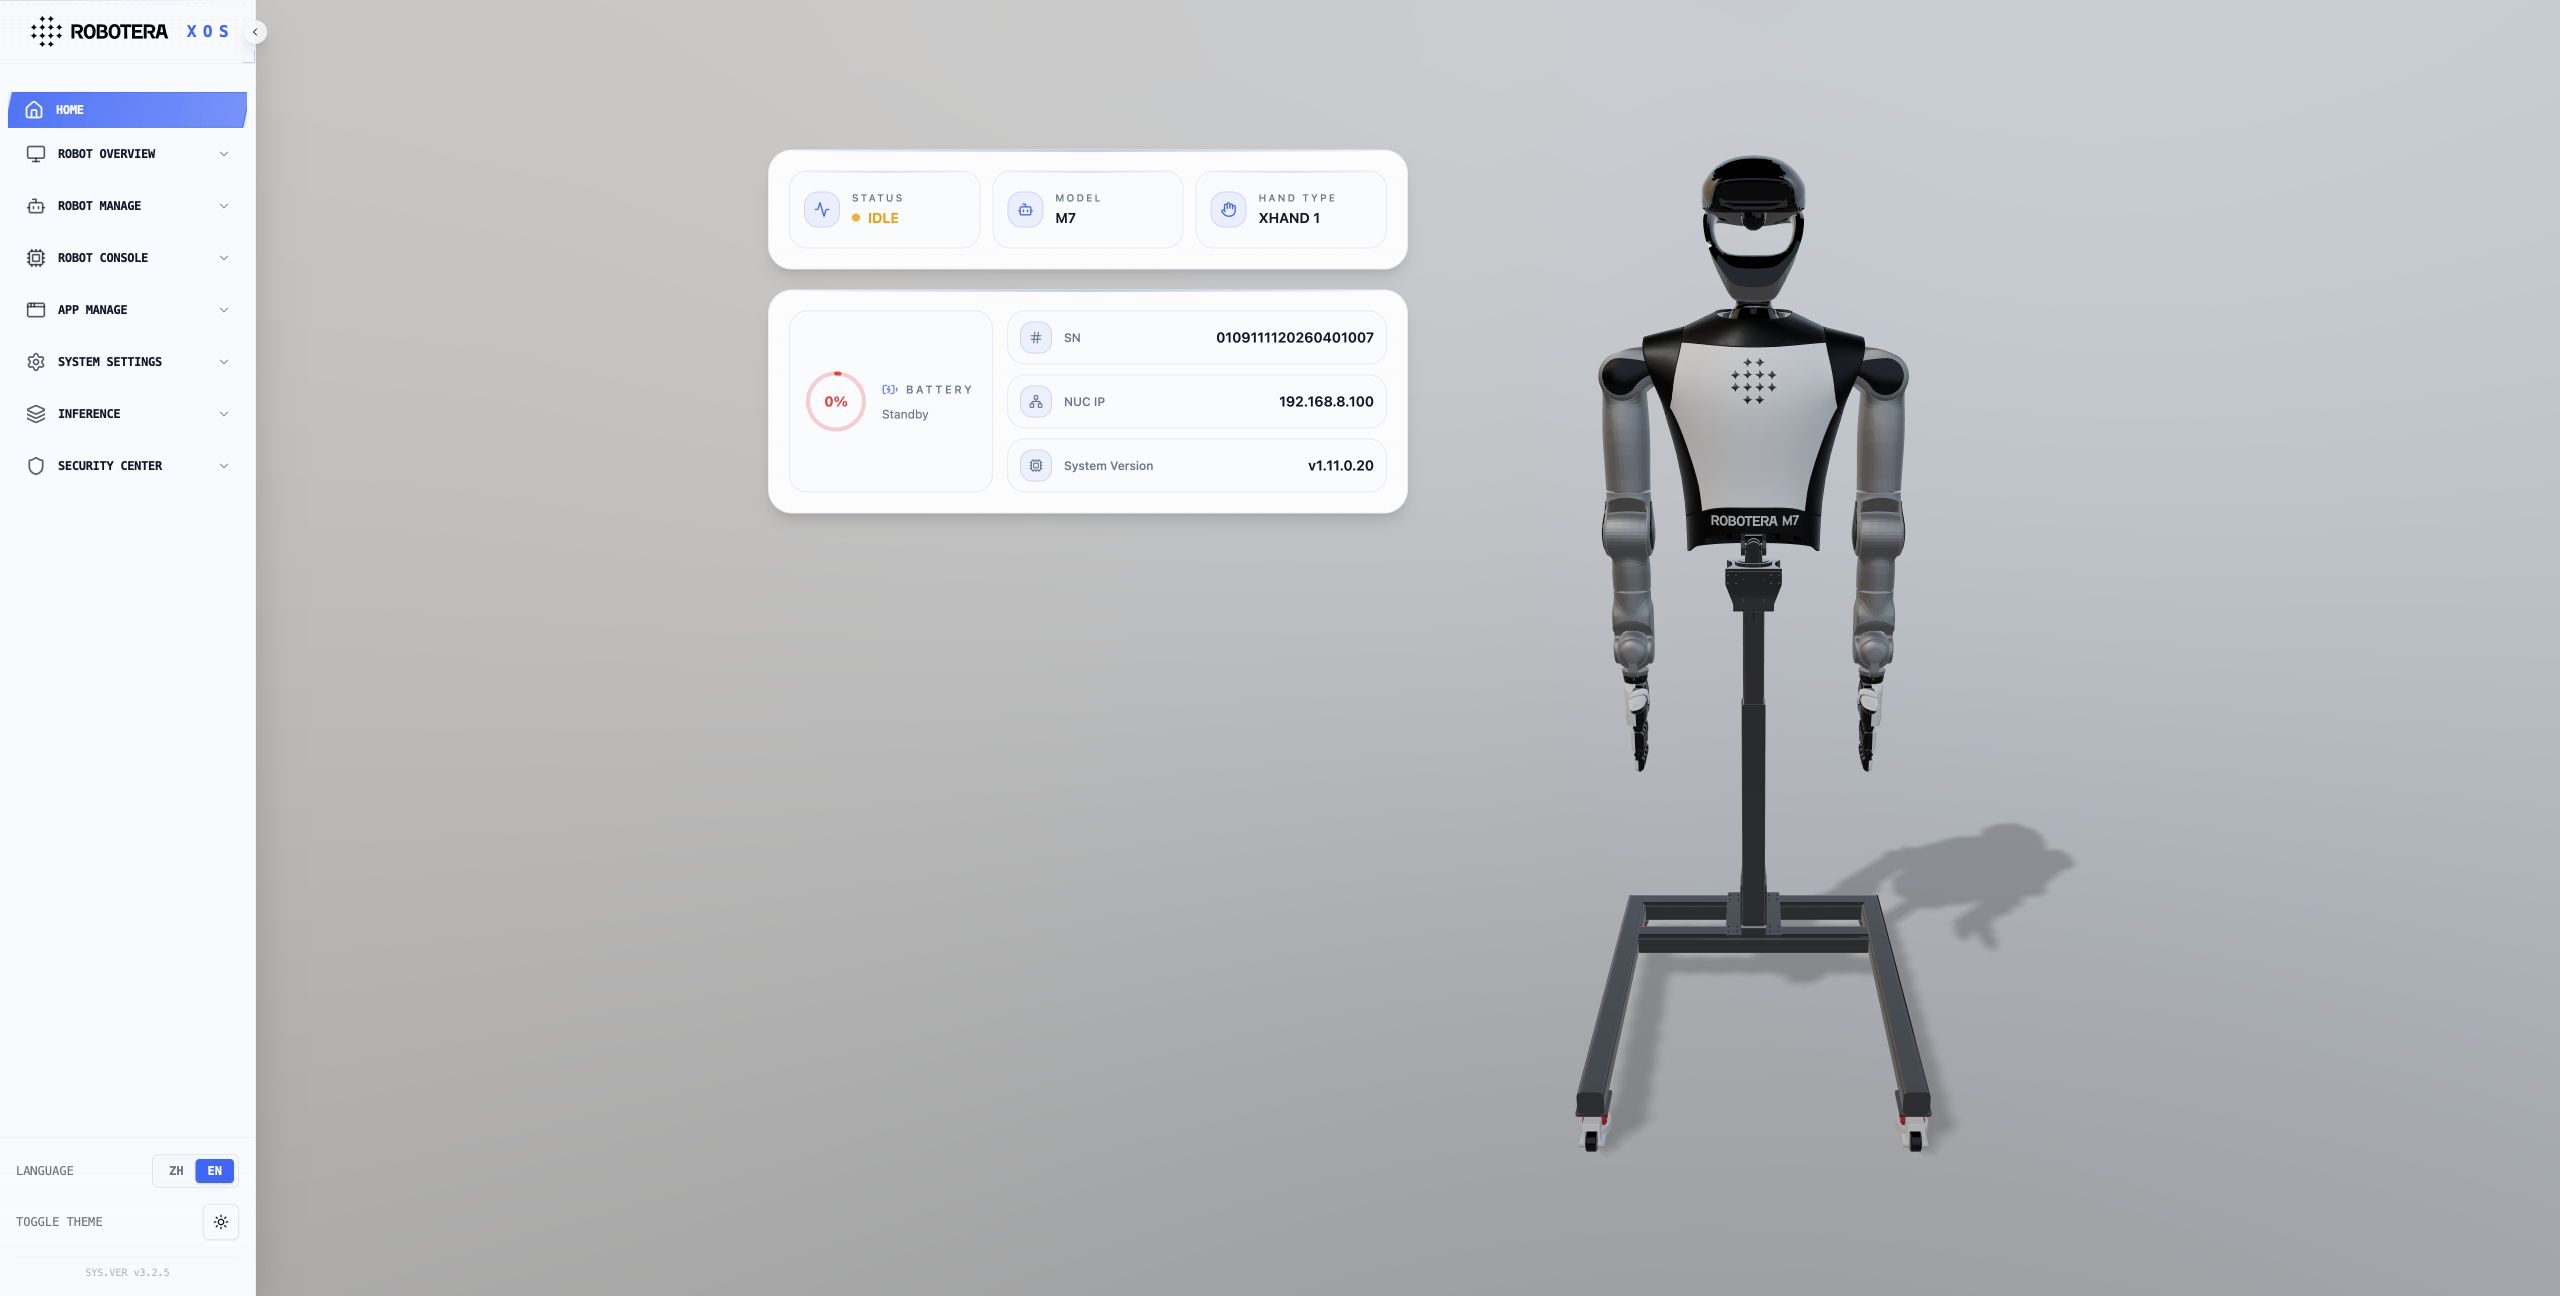
- View the overall robot status information on the home page to monitor the current robot status in real time.
- The overall robot information is displayed as follows: INIT: State after power-on startup. IDLE: Robot hardware connection state. READY: Robot initialization state. ACTIVE: The robot is ready to accept tasks. ERROR: The robot is in an error state. Robot Model: Model of the current robot. Dexterous Hand Model: Model of the dexterous hand installed on the current robot. Battery Level: Displayed as a percentage. Battery Status: Standby/Fully Charged, Charging, or Discharging. Robot SN: Serial number of the current robot. NUC IP Address: IP address of the NUC in the current robot. XOS Version: Current XOS version of the robot. CPU Usage: Overall CPU usage curve. Robot Simulation Model: Simulation model corresponding to the current robot model.
- Real-time Error Information: If an alarm or error occurs, the corresponding joint in the robot simulation model will turn red.
Robot Overview
Log Management
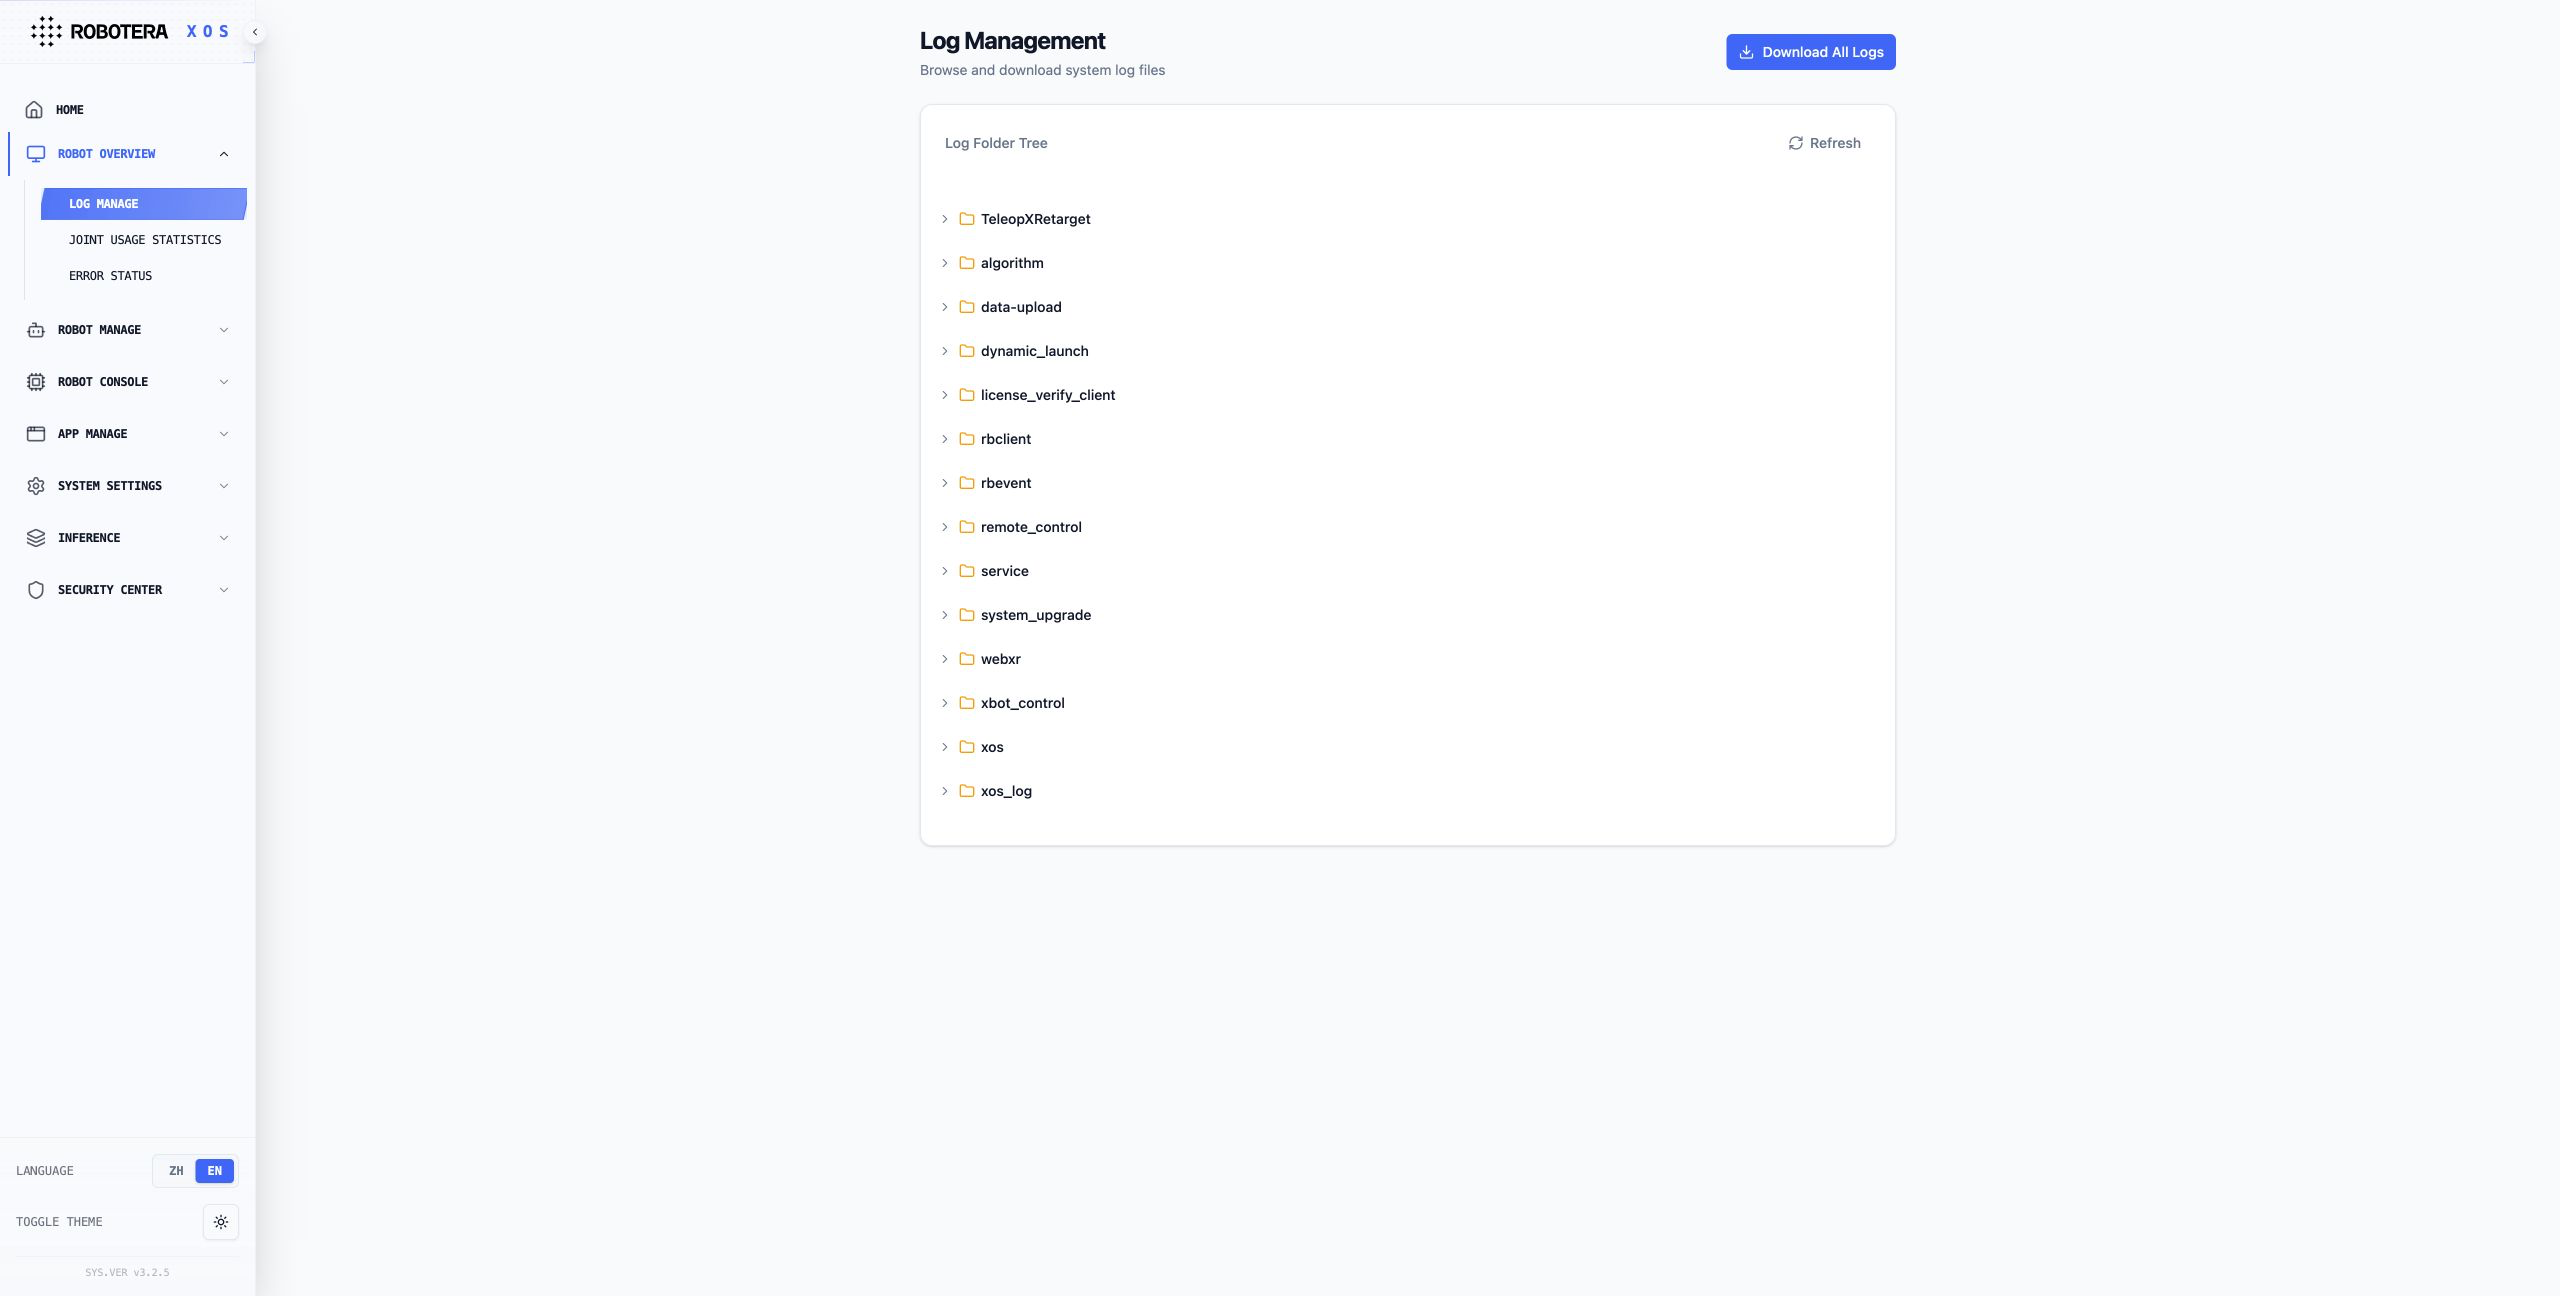
- The log management module supports log collection, storage, and visualization.
- Operation logs from each functional module can be classified and aggregated based on the system architecture hierarchy.
- The interactive interface supports log display and structured parsing.
- Users can manually download log files for specified modules according to operational needs, supporting system debugging, issue tracing, and troubleshooting.
Joint Usage Statistics
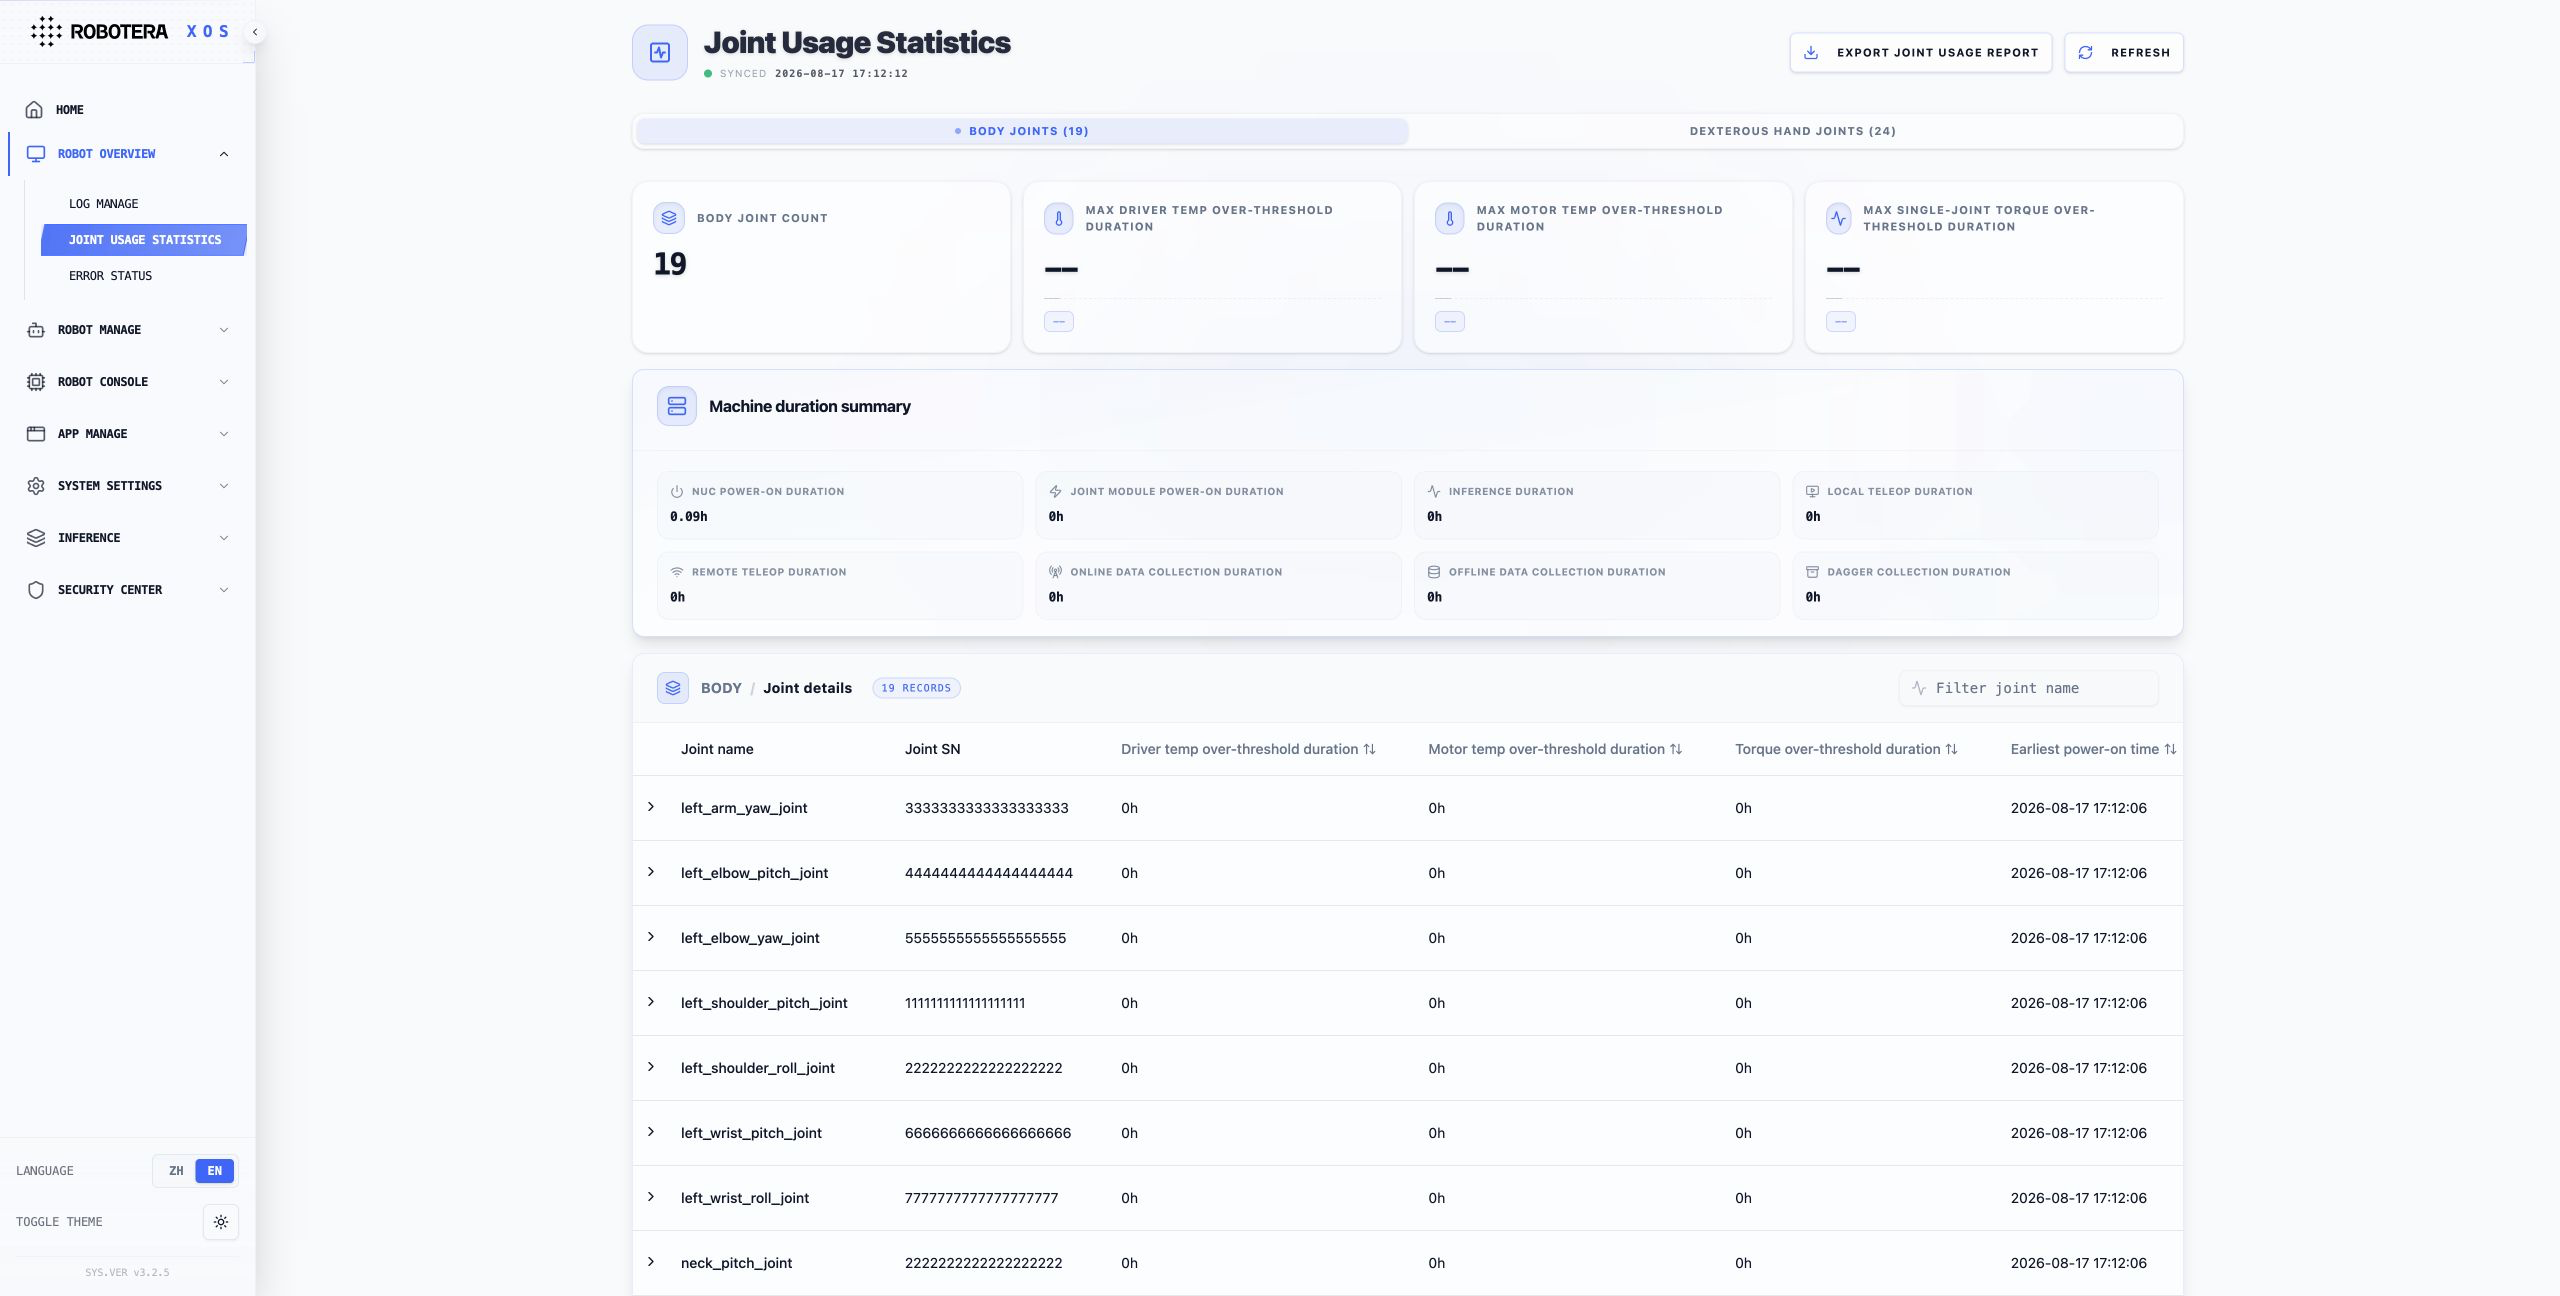
The Joint Usage Statistics page summarizes usage data for both body joints and dexterous hand joints. Switch between the two joint groups to view joint module power-on, inference, teleoperation, and data collection durations, as well as driver temperature, motor temperature, and torque over-threshold durations.
The table below shows each joint's SN, over-threshold durations, and earliest and latest power-on times, with access to historical records. You can also refresh the statistics or export a joint usage report. Refreshing may cause the robot to lag while it is running, so perform this operation when the robot is idle.
Abnormal State
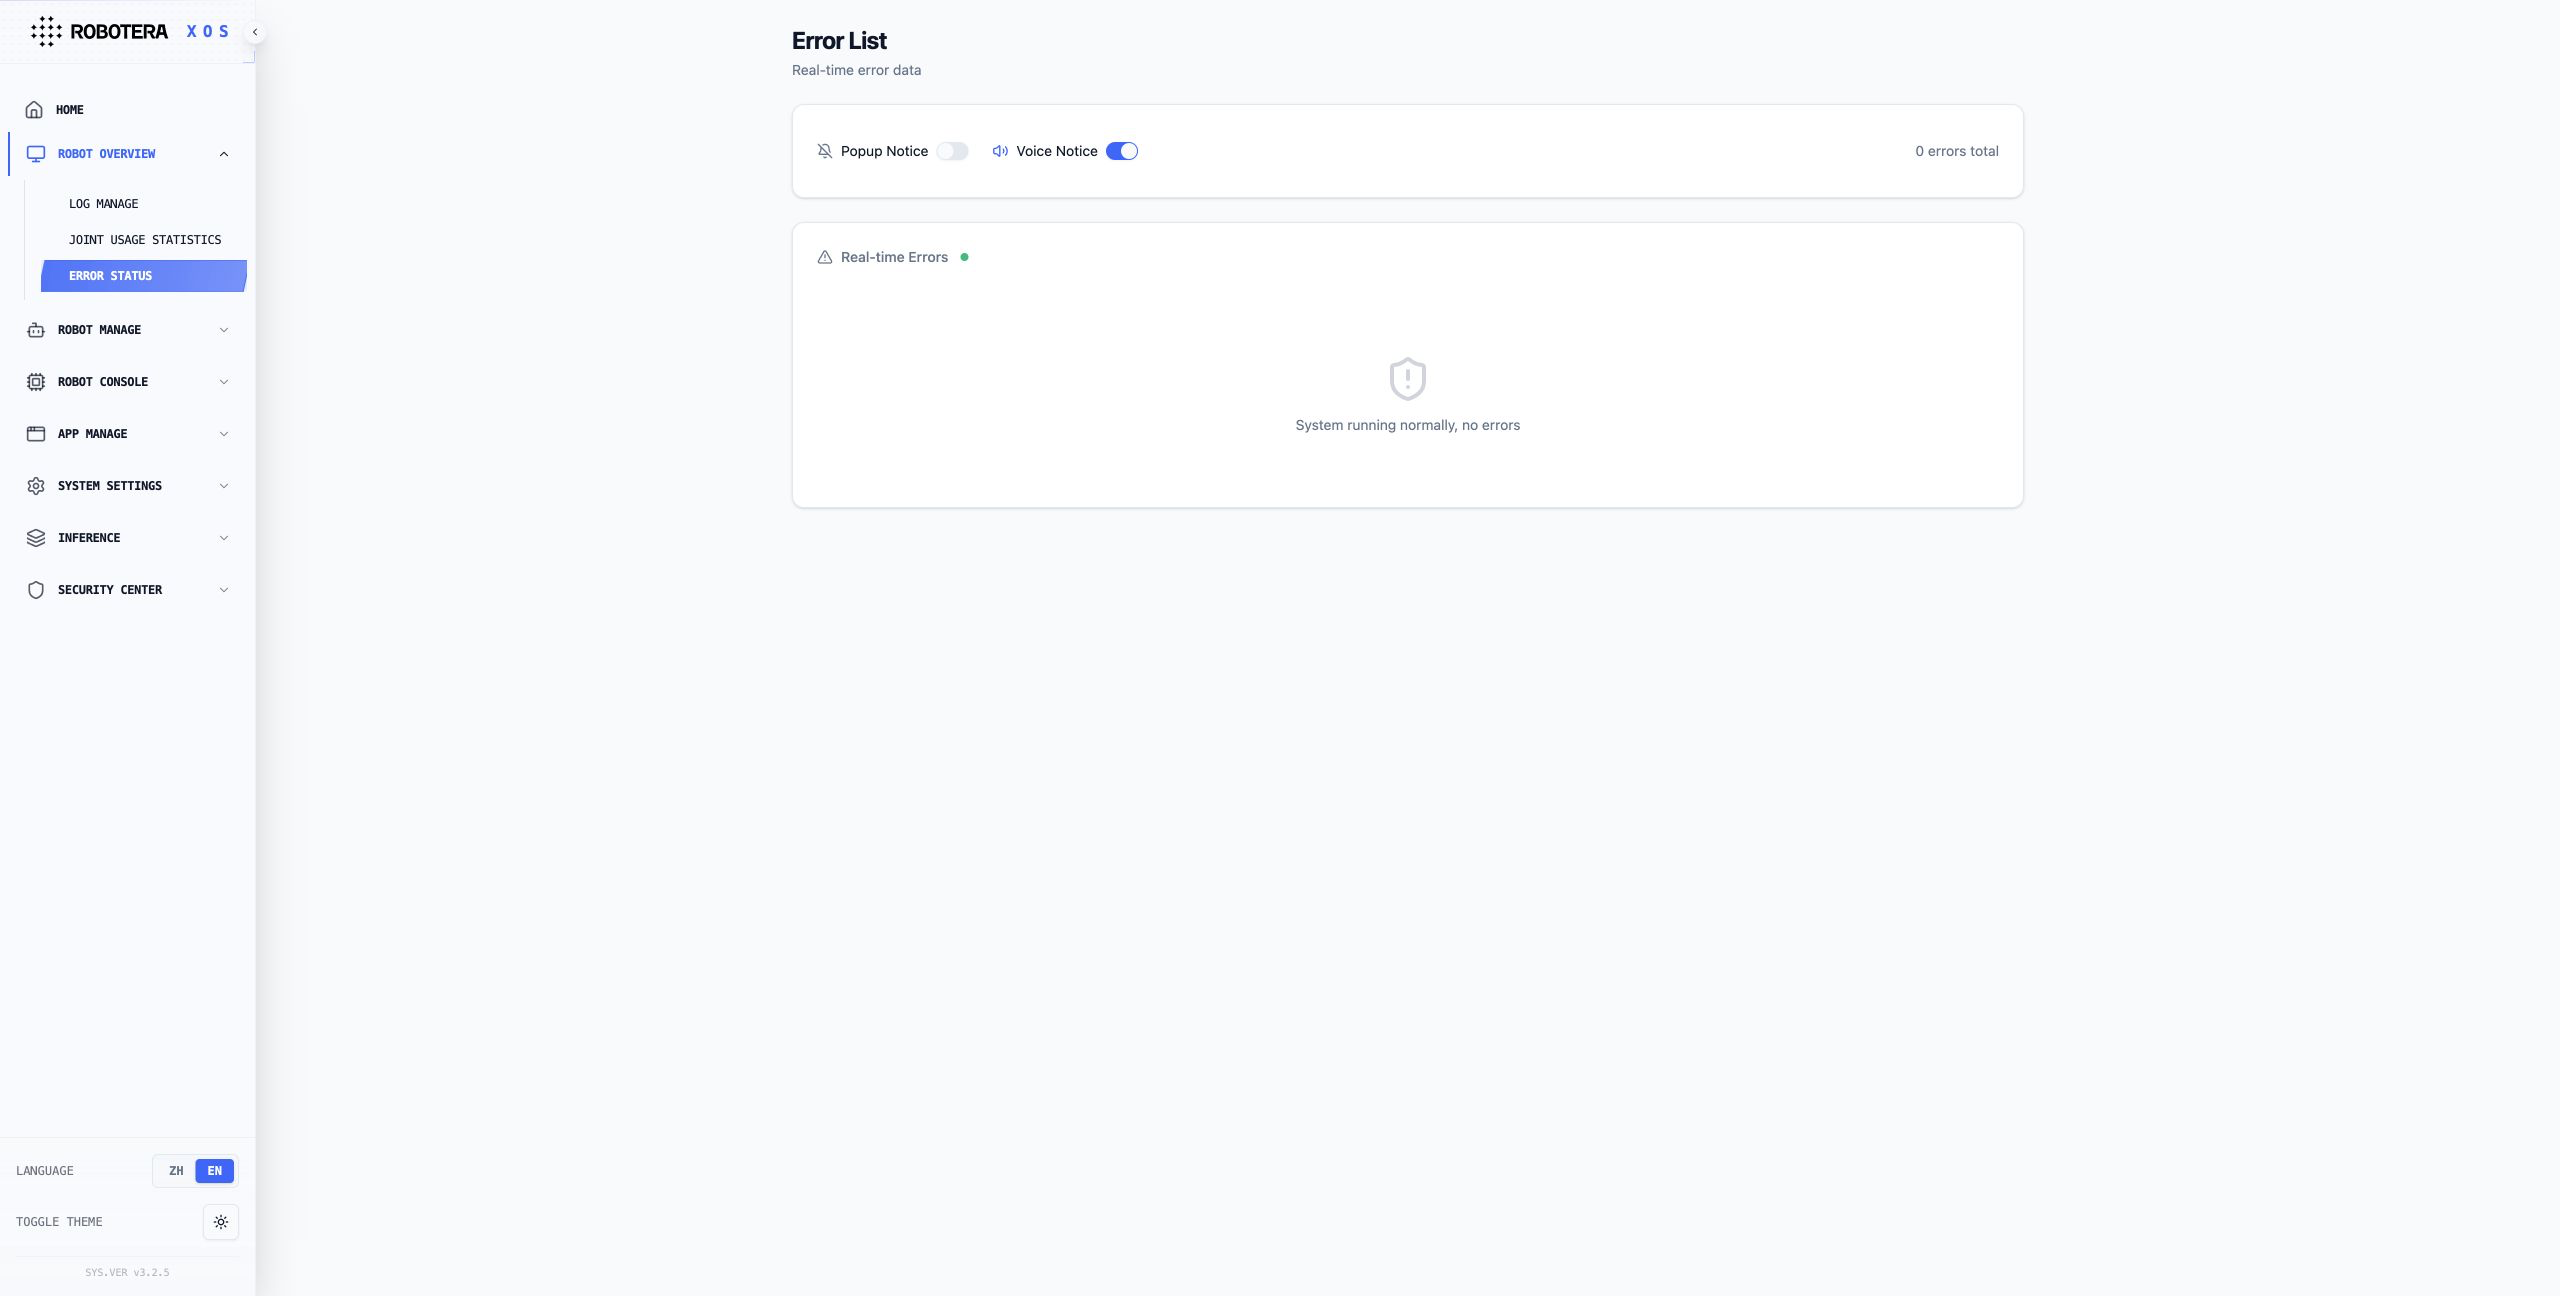
- Supports real-time monitoring of abnormal operating states of each module of the robot, supports pop-up notifications and voice announcements, and can quickly locate and handle faults.
Core Features:
- Abnormal Notification: Supports two reminder methods, pop-up notification and voice broadcast, and is enabled by default.
- Exception List: Clearly displays the exception module, name, code, location, description, and level, facilitating quick identification of issues.
- Quick Processing: Each exception provides a "View Solution" entry, which directly jumps to the corresponding handling instructions.
Operation Instructions:
- Turn on/off notifications
- Click the switch on the right side of "Pop-up Notification" or "Voice Broadcast" to toggle the on/off state.
- View exception details
- View key information such as abnormal modules, locations, and levels in the list.
- Exception levels are divided into: fatal error, serious error, error, warning, prompt, and information.
- Handle exceptions
- Click "View Solution" in the action bar on the right side of the abnormal row to obtain the official processing steps.
Robot Management
Sound Settings
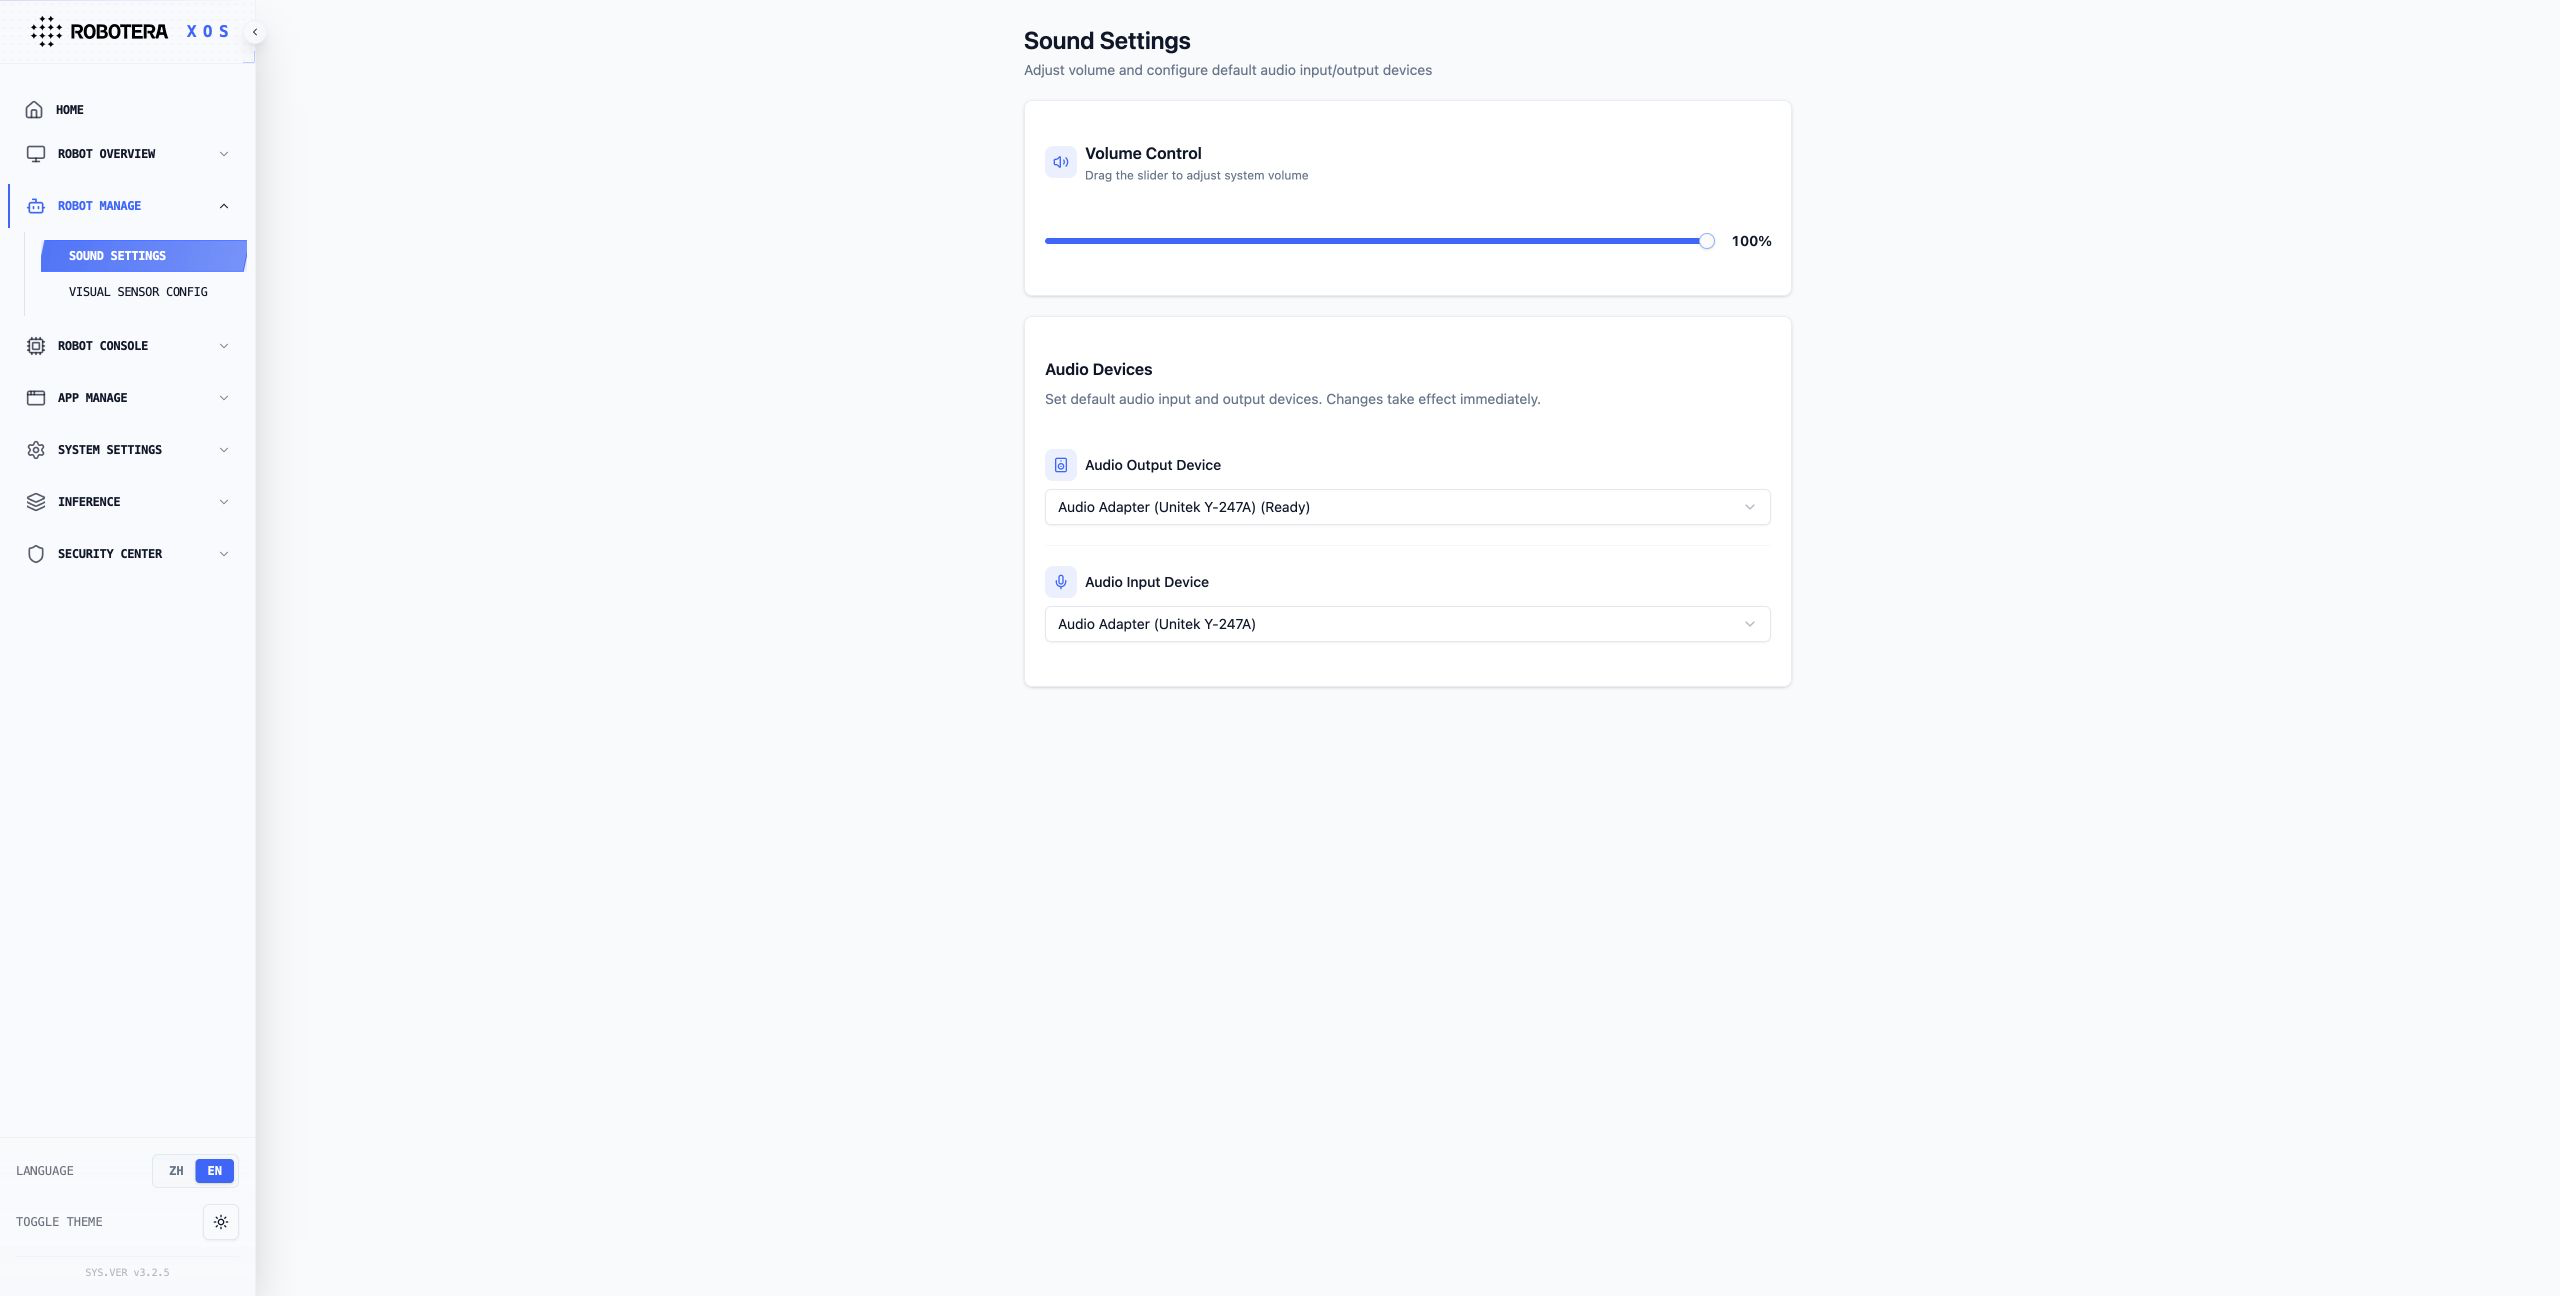
- This function supports a volume adjustment range of 0-100%. Users can precisely control the robot's sound volume by sliding the adjustment bar or using the plus/minus buttons. By default, the system remembers the last settings parameters and automatically restores the user's preferred settings after restarting.
- Supports users to independently select the audio output device of the robot. The system will automatically scan and list the currently available sound card list (including built-in sound cards, external USB sound cards, etc.), and the output device can be quickly switched via the drop-down menu.
Visual Sensor Configuration
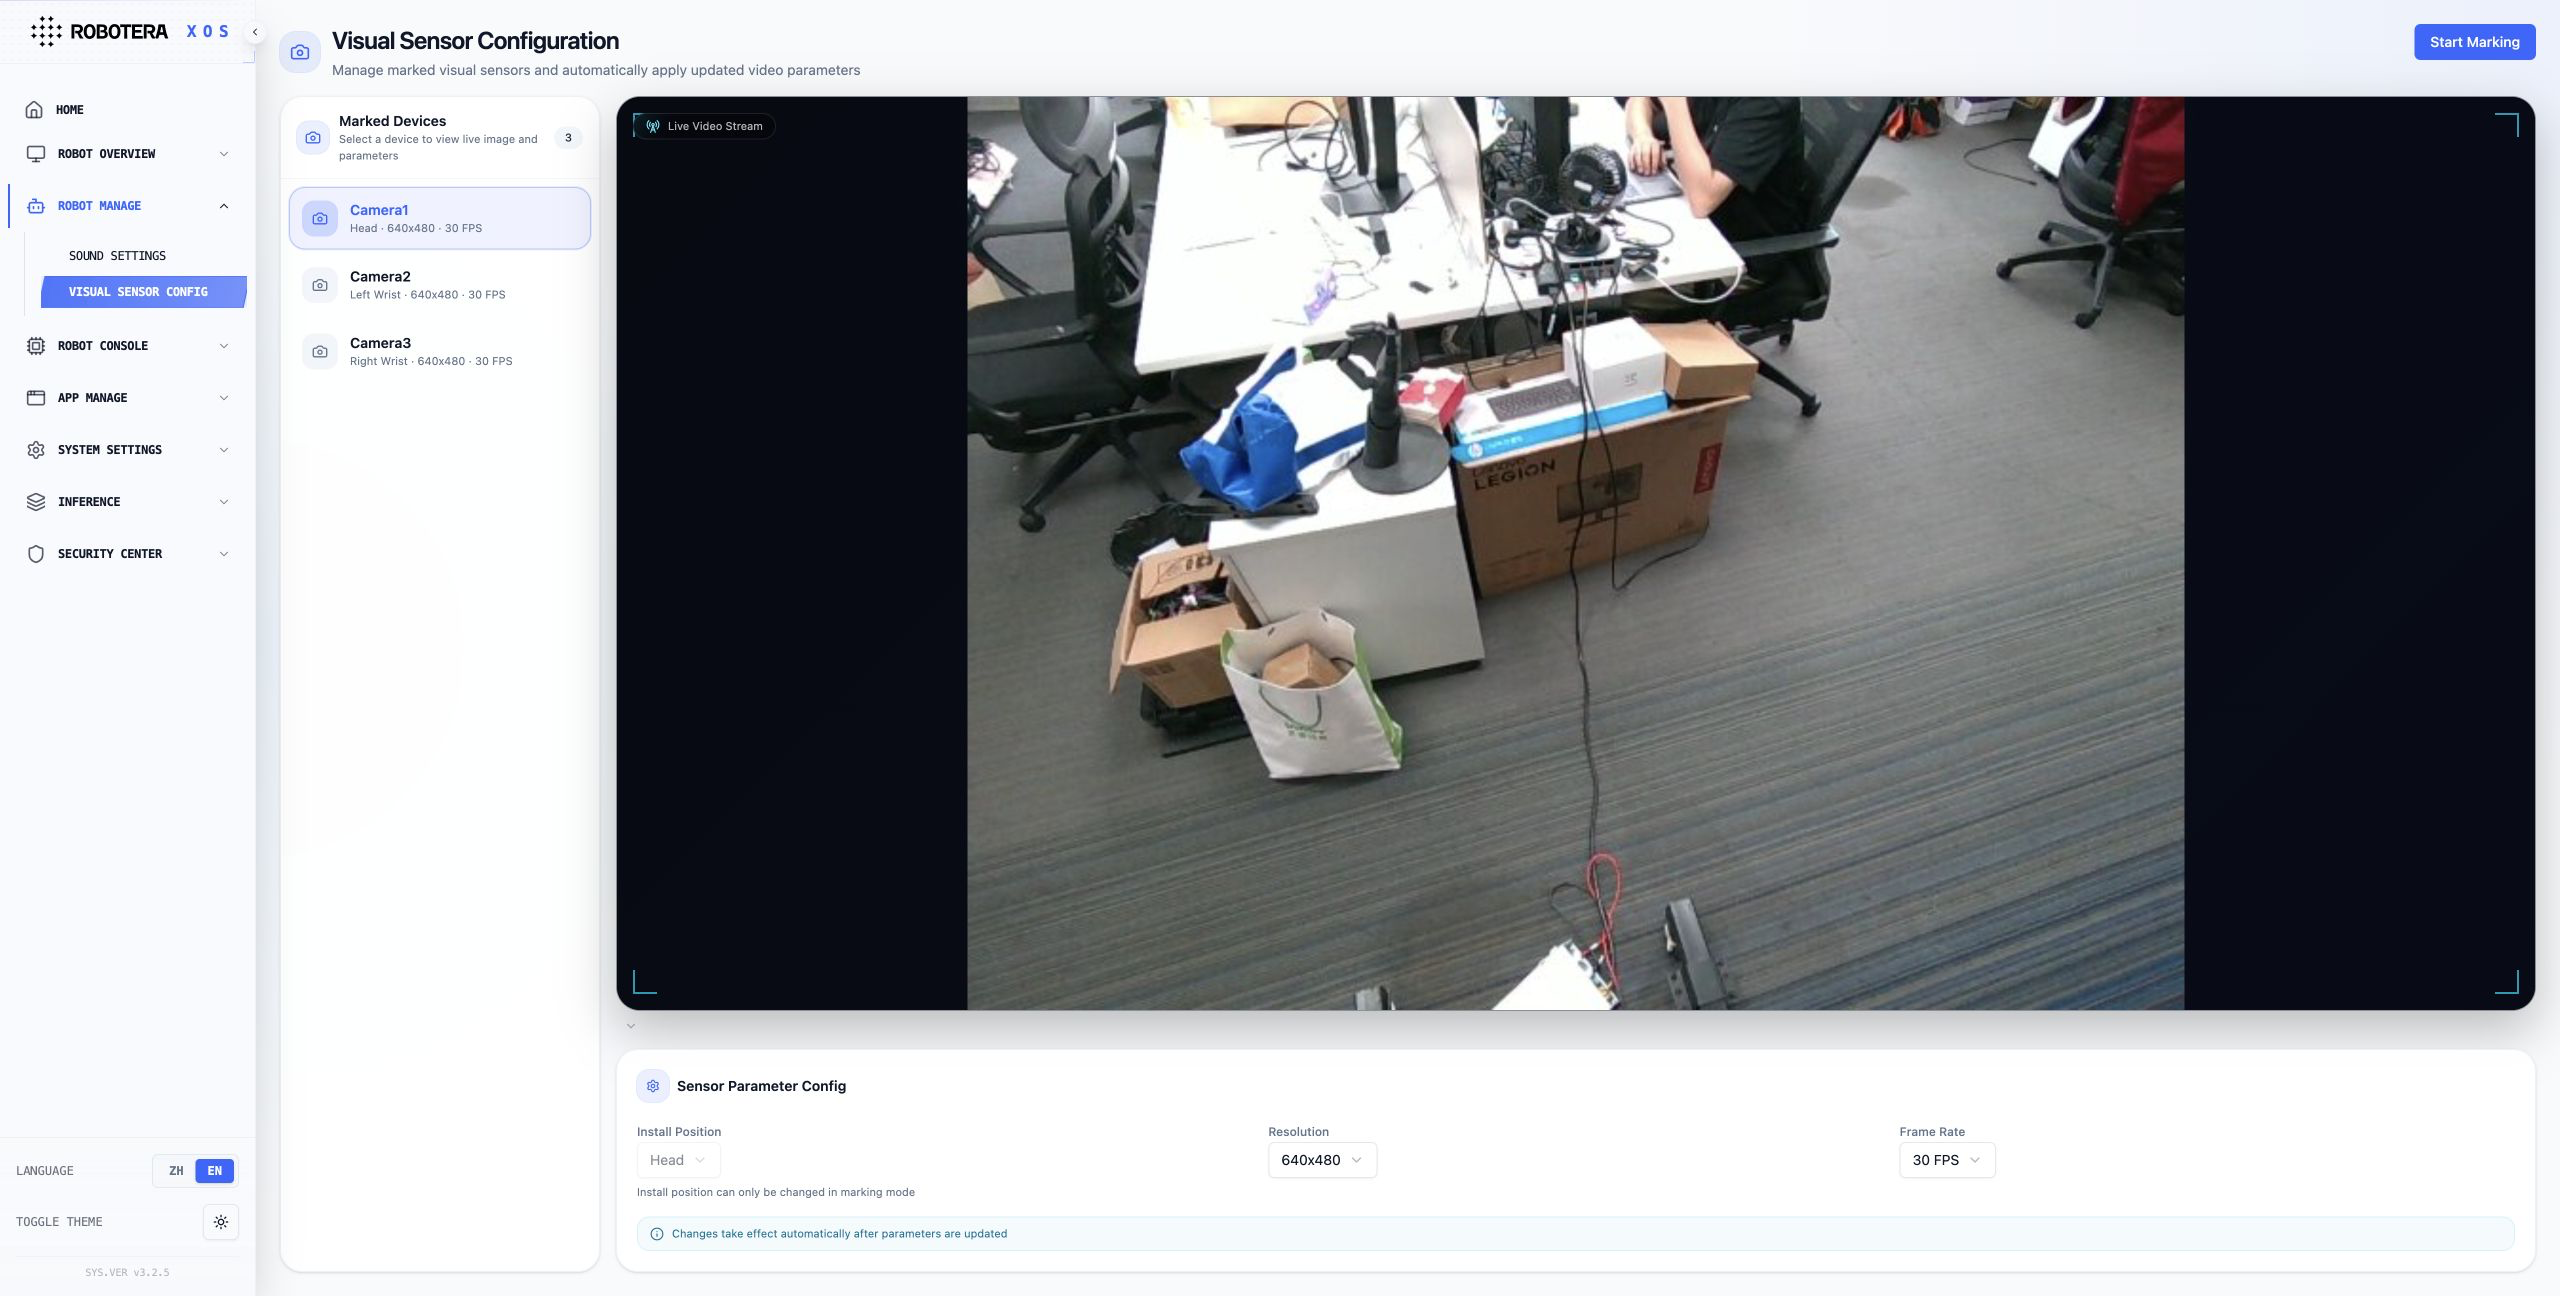
Provides a visual configuration interface for camera sensors. Supports full camera labeling with installation positions at the head, left wrist, and right wrist. Resolution and frame rate can be configured manually; changes take effect after restarting the camera. Designed for flexible multi-camera management.
Robot Control Console
Refer to the detailed usage method in xviz usage documentation.
Integrated Data Center
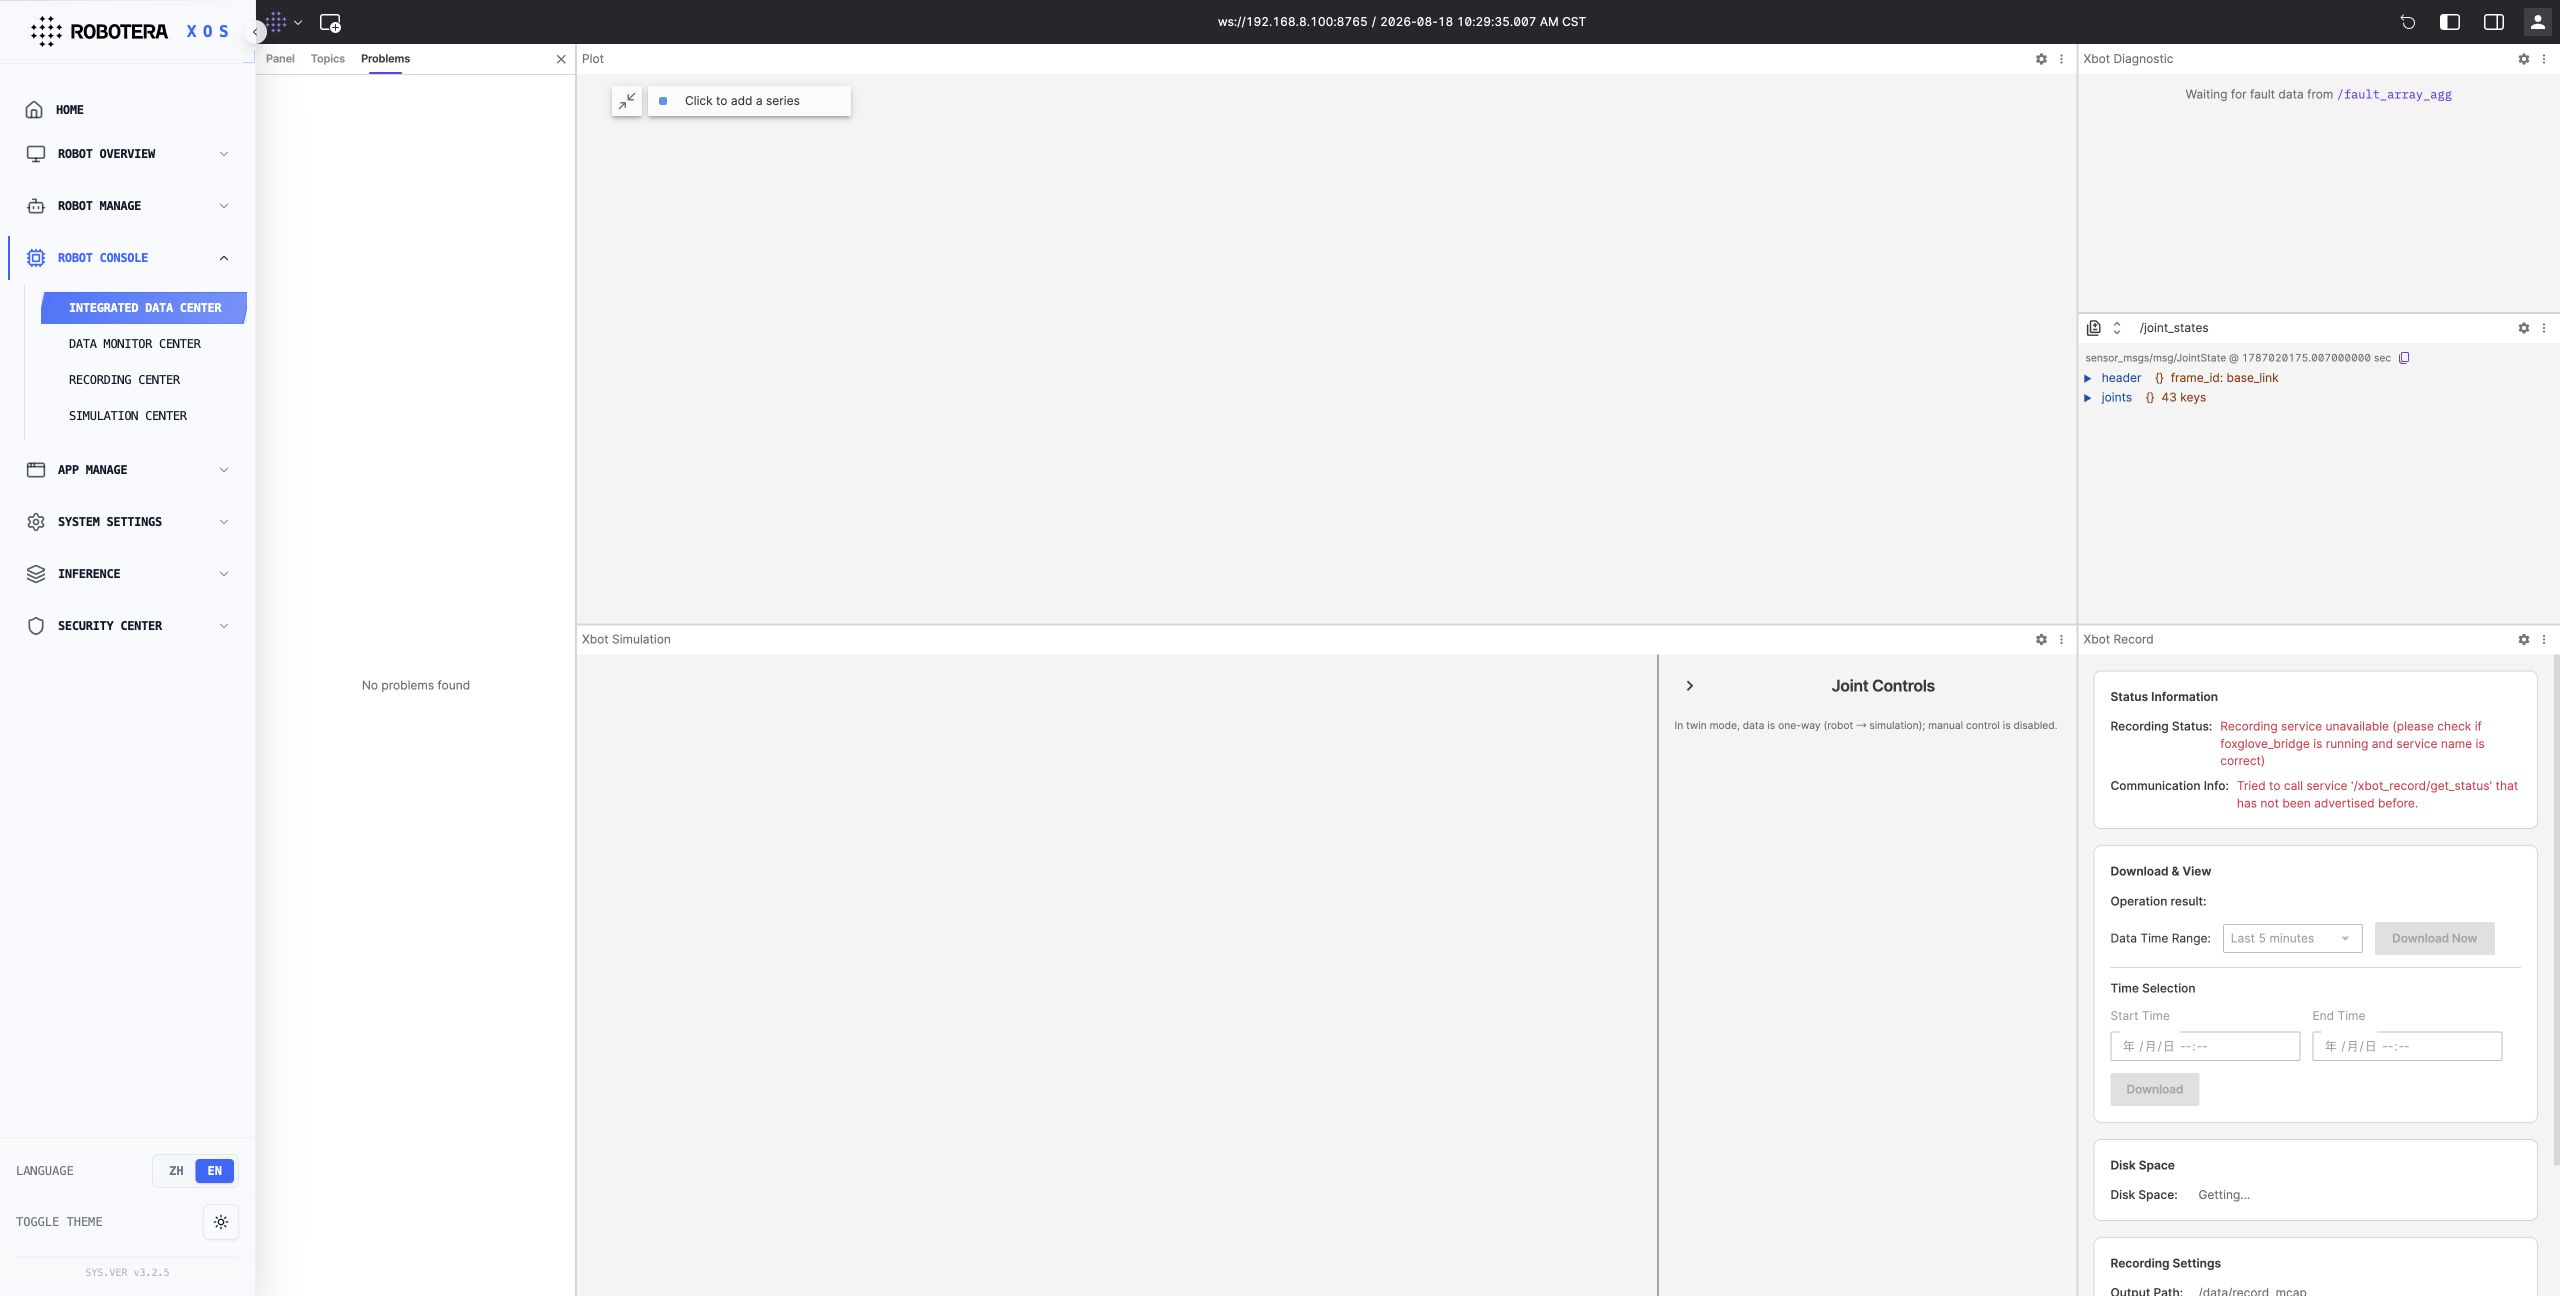
The XOS Robot Console – Integrated Data Center is a one-stop data visualization and simulation debugging platform designed for robot users. It supports real-time monitoring of operational data such as robot joint status, as well as fault diagnosis, data recording, and simulation validation. It provides end-to-end support for robot debugging, operation analysis, and issue localization.
Data Monitoring Center
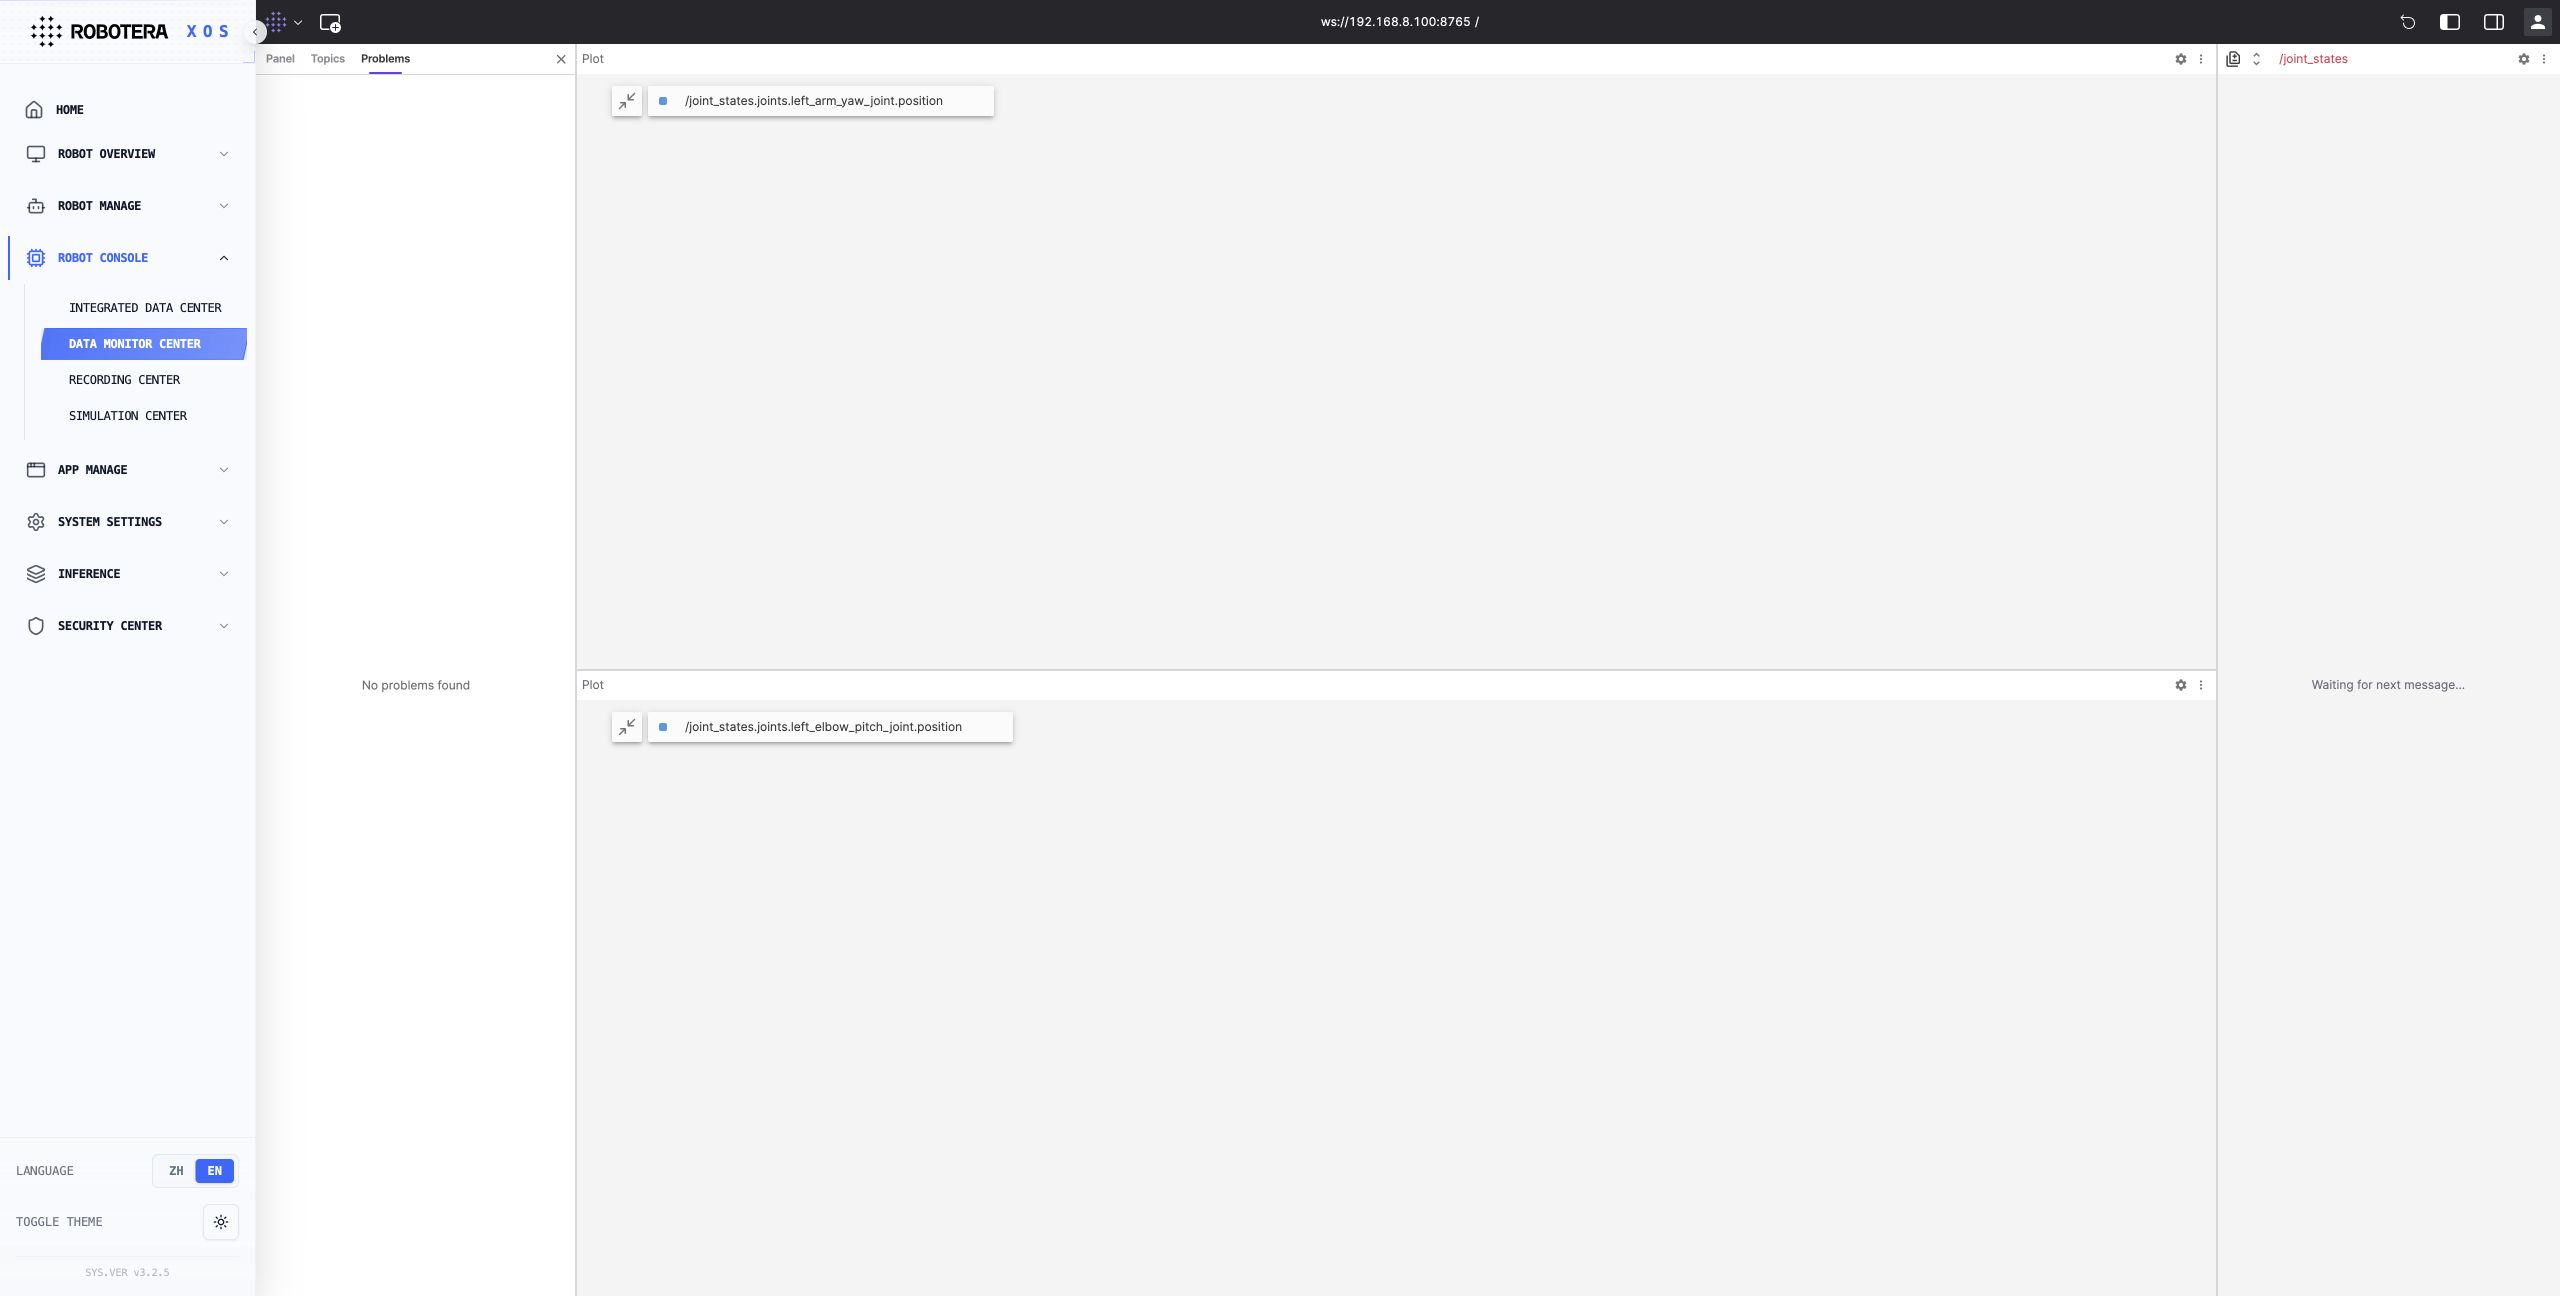
The XOS Data Monitoring Center is a real-time visualization dashboard for robot operation data. It supports real-time acquisition and visualization of key data streams, such as joint status data, including arm and elbow joint positions, through line charts and other visual formats. This helps users intuitively monitor the robot’s operating status and quickly identify data anomalies and fluctuations.
Recording Center
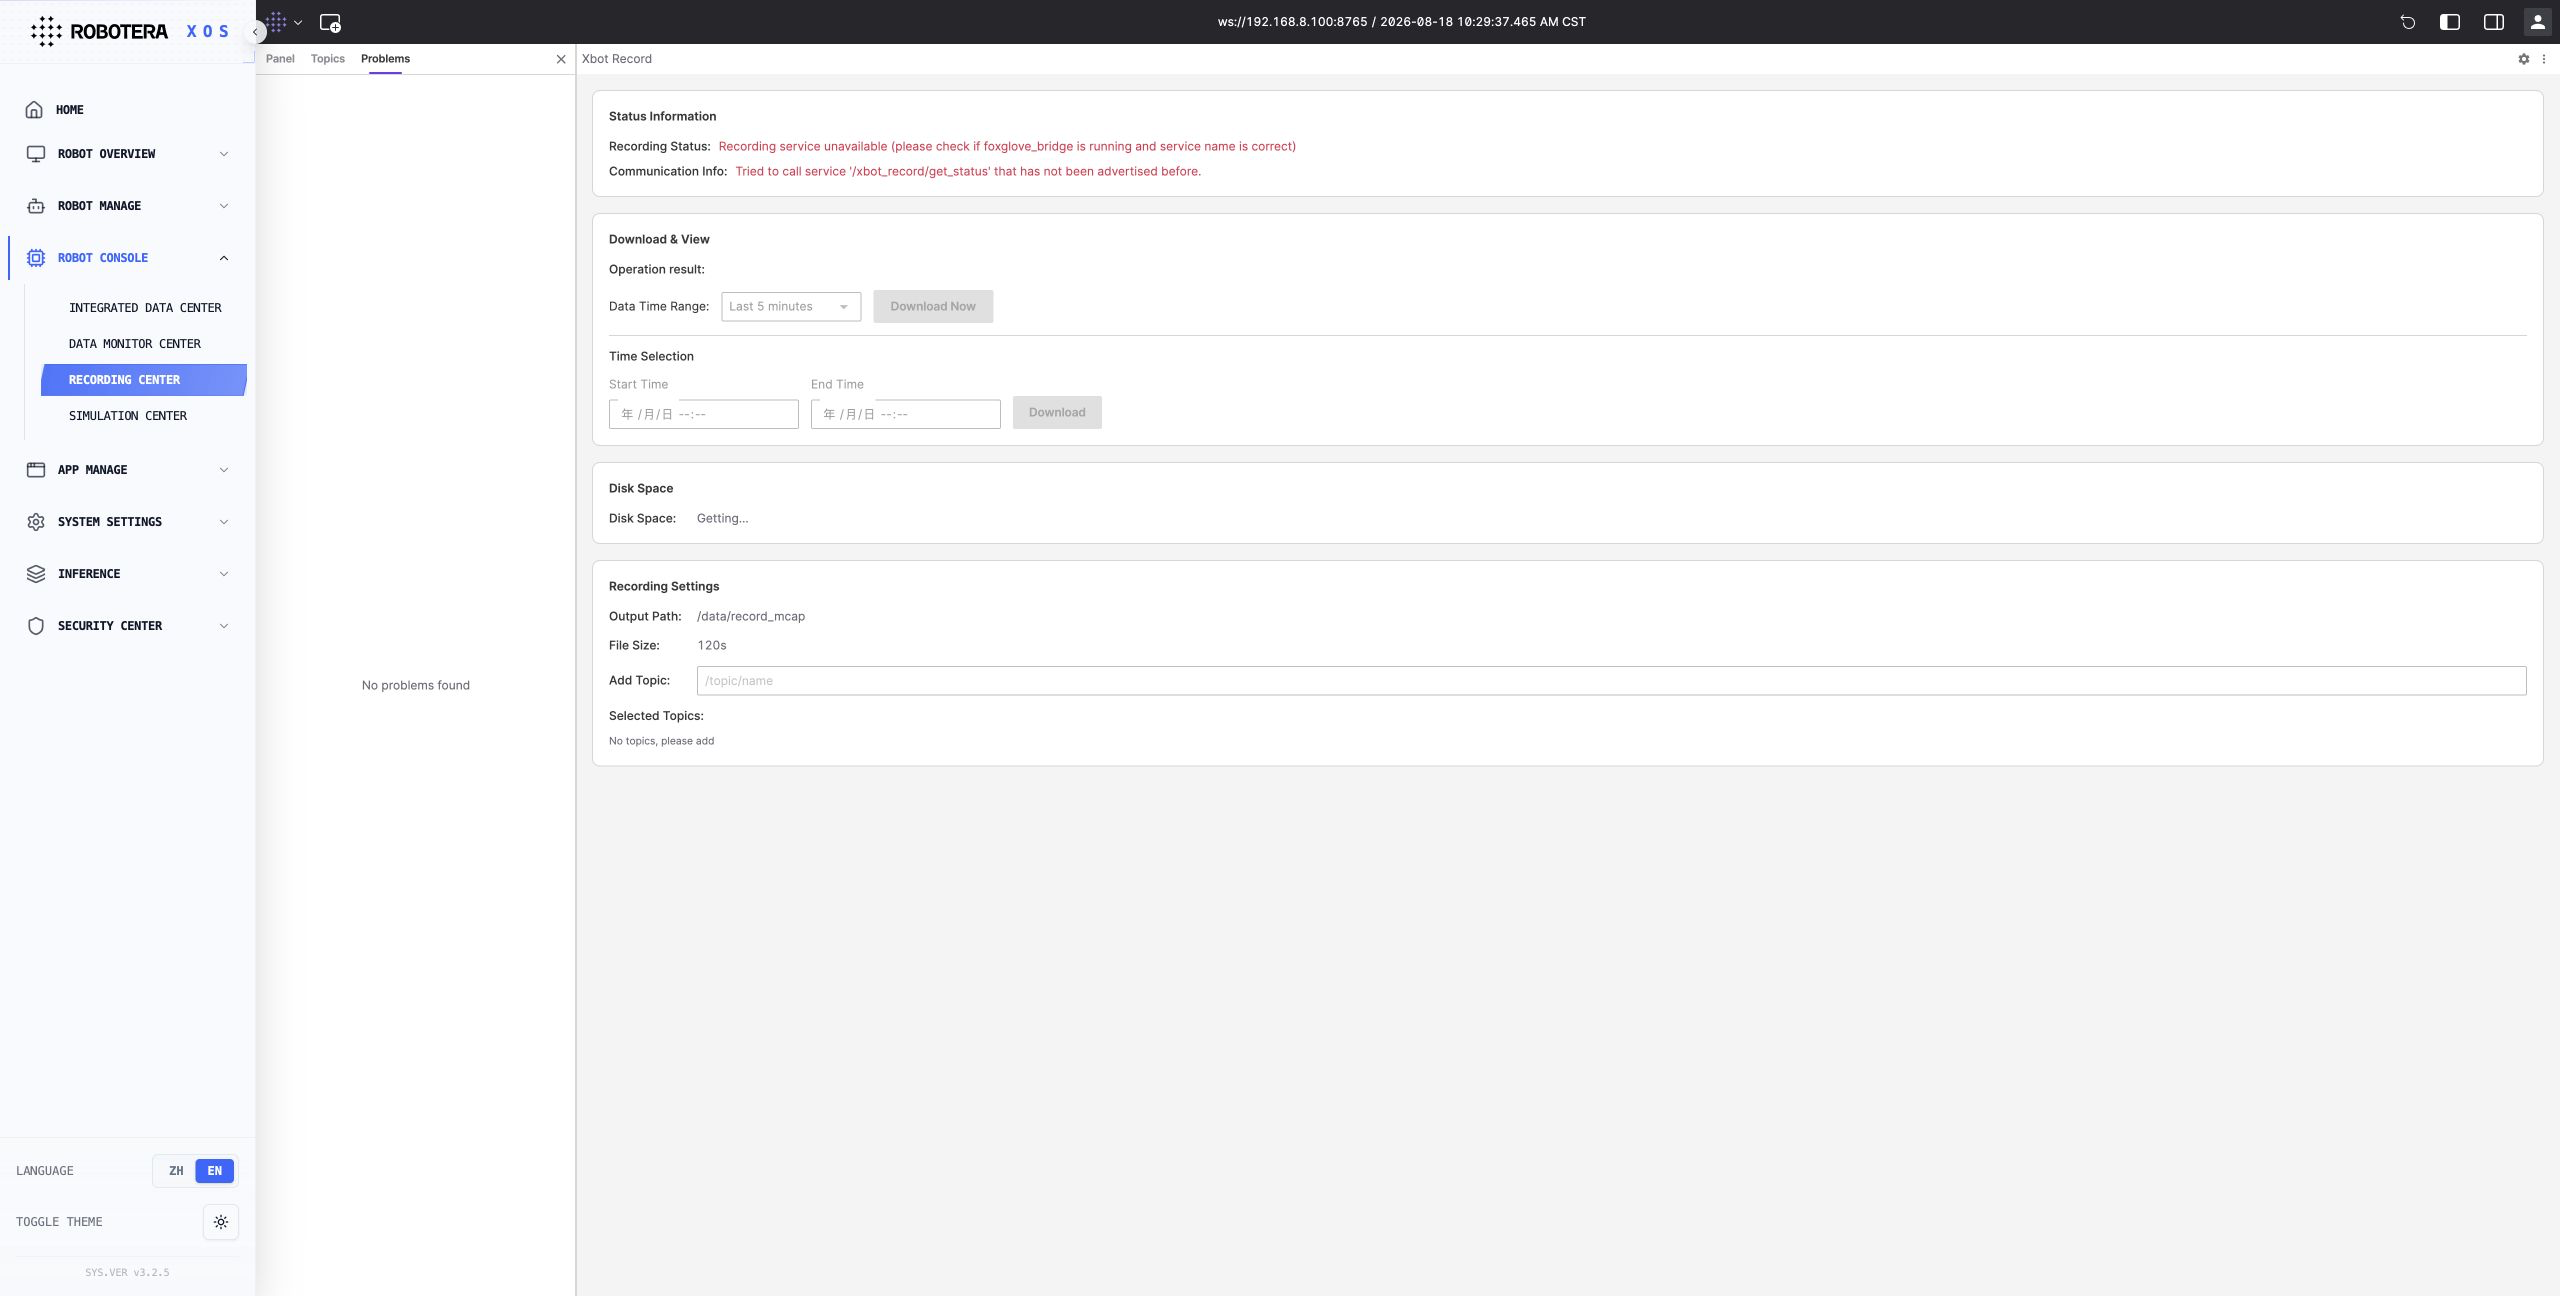
- Enables flexible subscription to ROS topics, including XOS-specific topics, as well as custom recording and export by time range. It supports one-click quick export and precise time-range export, adapts to the XOS data format and the small-screen layout of portable devices, and simplifies data acquisition and export operations.
Simulation Center
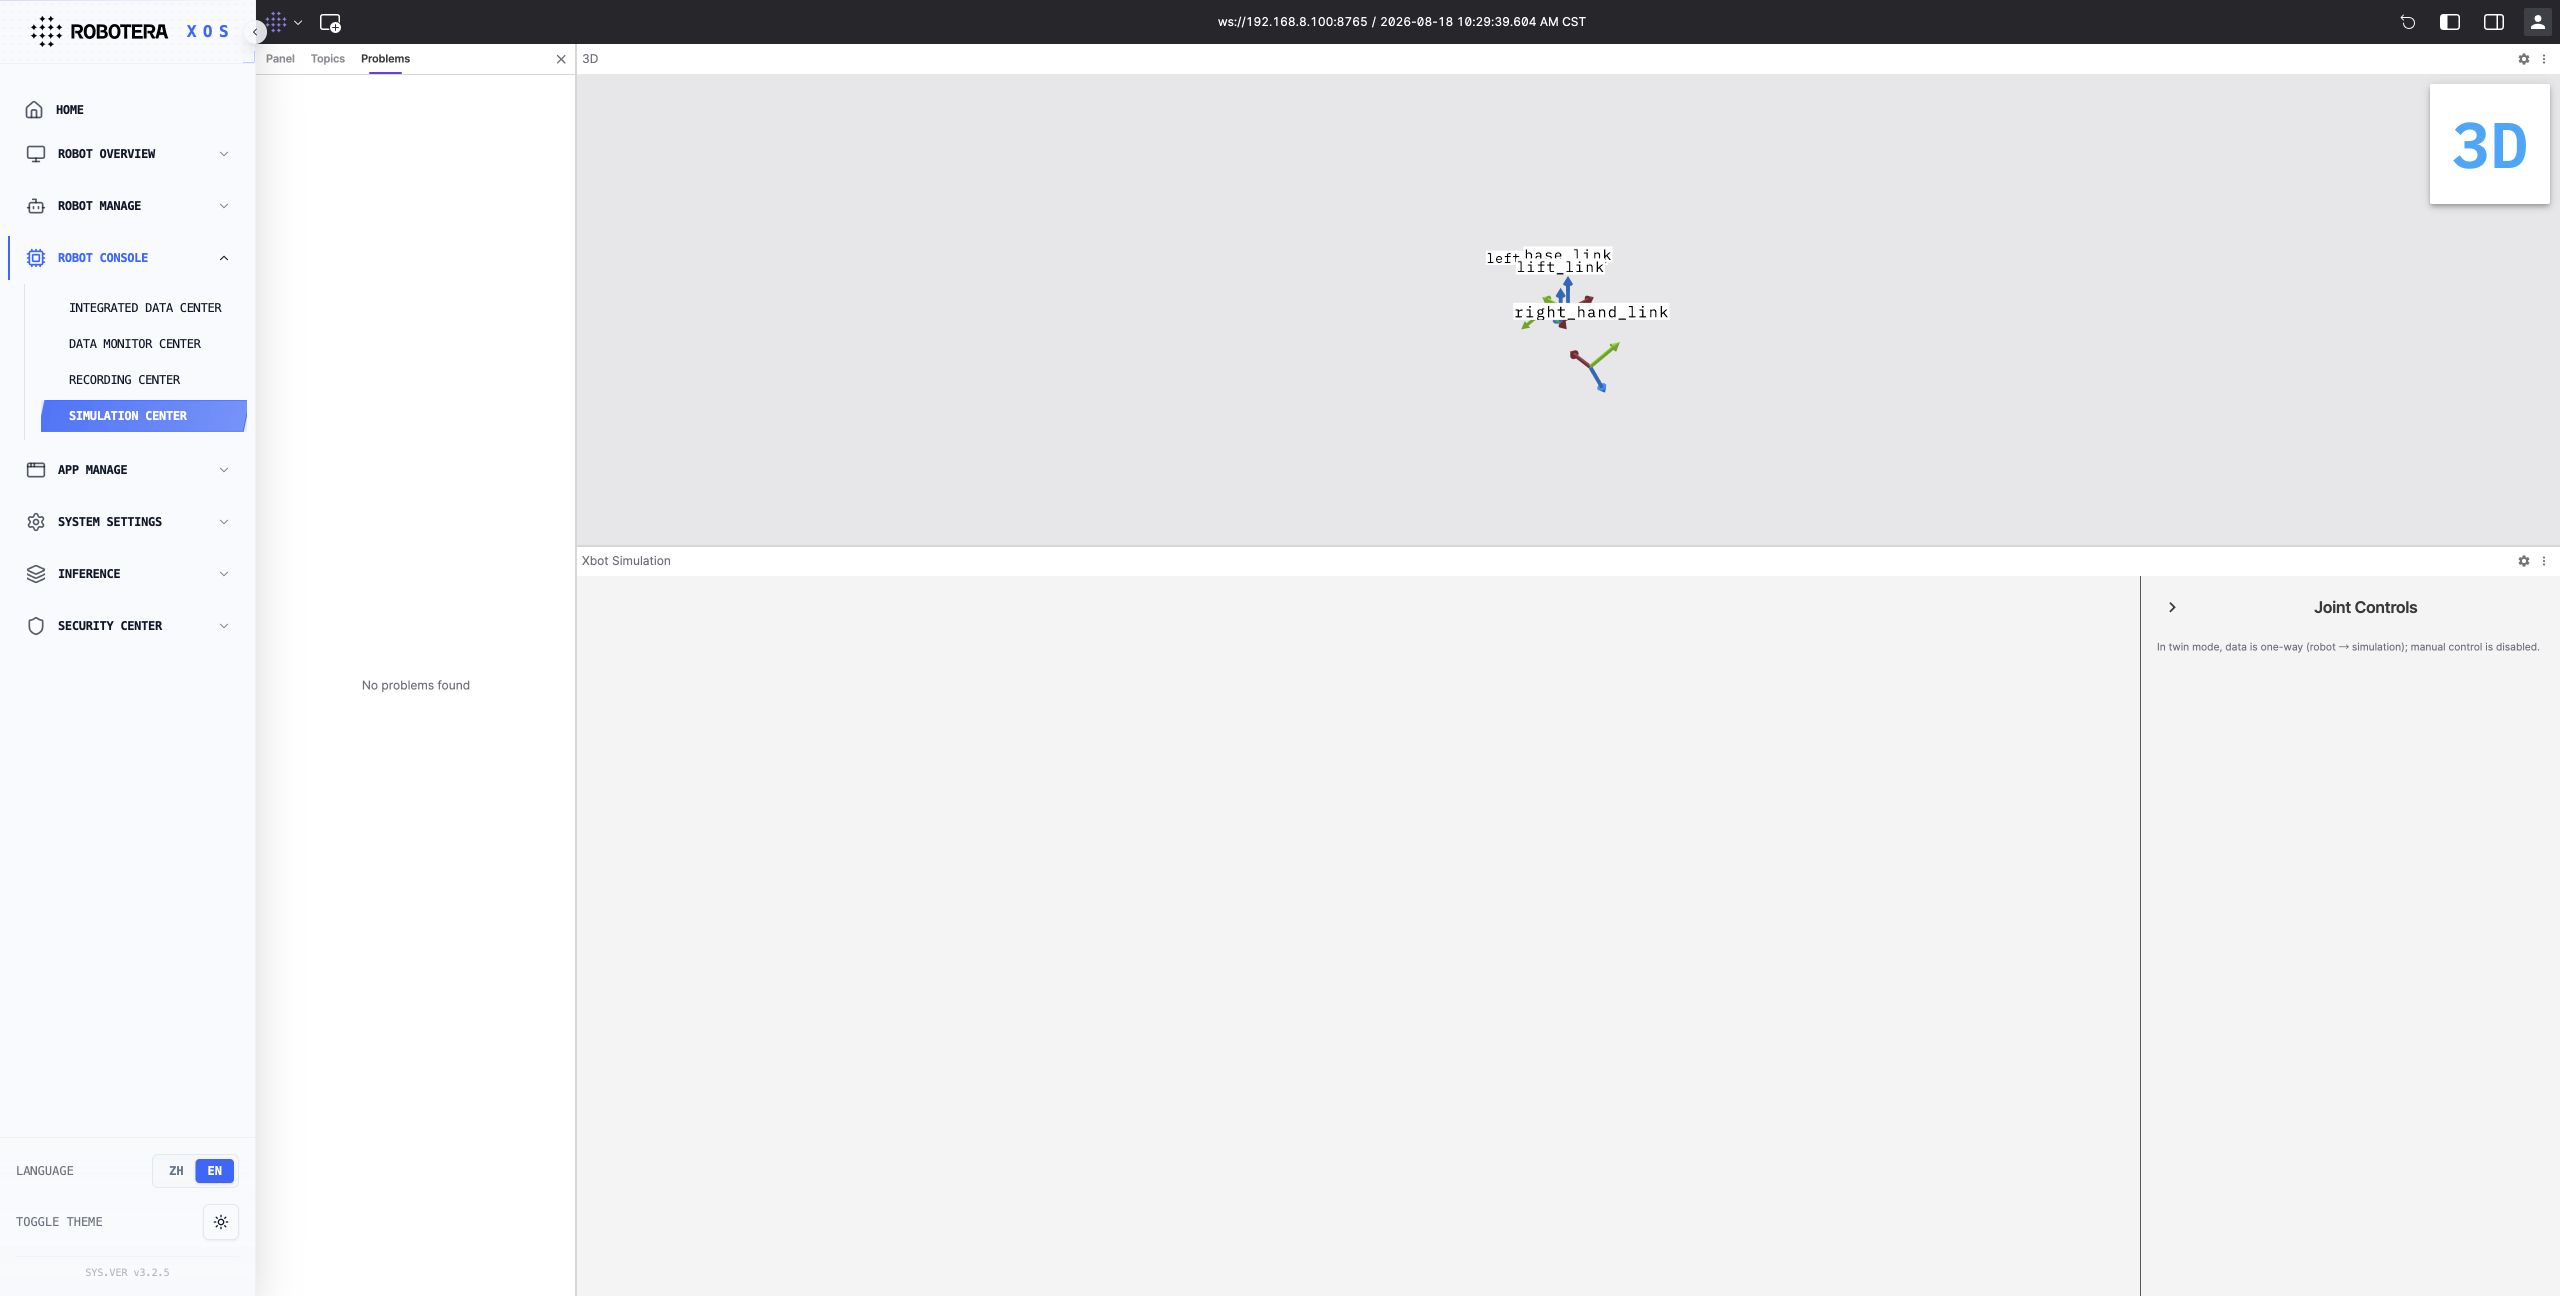
XOS Simulation Center – Twin Mode links the robot’s real-world operating data with a virtual model in real time, enabling visual debugging and validation through virtual-real synchronization. It supports real-time mapping of joint states, motion trajectory replay, and physics-based simulation validation. This helps developers verify control logic, identify potential risks in advance, and improve debugging efficiency and safety.
Application Management
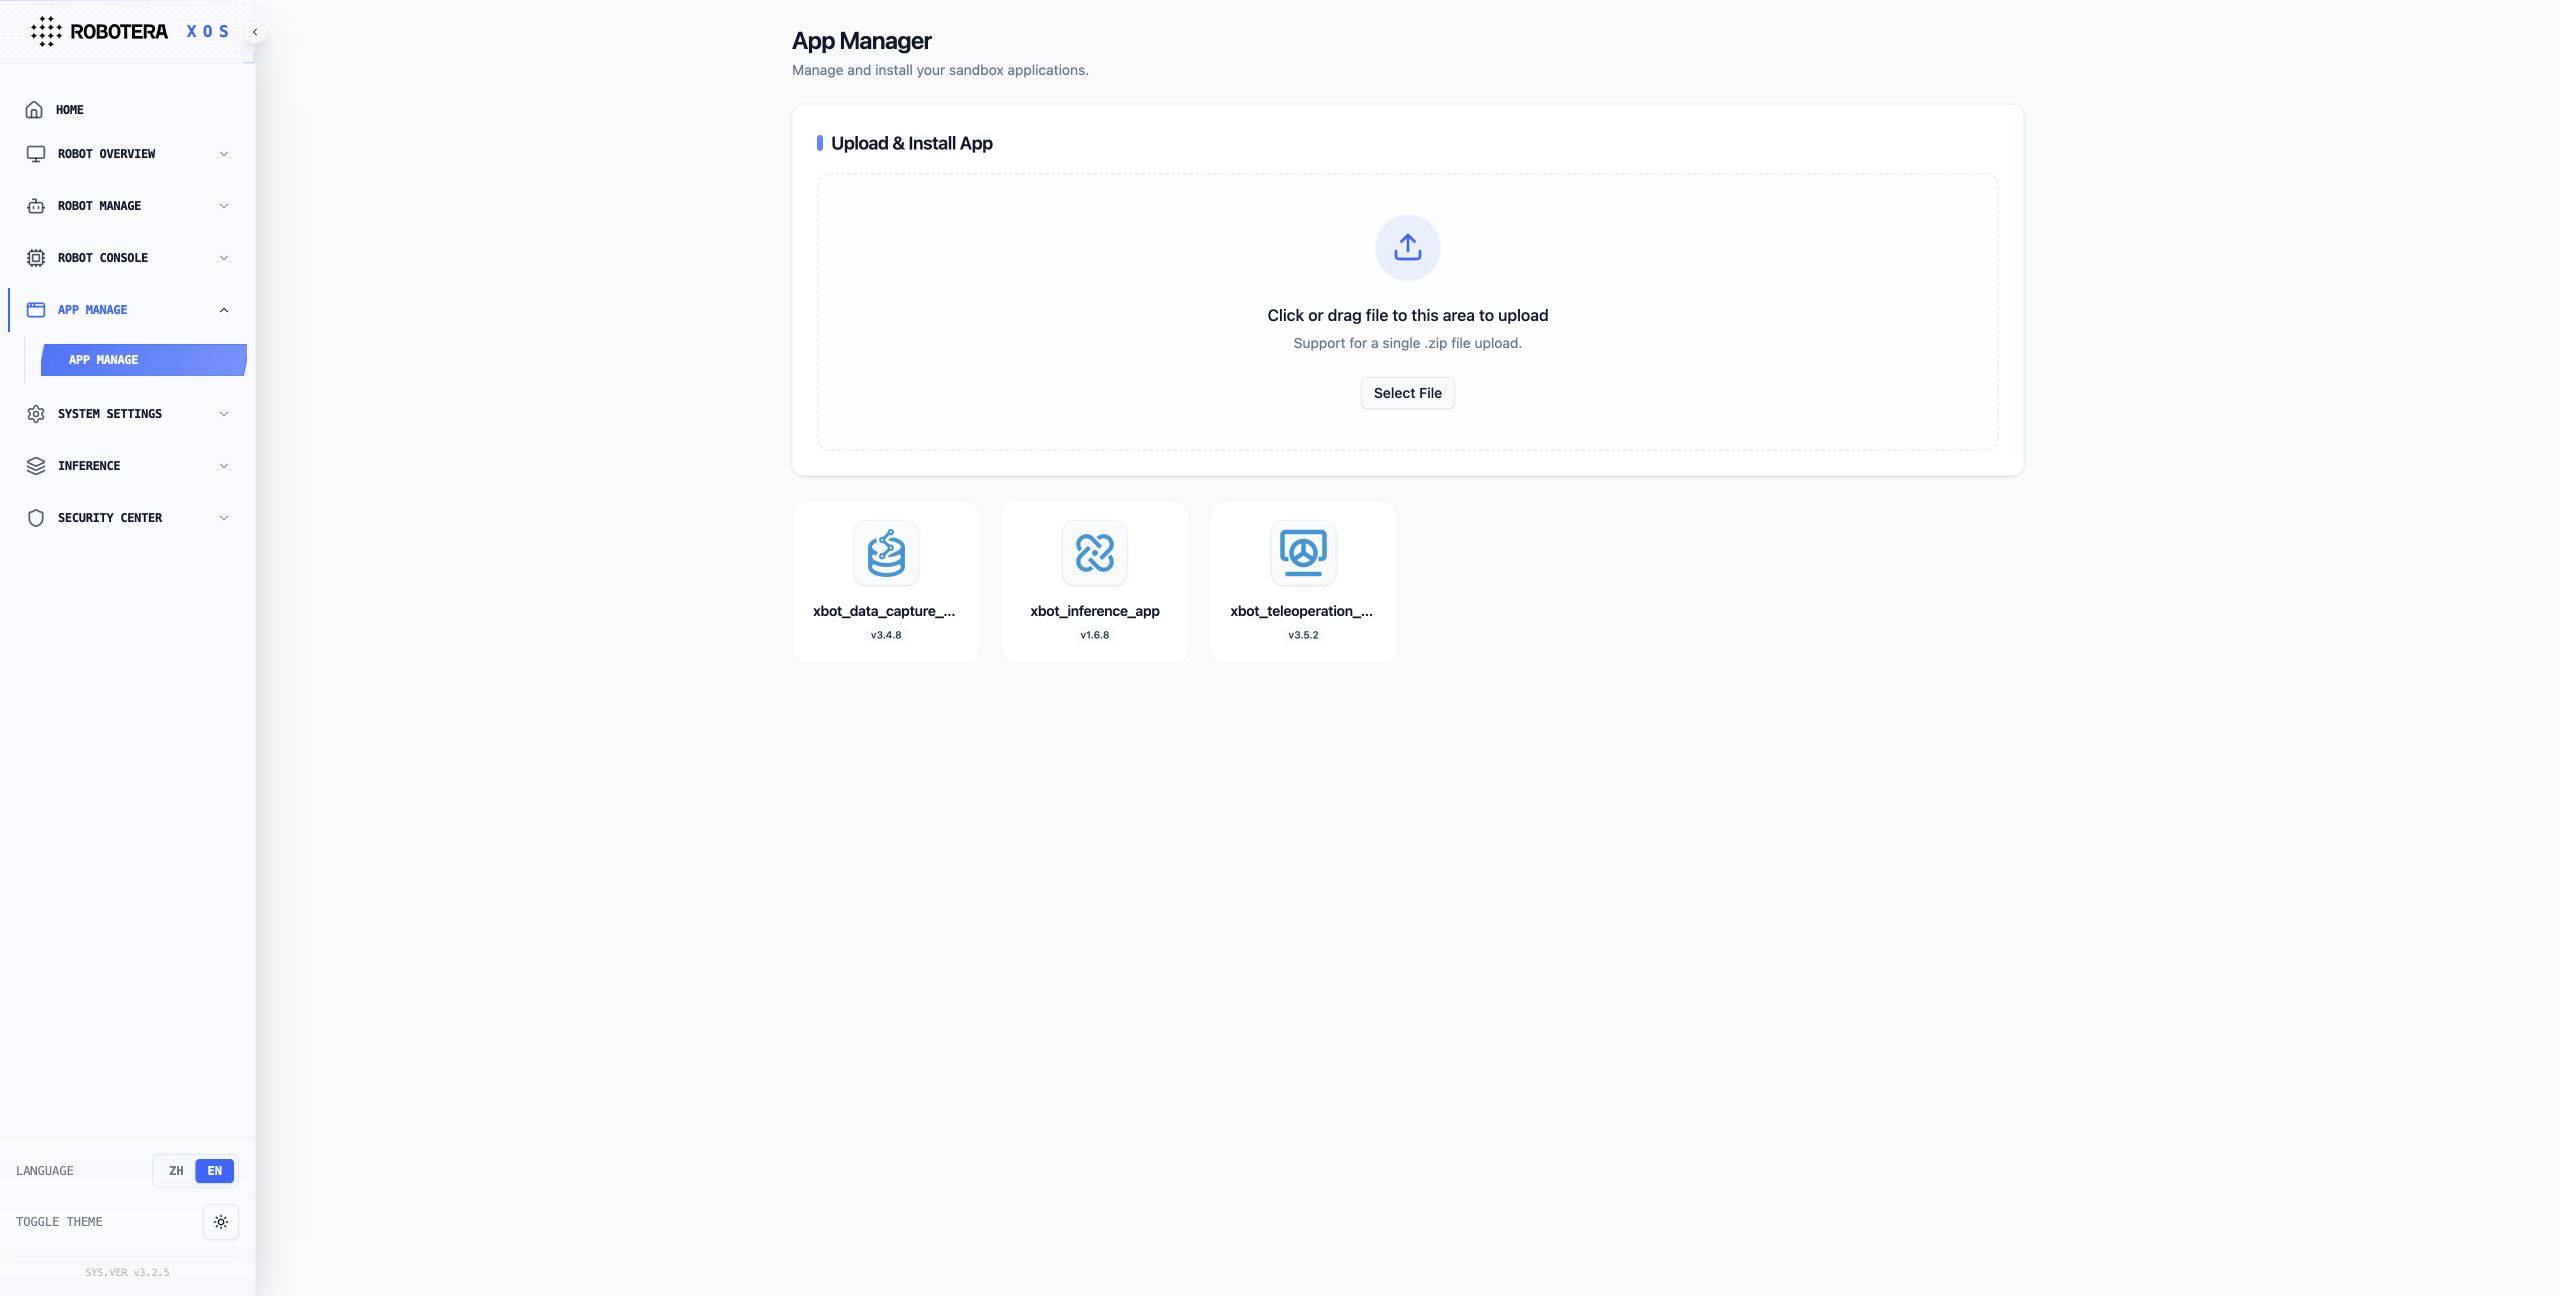
- This page allows users to upload, install, and launch system extension applications.
- Upload the compressed application package. The page supports both drag-and-drop upload and file selection from the system file browser. After the upload is complete, click Upload and Install to install the application.
- Once the installation is complete, the application will appear in the application list. Click the application to open it.
System Settings
Robot Info
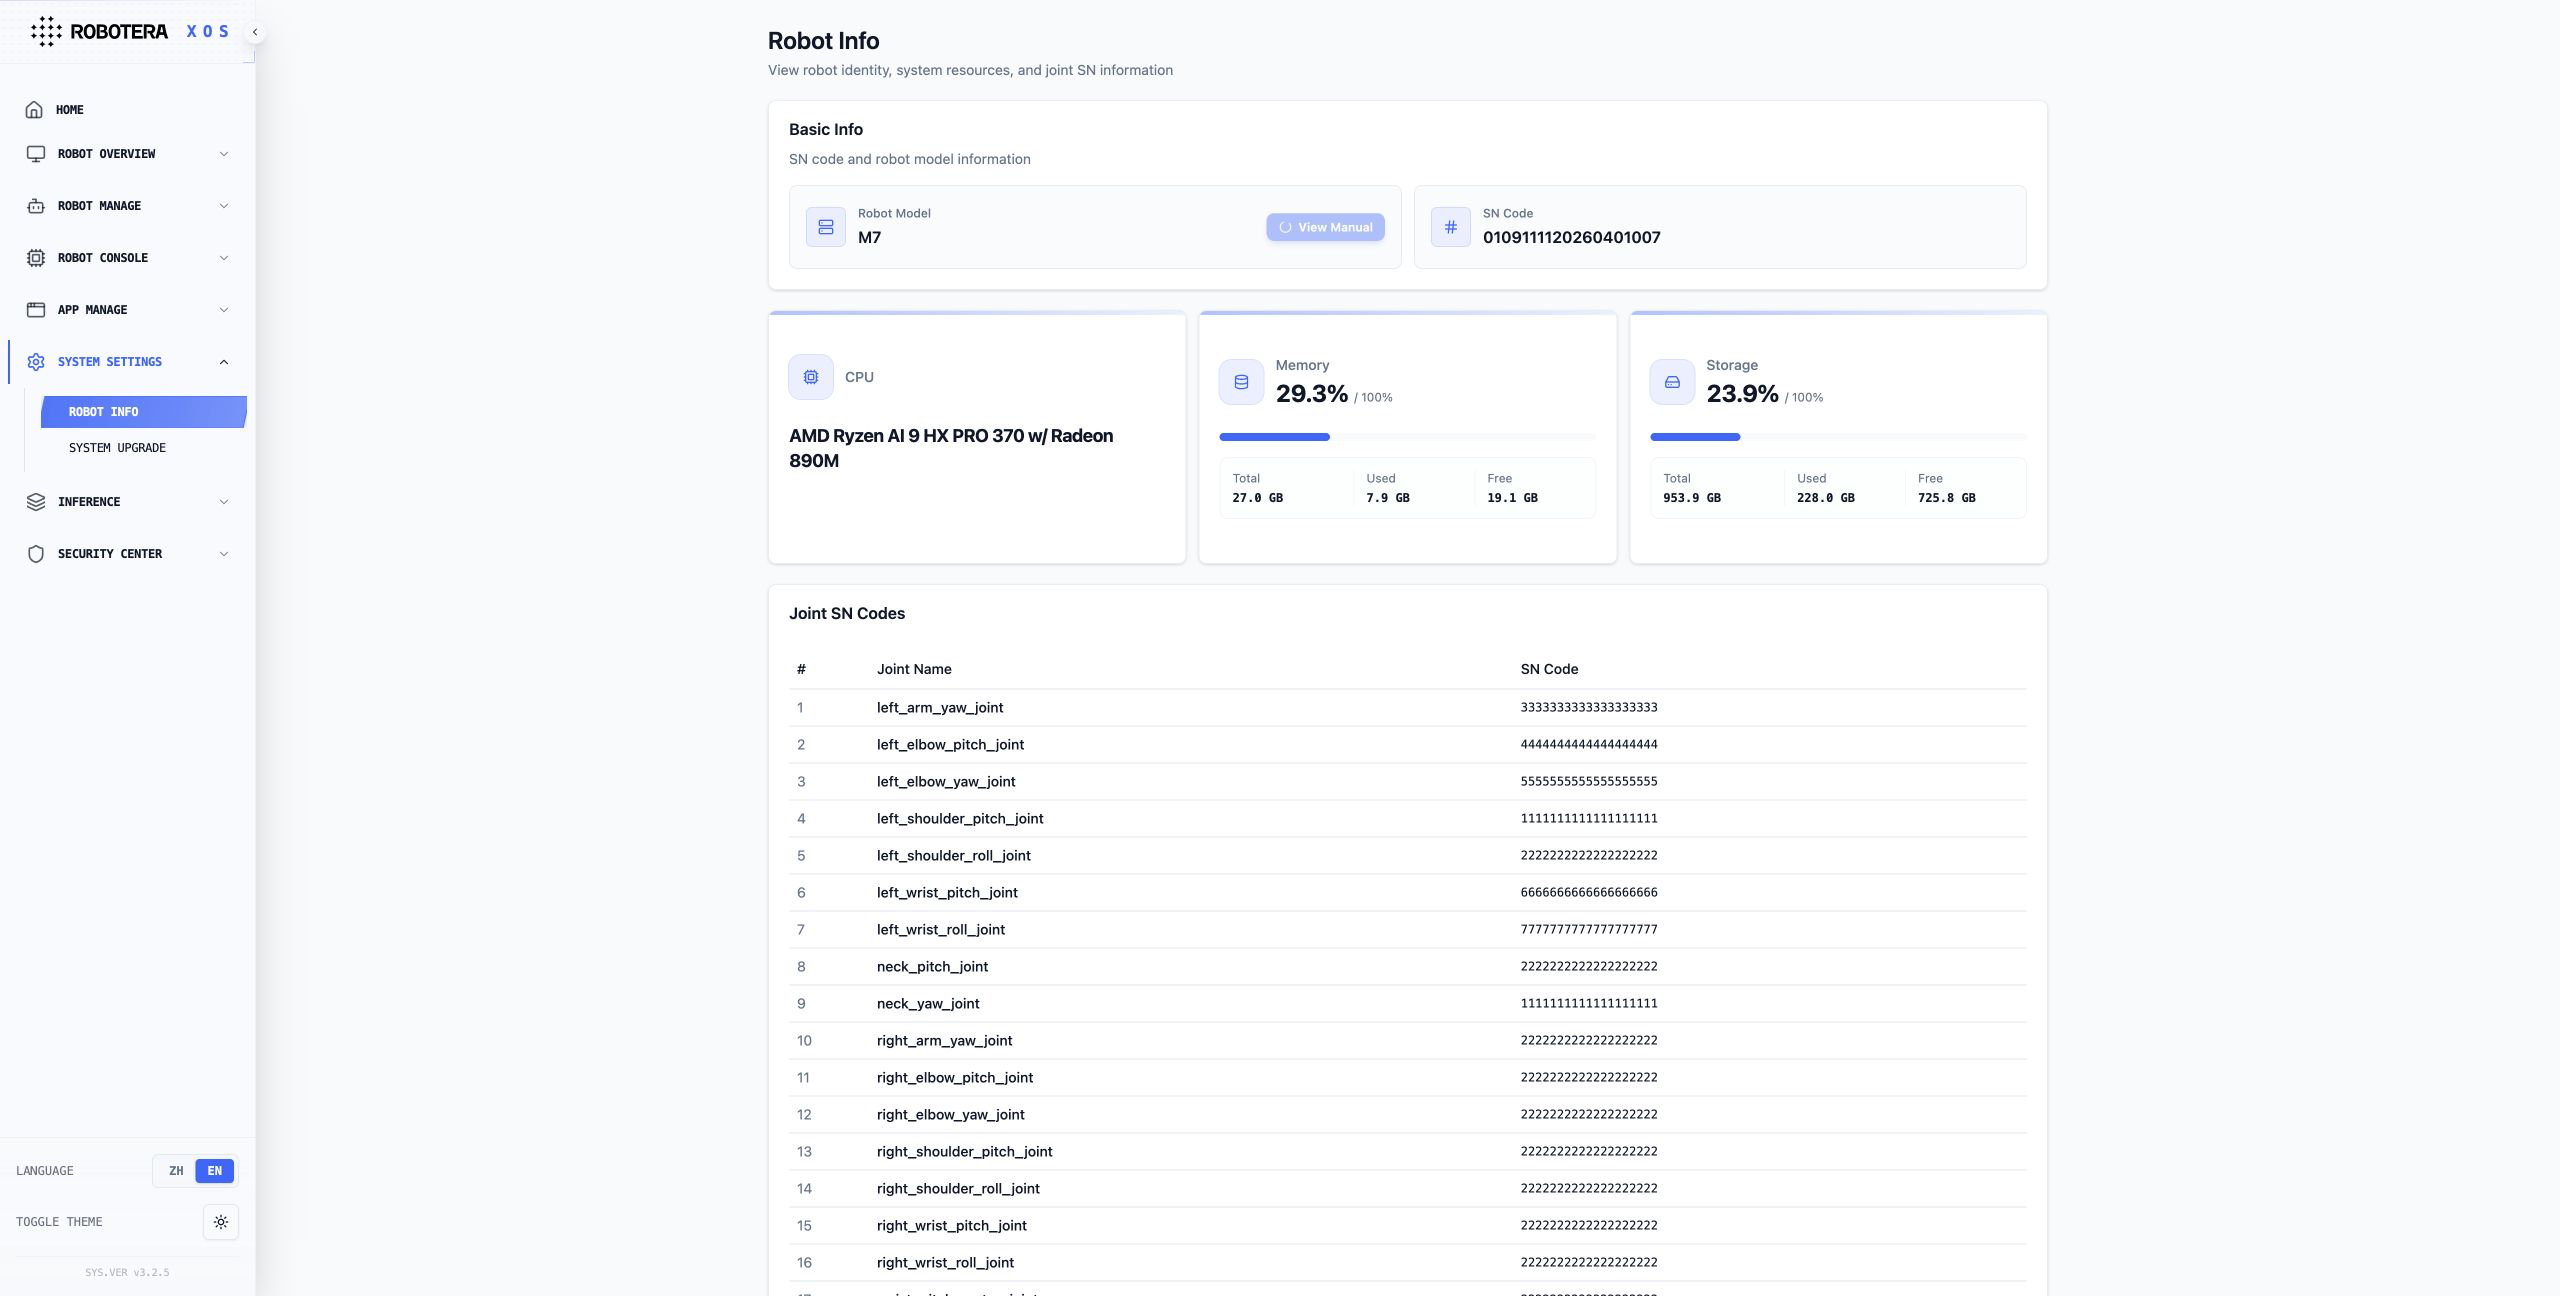
- Basic Info: View the robot model and full-unit SN code, which is required for after-sales and warranty service. Click "View Manual" to access the complete manual.
- Resource Status: Monitor CPU, memory, and storage usage to determine whether the system load is normal.
- Joint SN Codes: Unique identifiers for all motion joints. Required when repairing or replacing joints.
exclamation Note: Do not modify SN codes. If storage or memory usage is too high, contact operations.
System Upgrade
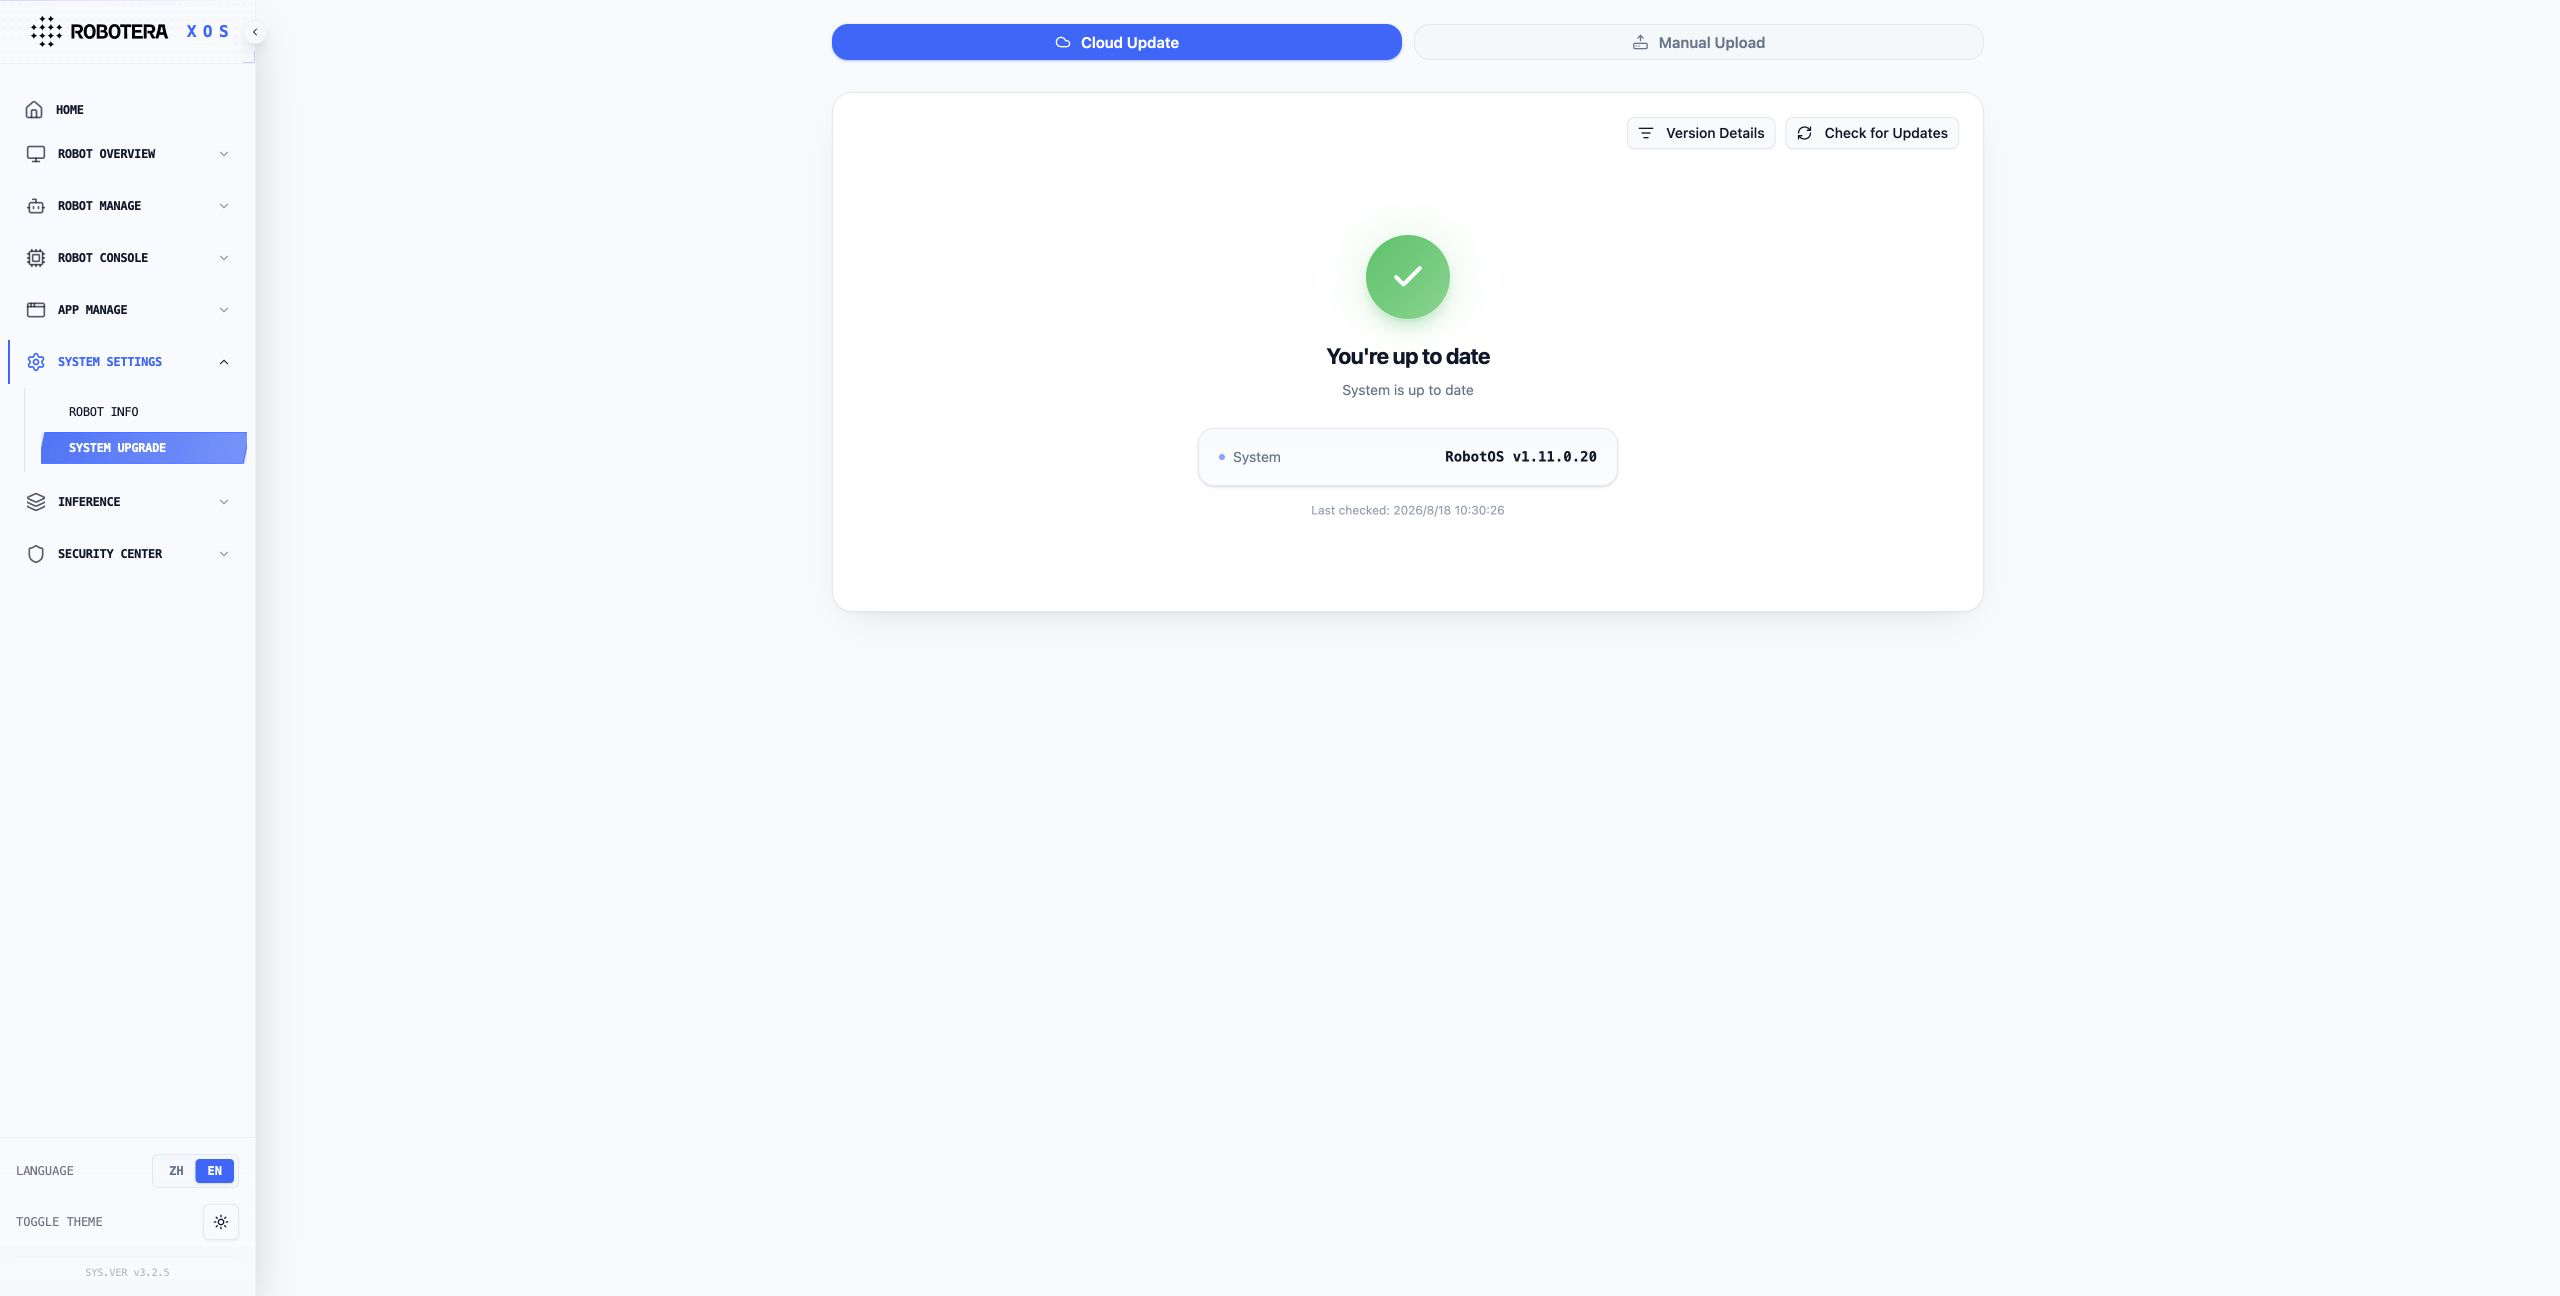
- This function is used to manage the software versions of the robot system and the dexterous hand controller. It supports both cloud-based update checking and manual upgrade.
- Users can view the current system version, RobotOS, and the version details of each module.
- The page supports checking for updates, downloading upgrade packages, manually uploading upgrade packages, and starting the upgrade after the robot is stationary, the battery level is sufficient, or an external power source is connected.
exclamation The robot will restart automatically during the upgrade. Do not operate or power off the robot during this process.
Inference Management
Inference Node Info
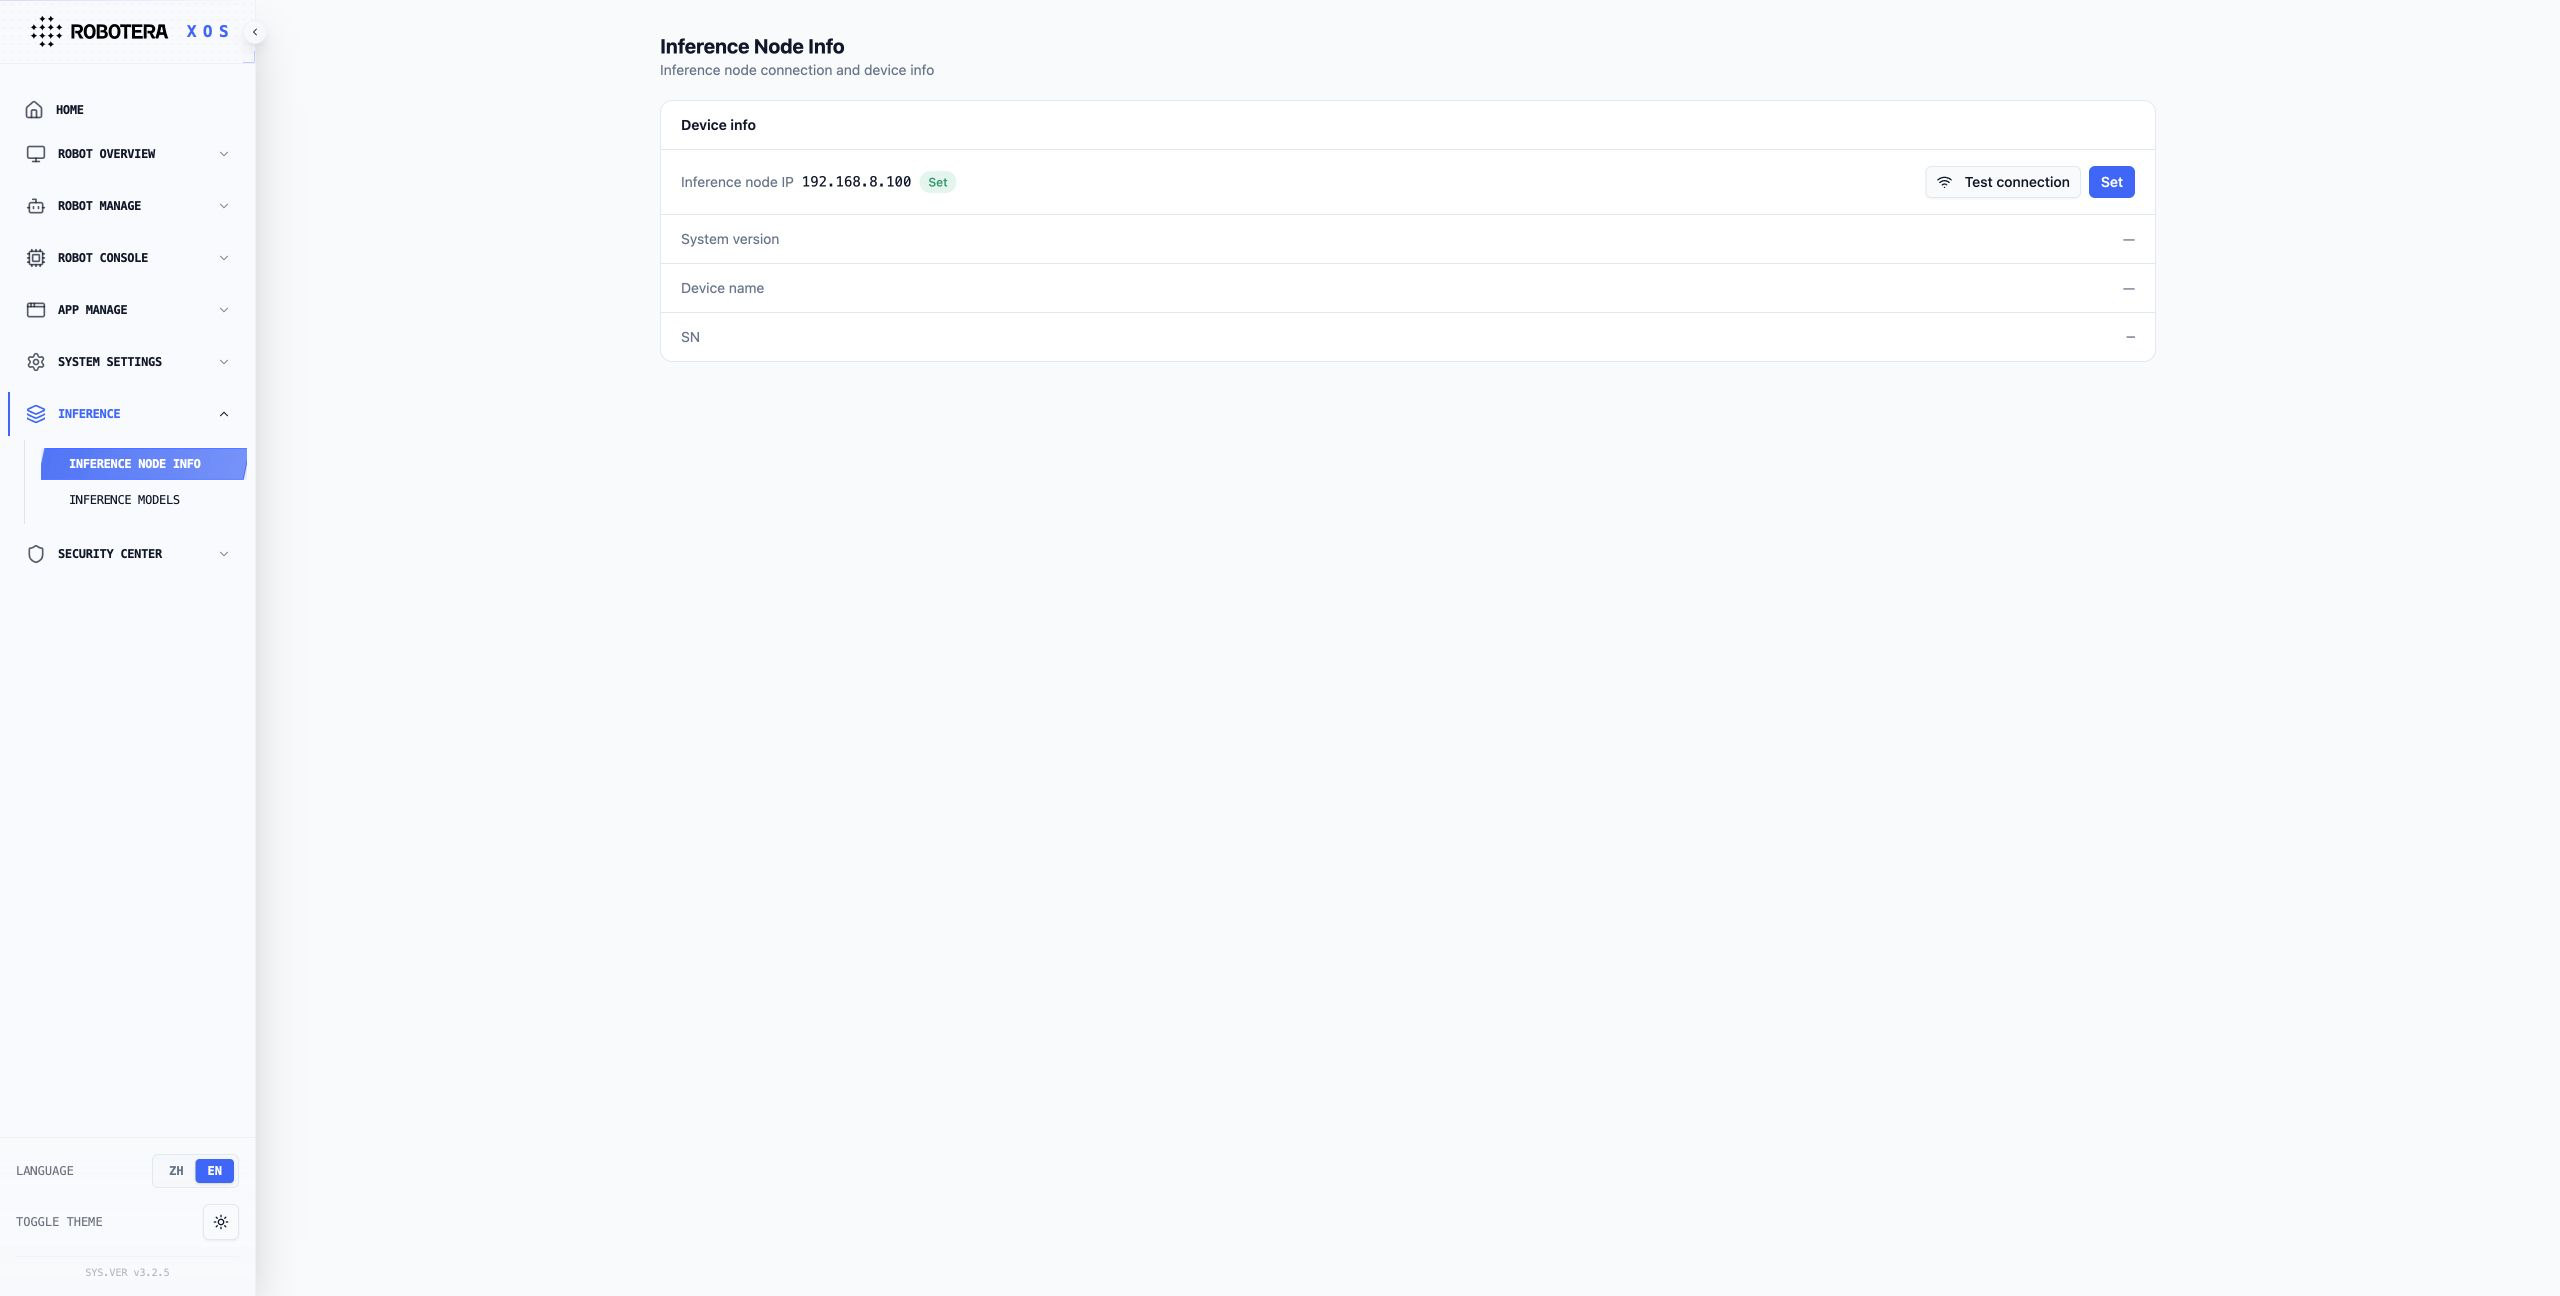
The Inference Node Info page is used to configure and review the inference node connection and device information.
- Set the inference node IP: Click Set to enter or change the inference node IP address.
- Test the connection: After setting the IP, click Test connection to verify network connectivity between the robot and the inference node.
- View device information: After a successful connection, the page displays the system version, device name, and SN of the inference node.
If the connection fails, make sure the inference node is powered on and reachable, and verify that the IP address is correct.
Inference Models
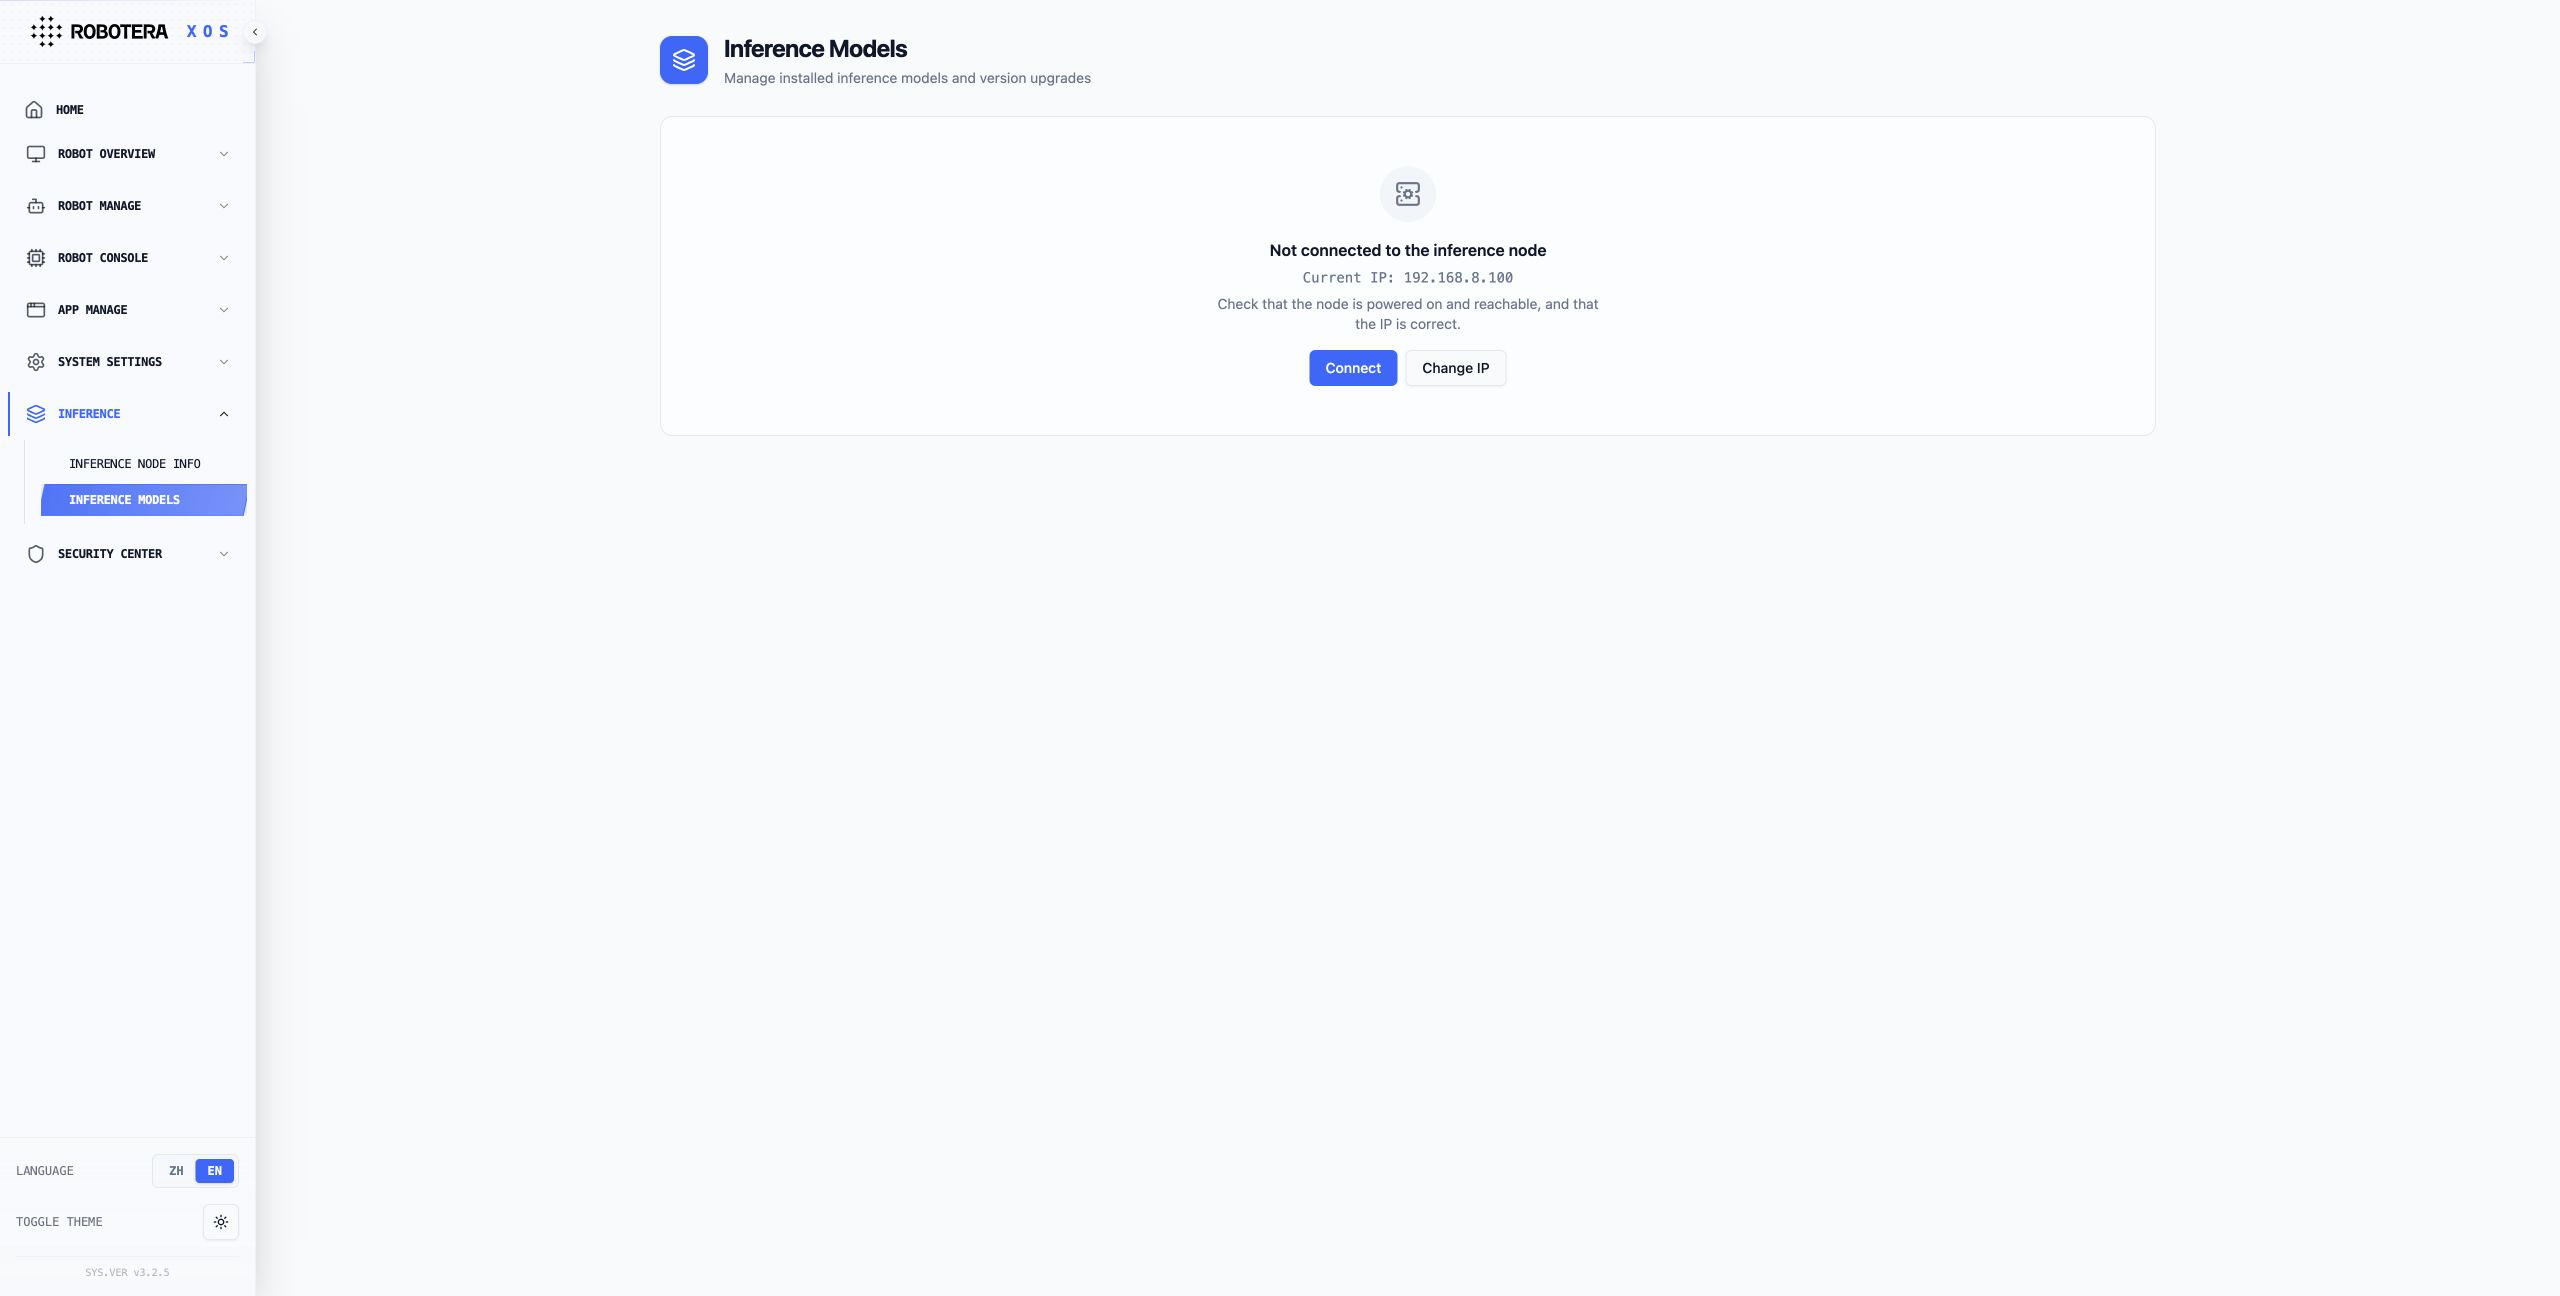
The Inference Models page is used to view installed inference models and manage model version upgrades. Connect to the inference node before managing models. When the node is disconnected, the page shows the current IP and troubleshooting guidance; click Connect to retry or Change IP to update the address. After a successful connection, you can review model and version information and apply available upgrades.
Security Center
For specific usage instructions, please refer to the User Manual – XOS Security Section.
Set Password
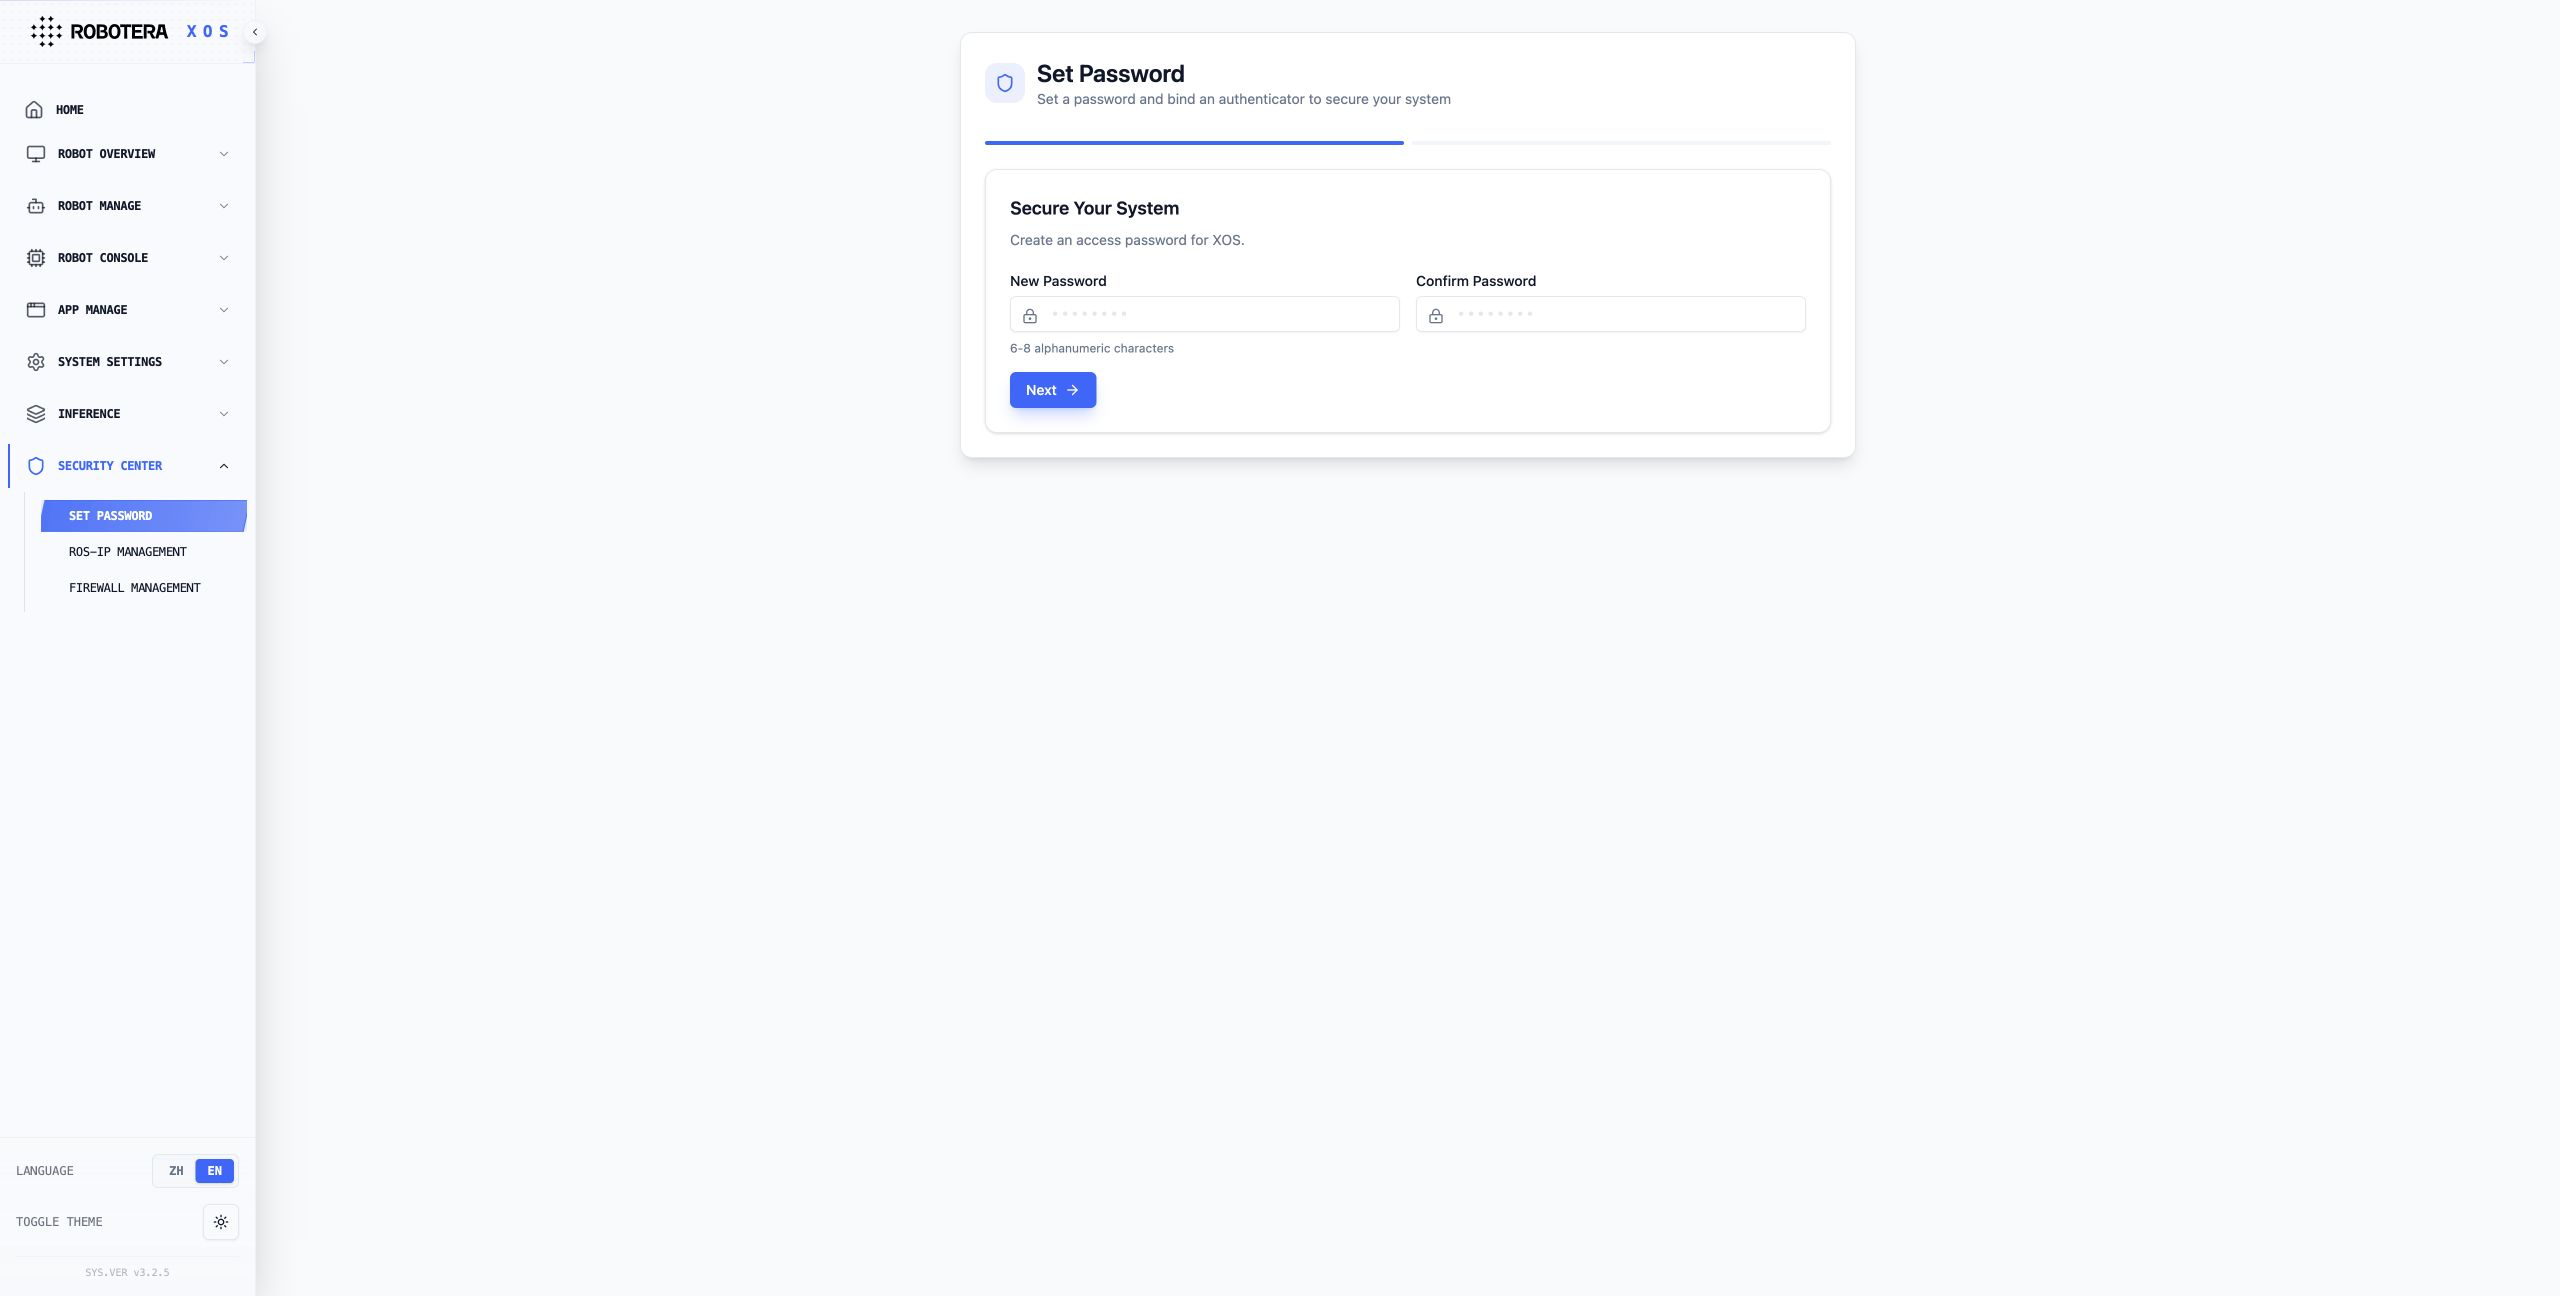
The Set Password function of the XOS Security Center supports users to update their login password (6-8 characters, letters or numbers), and can also turn off password protection to achieve flexible management of access rights to the Robot Control Center.
Authenticator Management
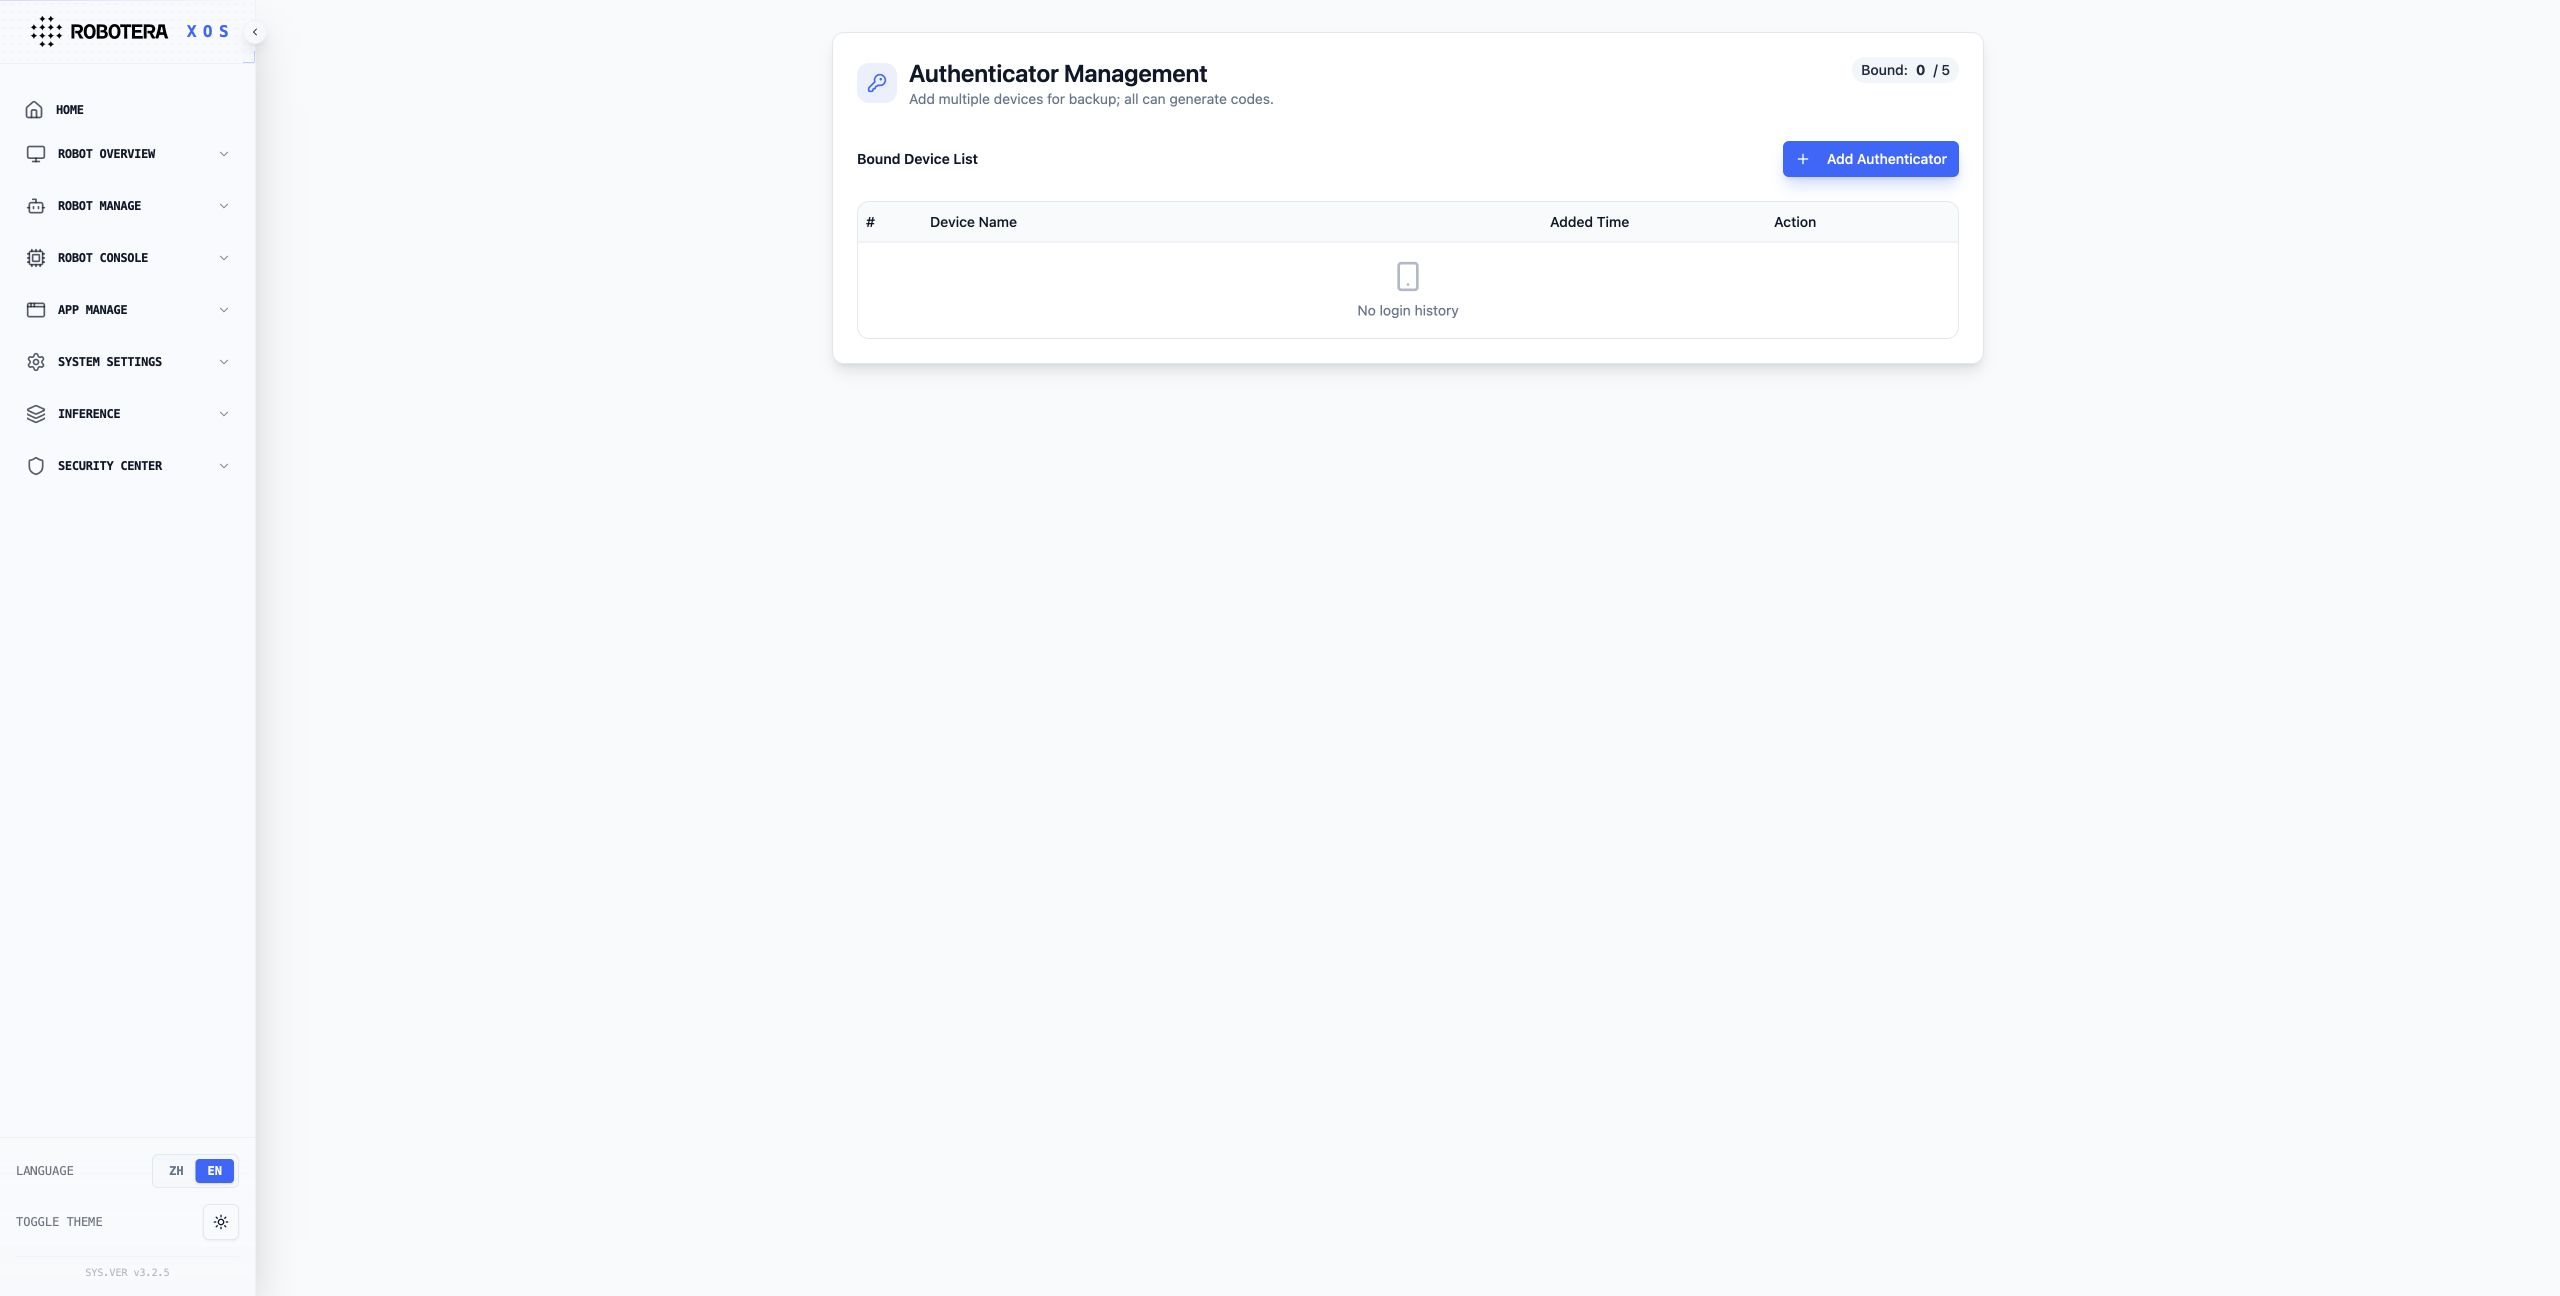
The Authenticator Management feature of XOS Security Center supports users in adding, renaming, and deleting TOTP verification devices, with a maximum of 5 devices that can be bound, facilitating users to flexibly manage backup devices for two-factor authentication and ensuring the security of system access.
Login History
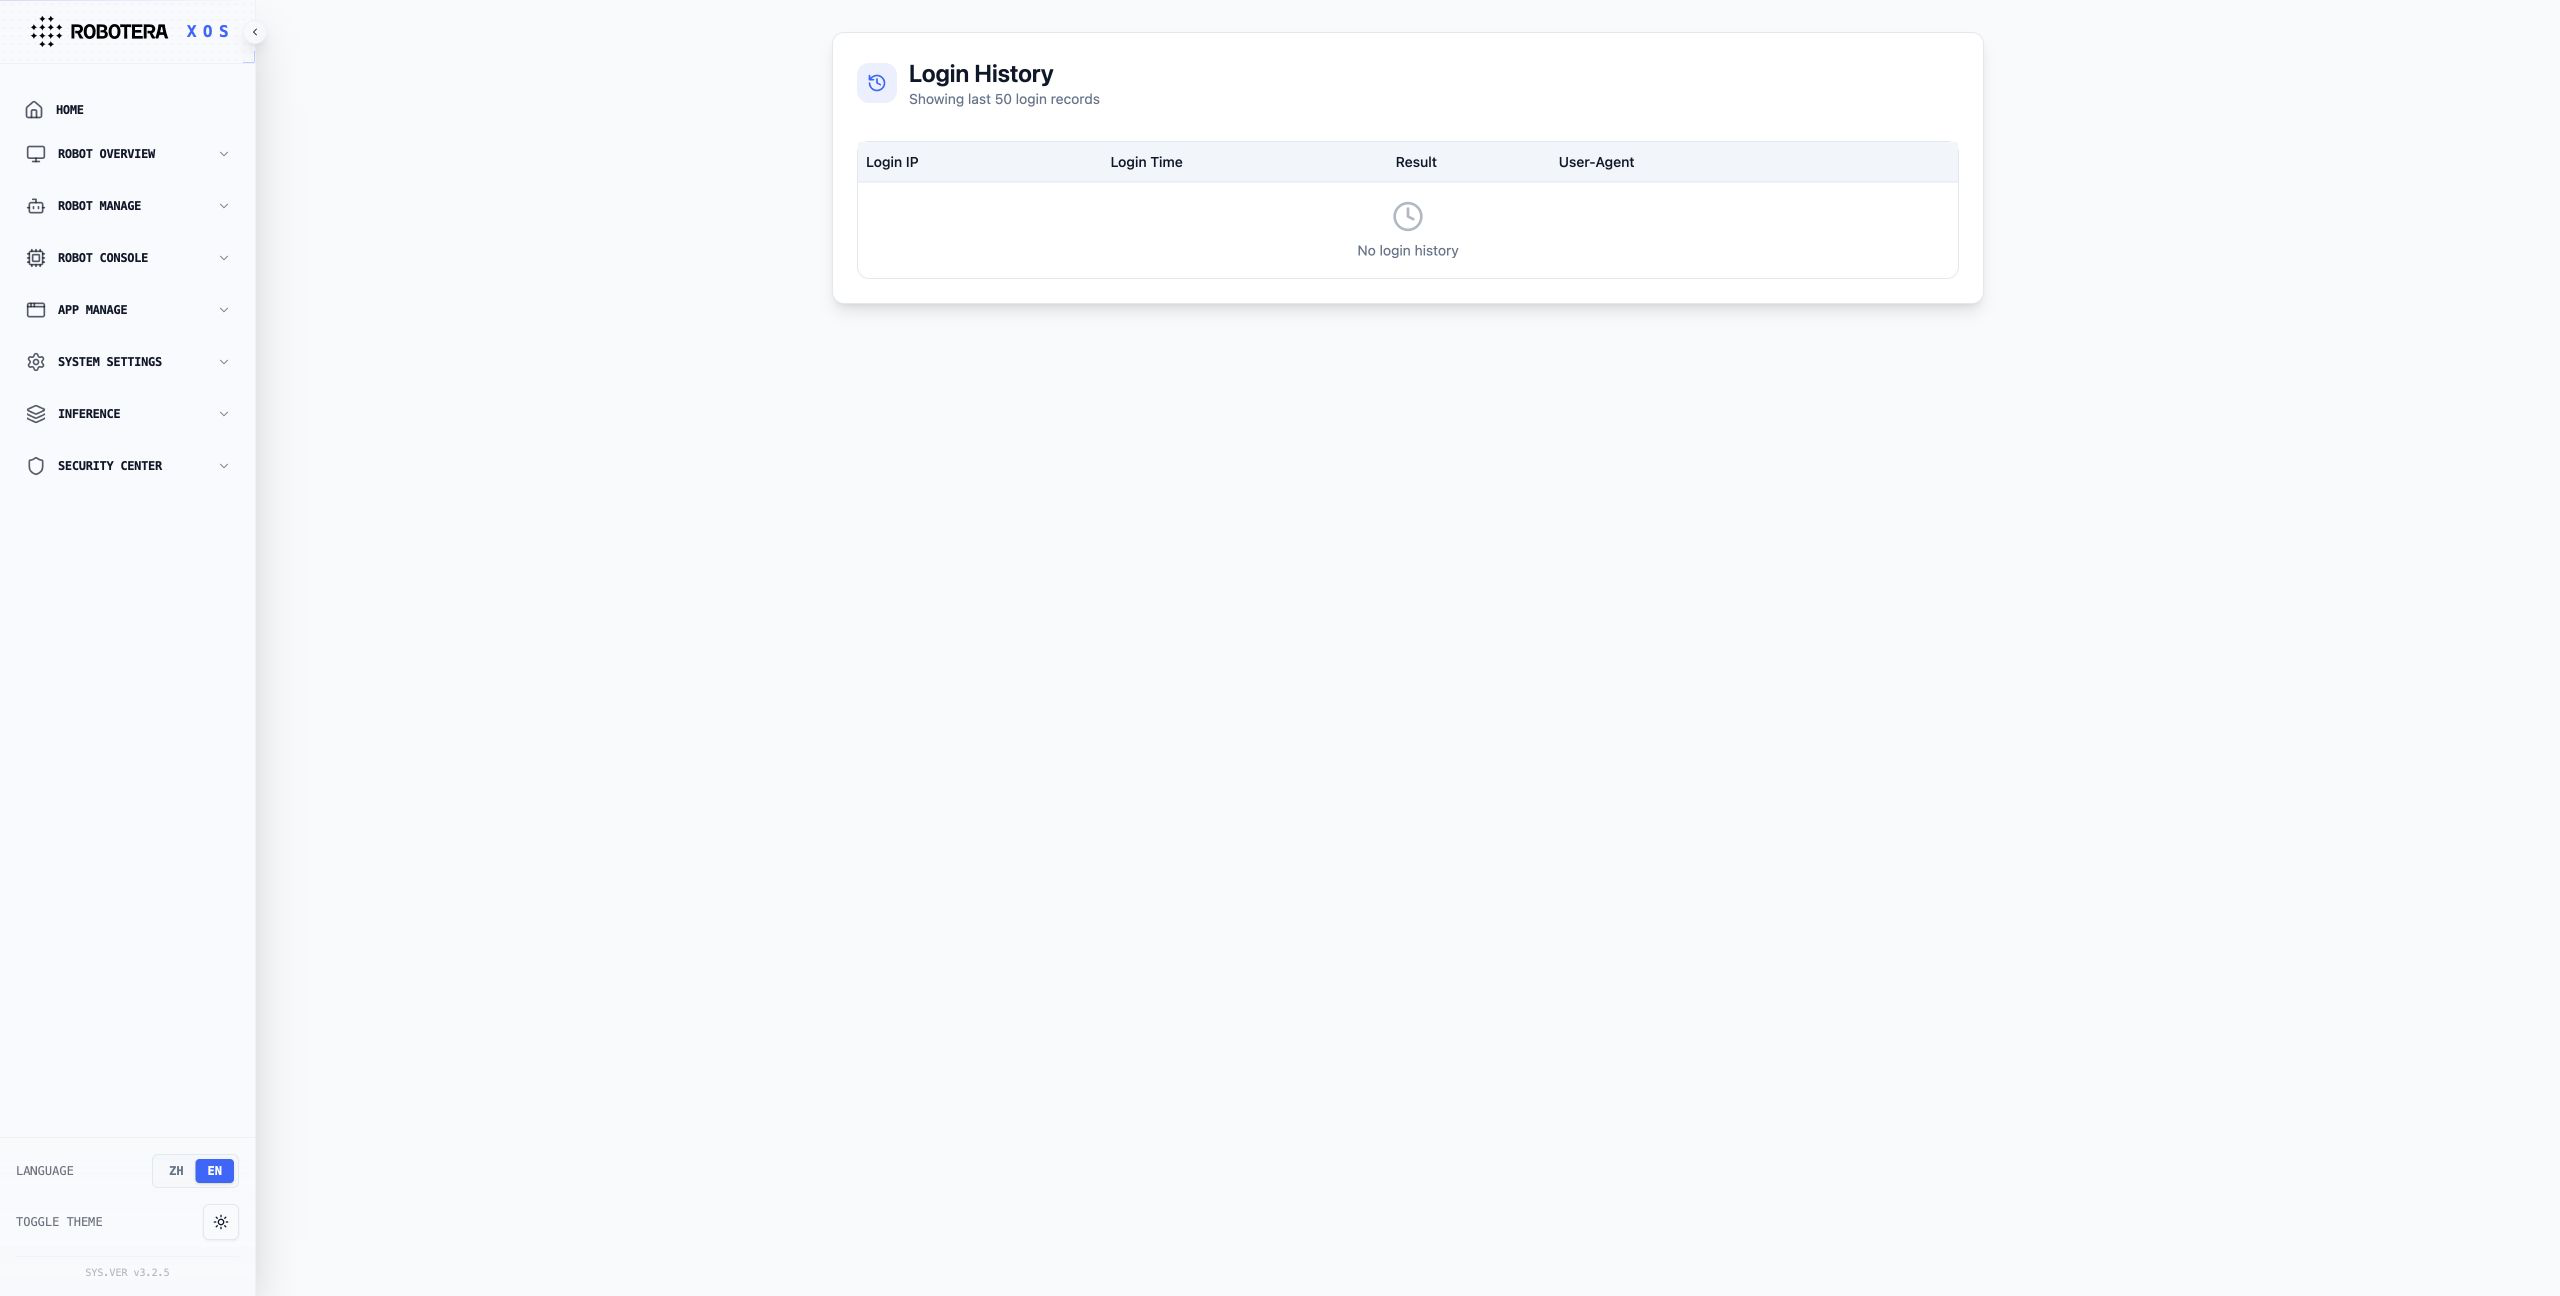
The Login History feature of the XOS Security Center can display the latest 50 login records, including login IP, time, result, and client information, helping users trace access behavior and promptly detect abnormal login risks.
ROS-IP Management
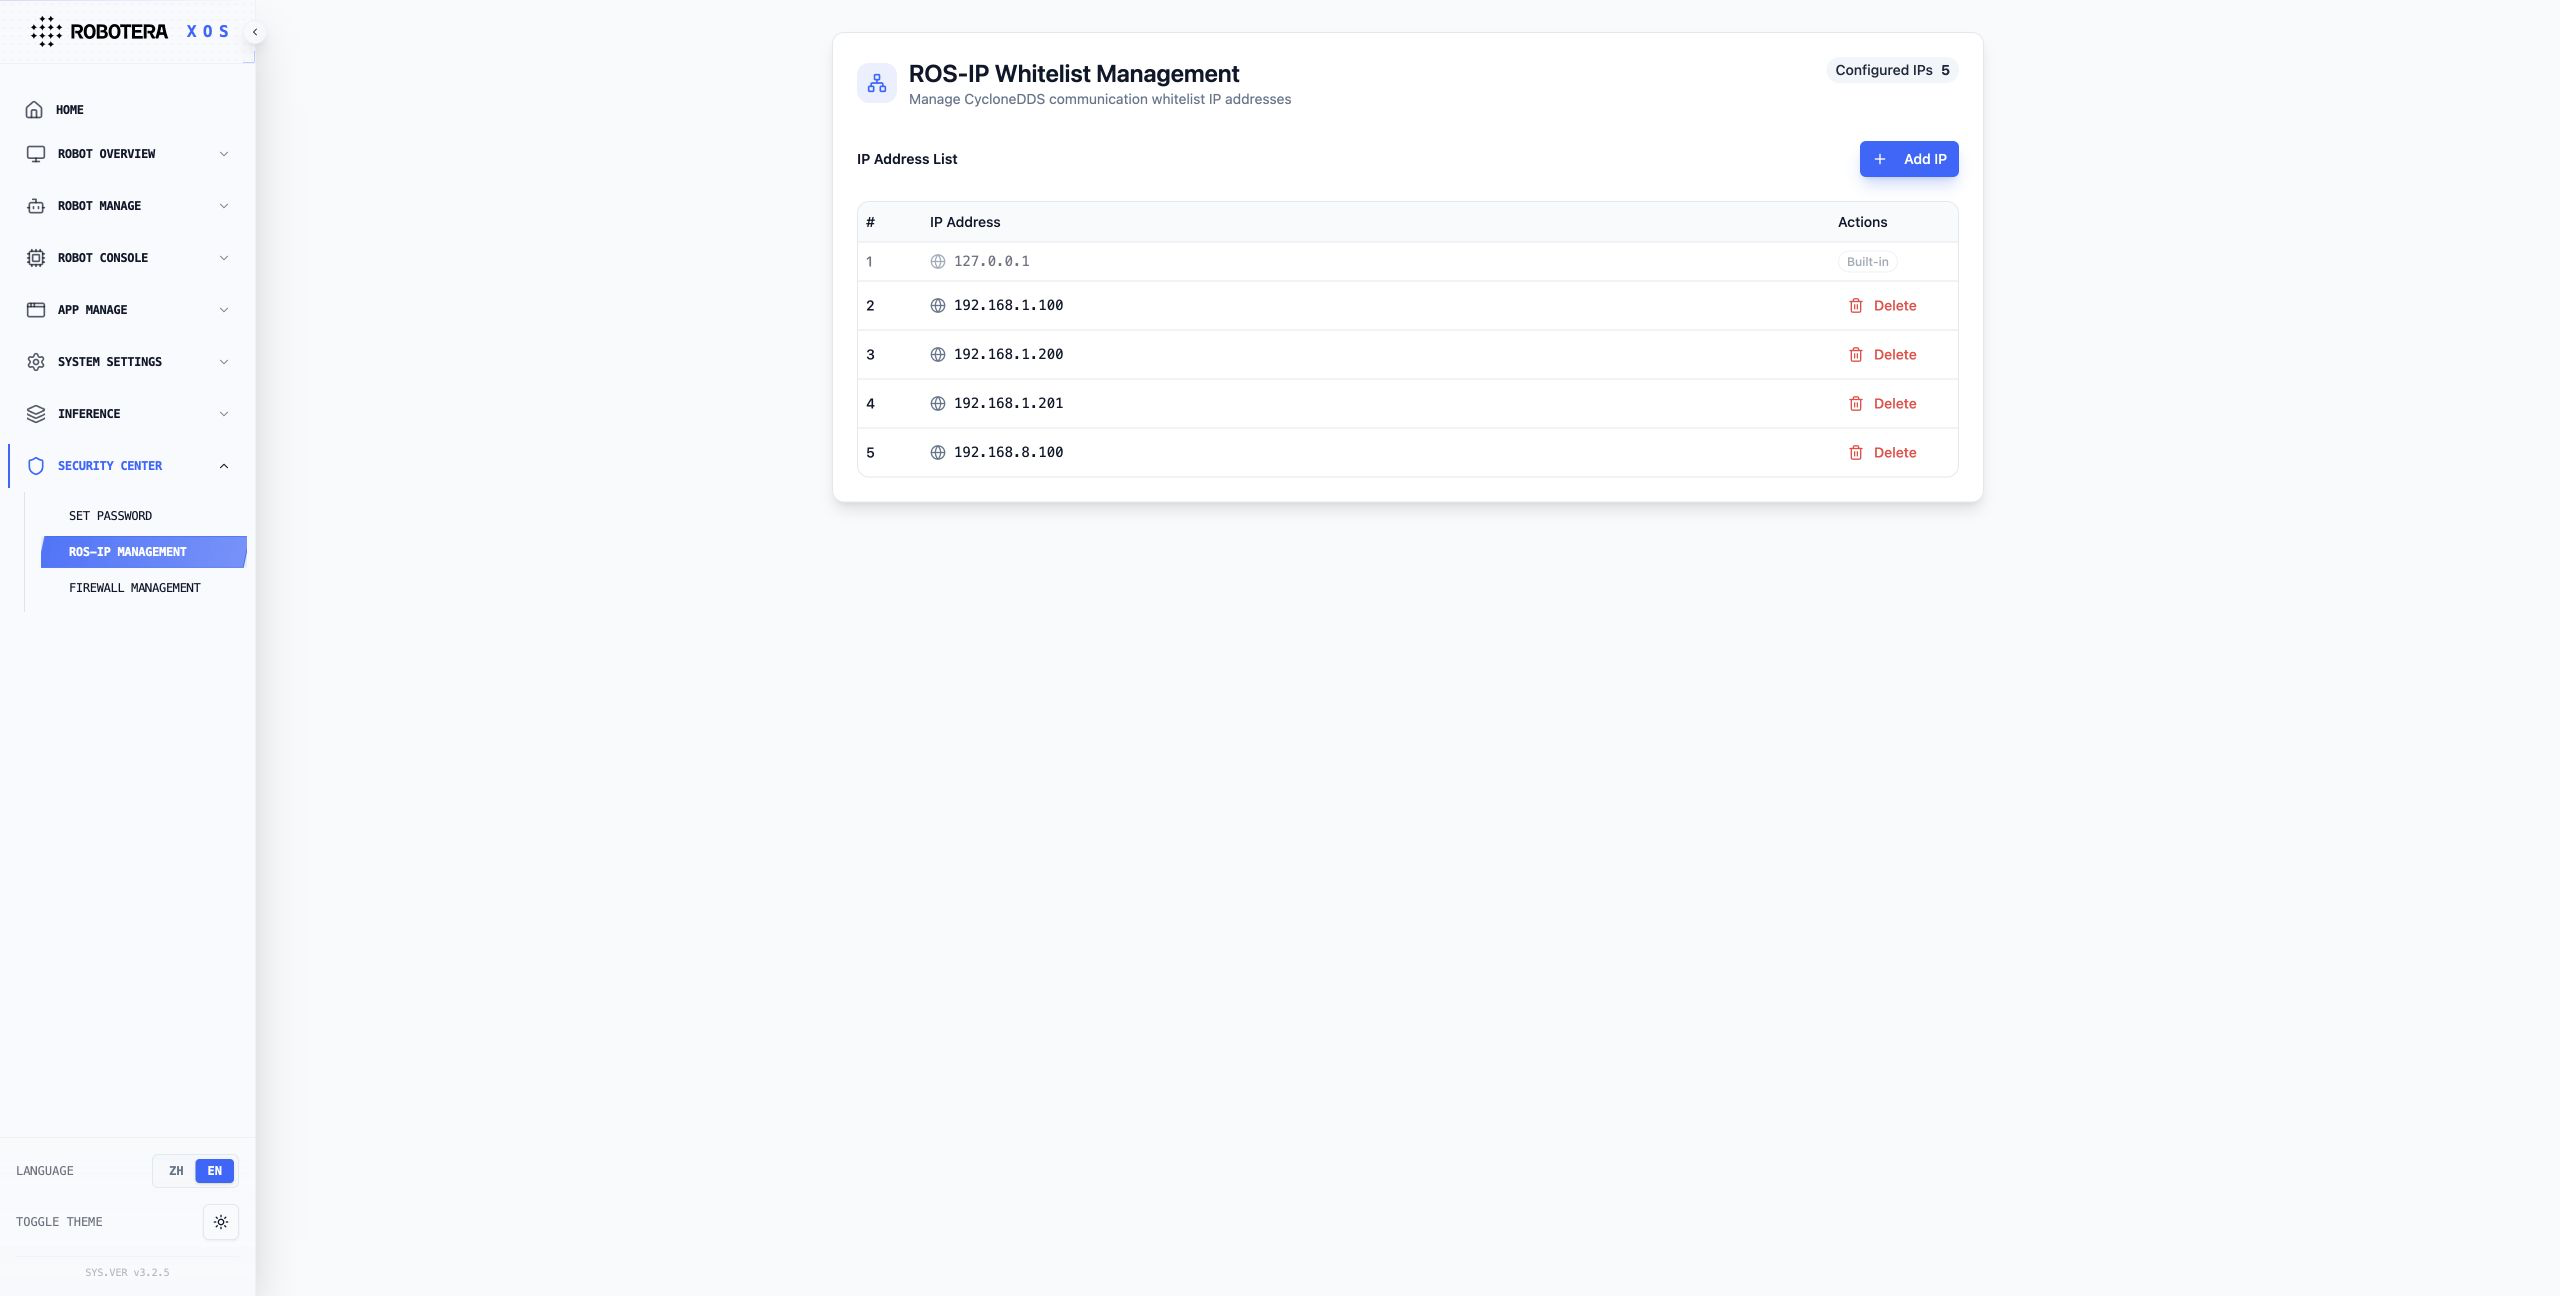
ROS-IP Allowlist Management function of XOS Security Center is used to configure trusted IP addresses for CycloneDDS communication, supports adding and deleting IPs, and only allows devices within the allowlist to communicate with the robot system, enhancing the security and controllability of ROS communication.
Firewall Management
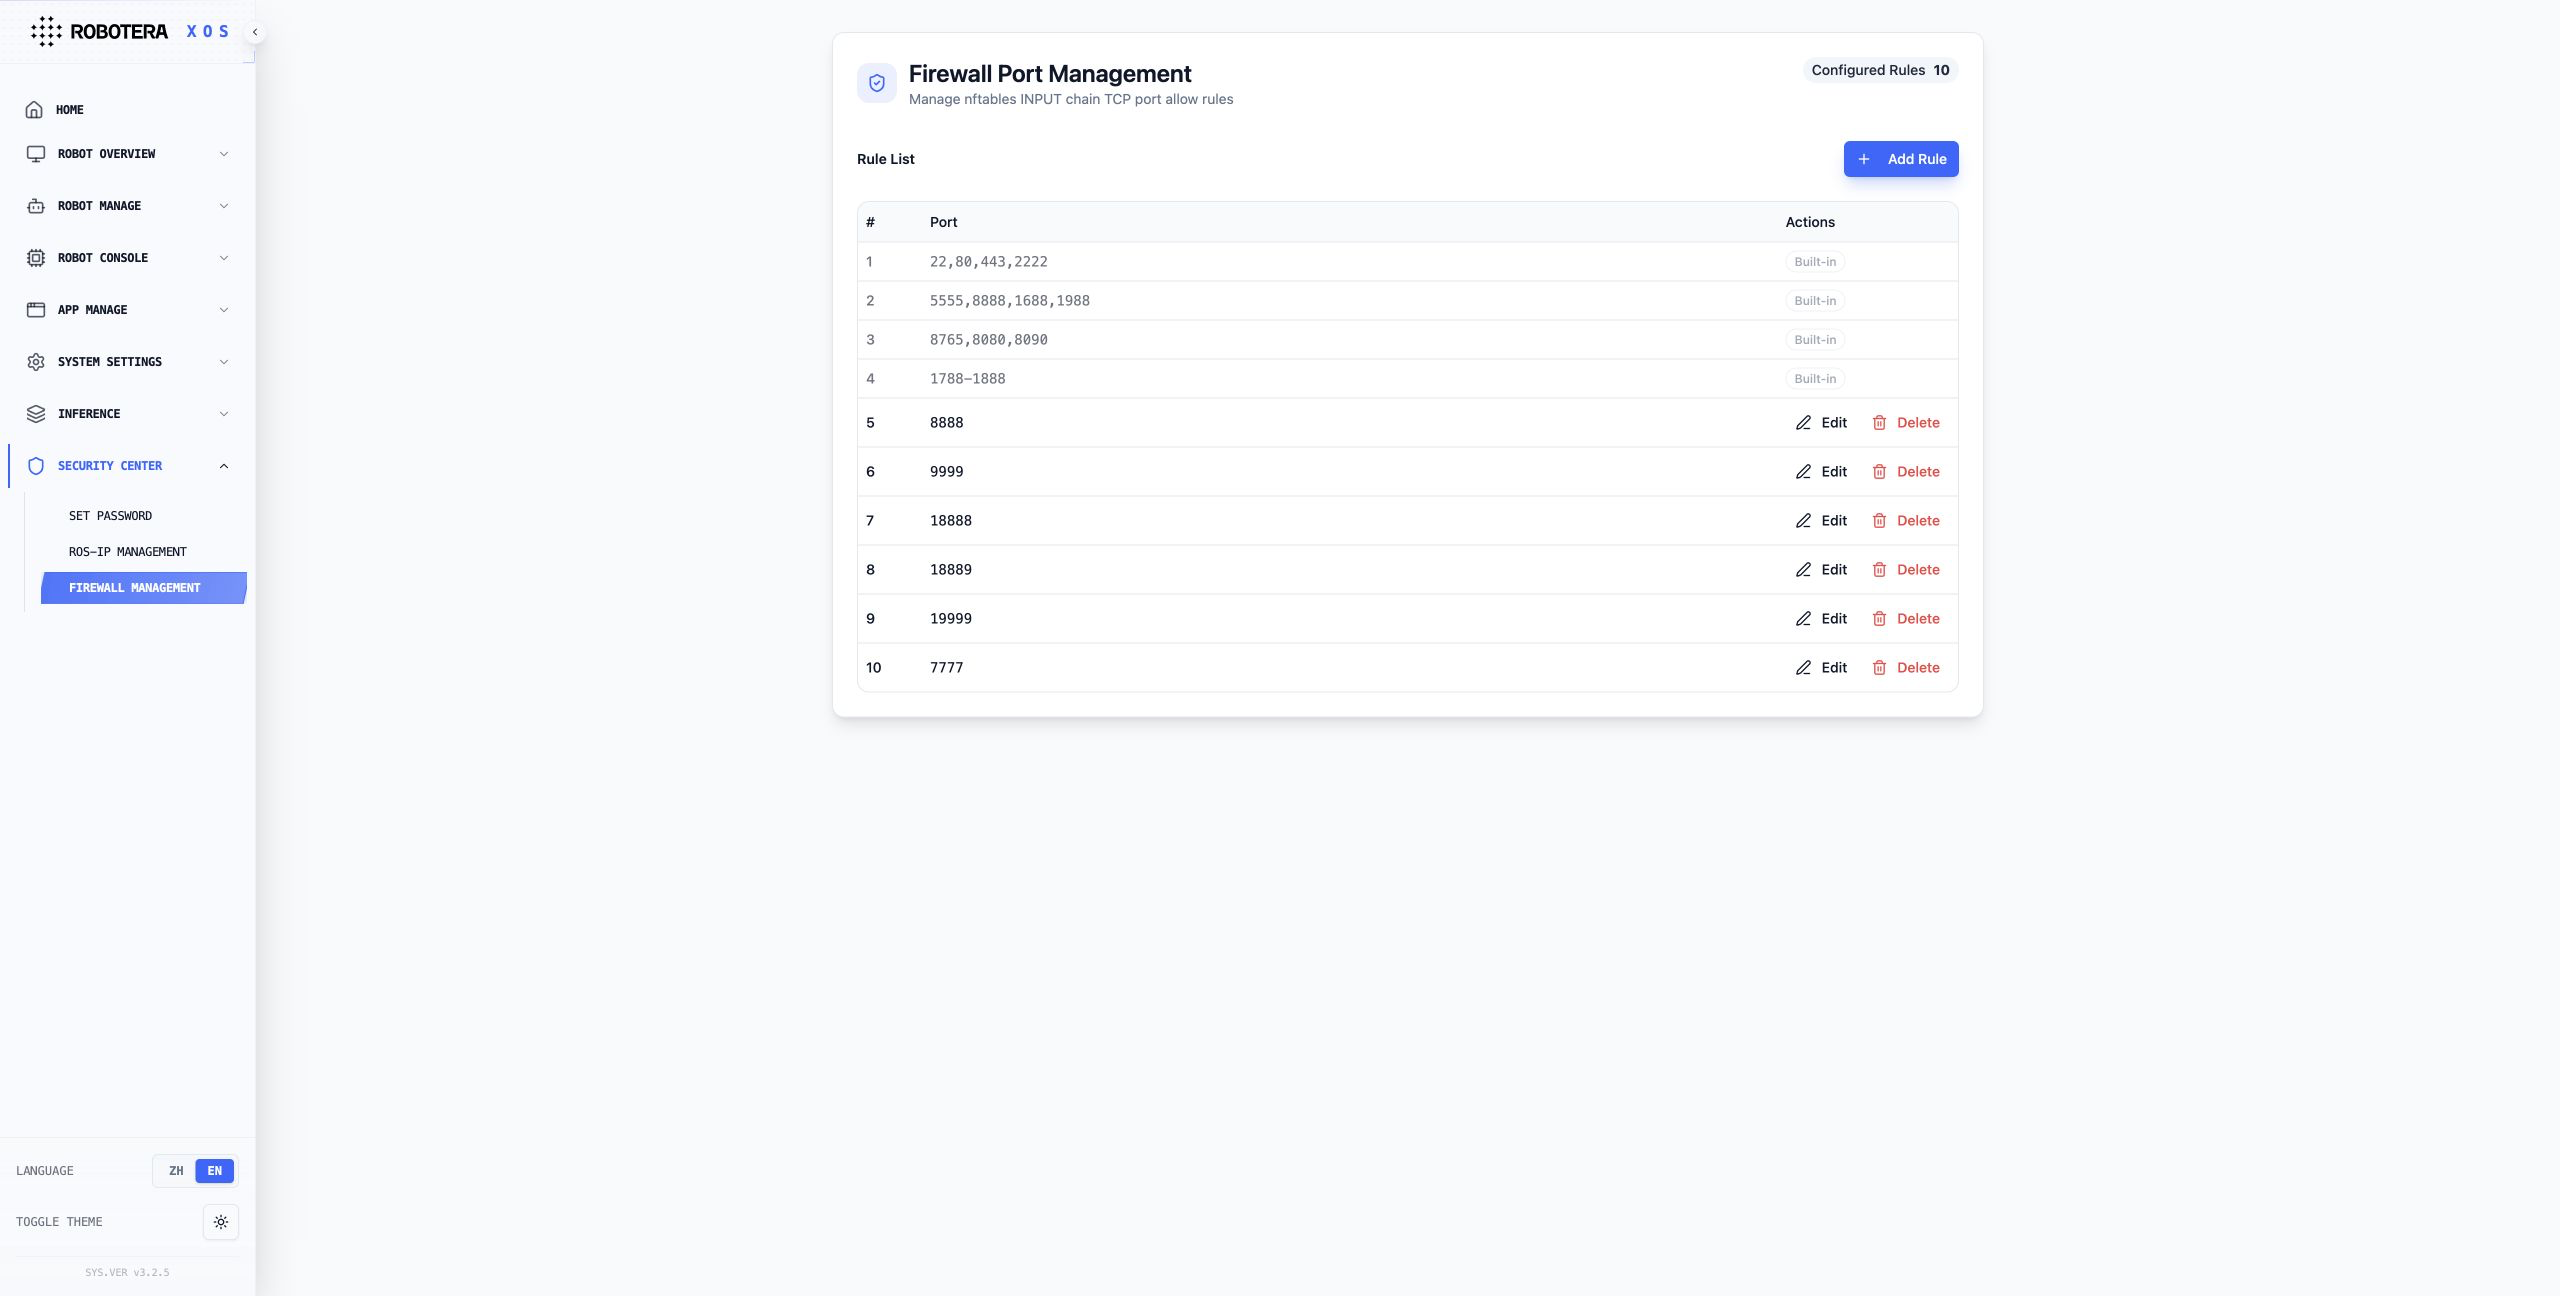
The firewall management function of the XOS Security Center is used to manage the port allowing rules of the nftables INPUT chain, supports viewing system built-in rules and customs adding new rules, controls network port access of the robot system, and strengthens network security protection.
Robot Intranet teleoperation
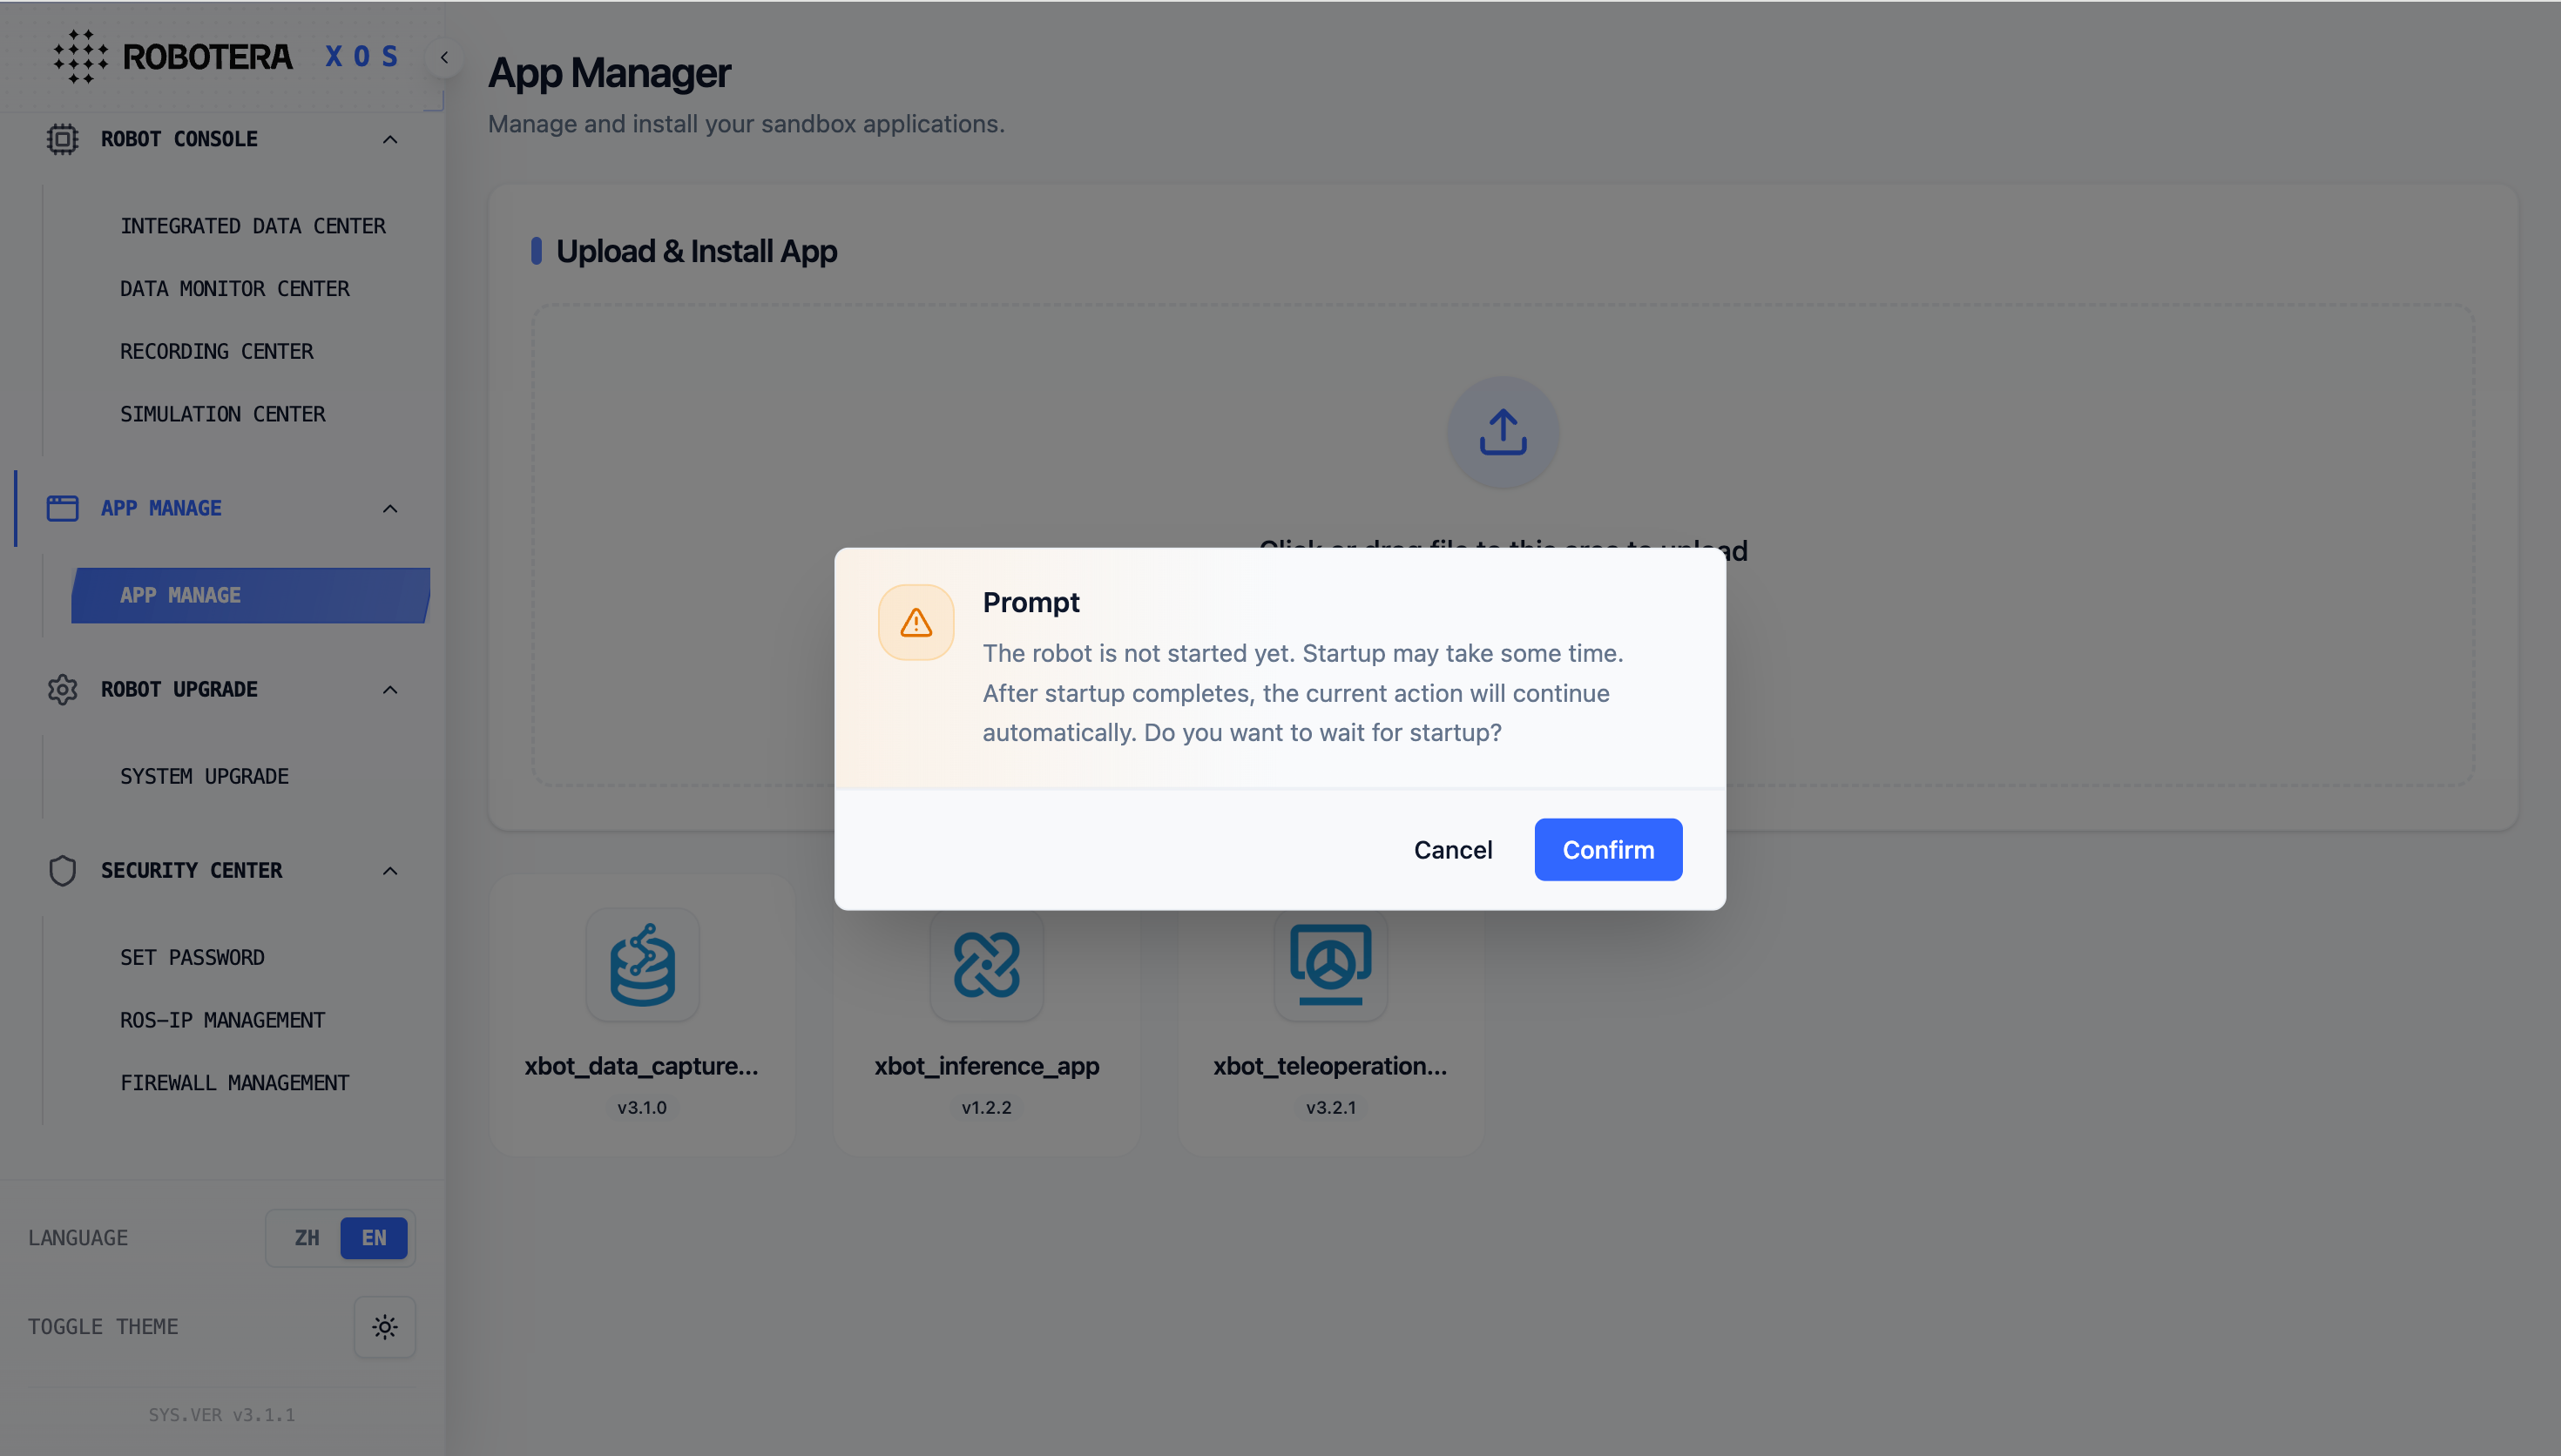
Upload the teleoperation authorization file
- Upload the teleoperation authorization file. After successful upload and verification, the teleoperation function can be used.
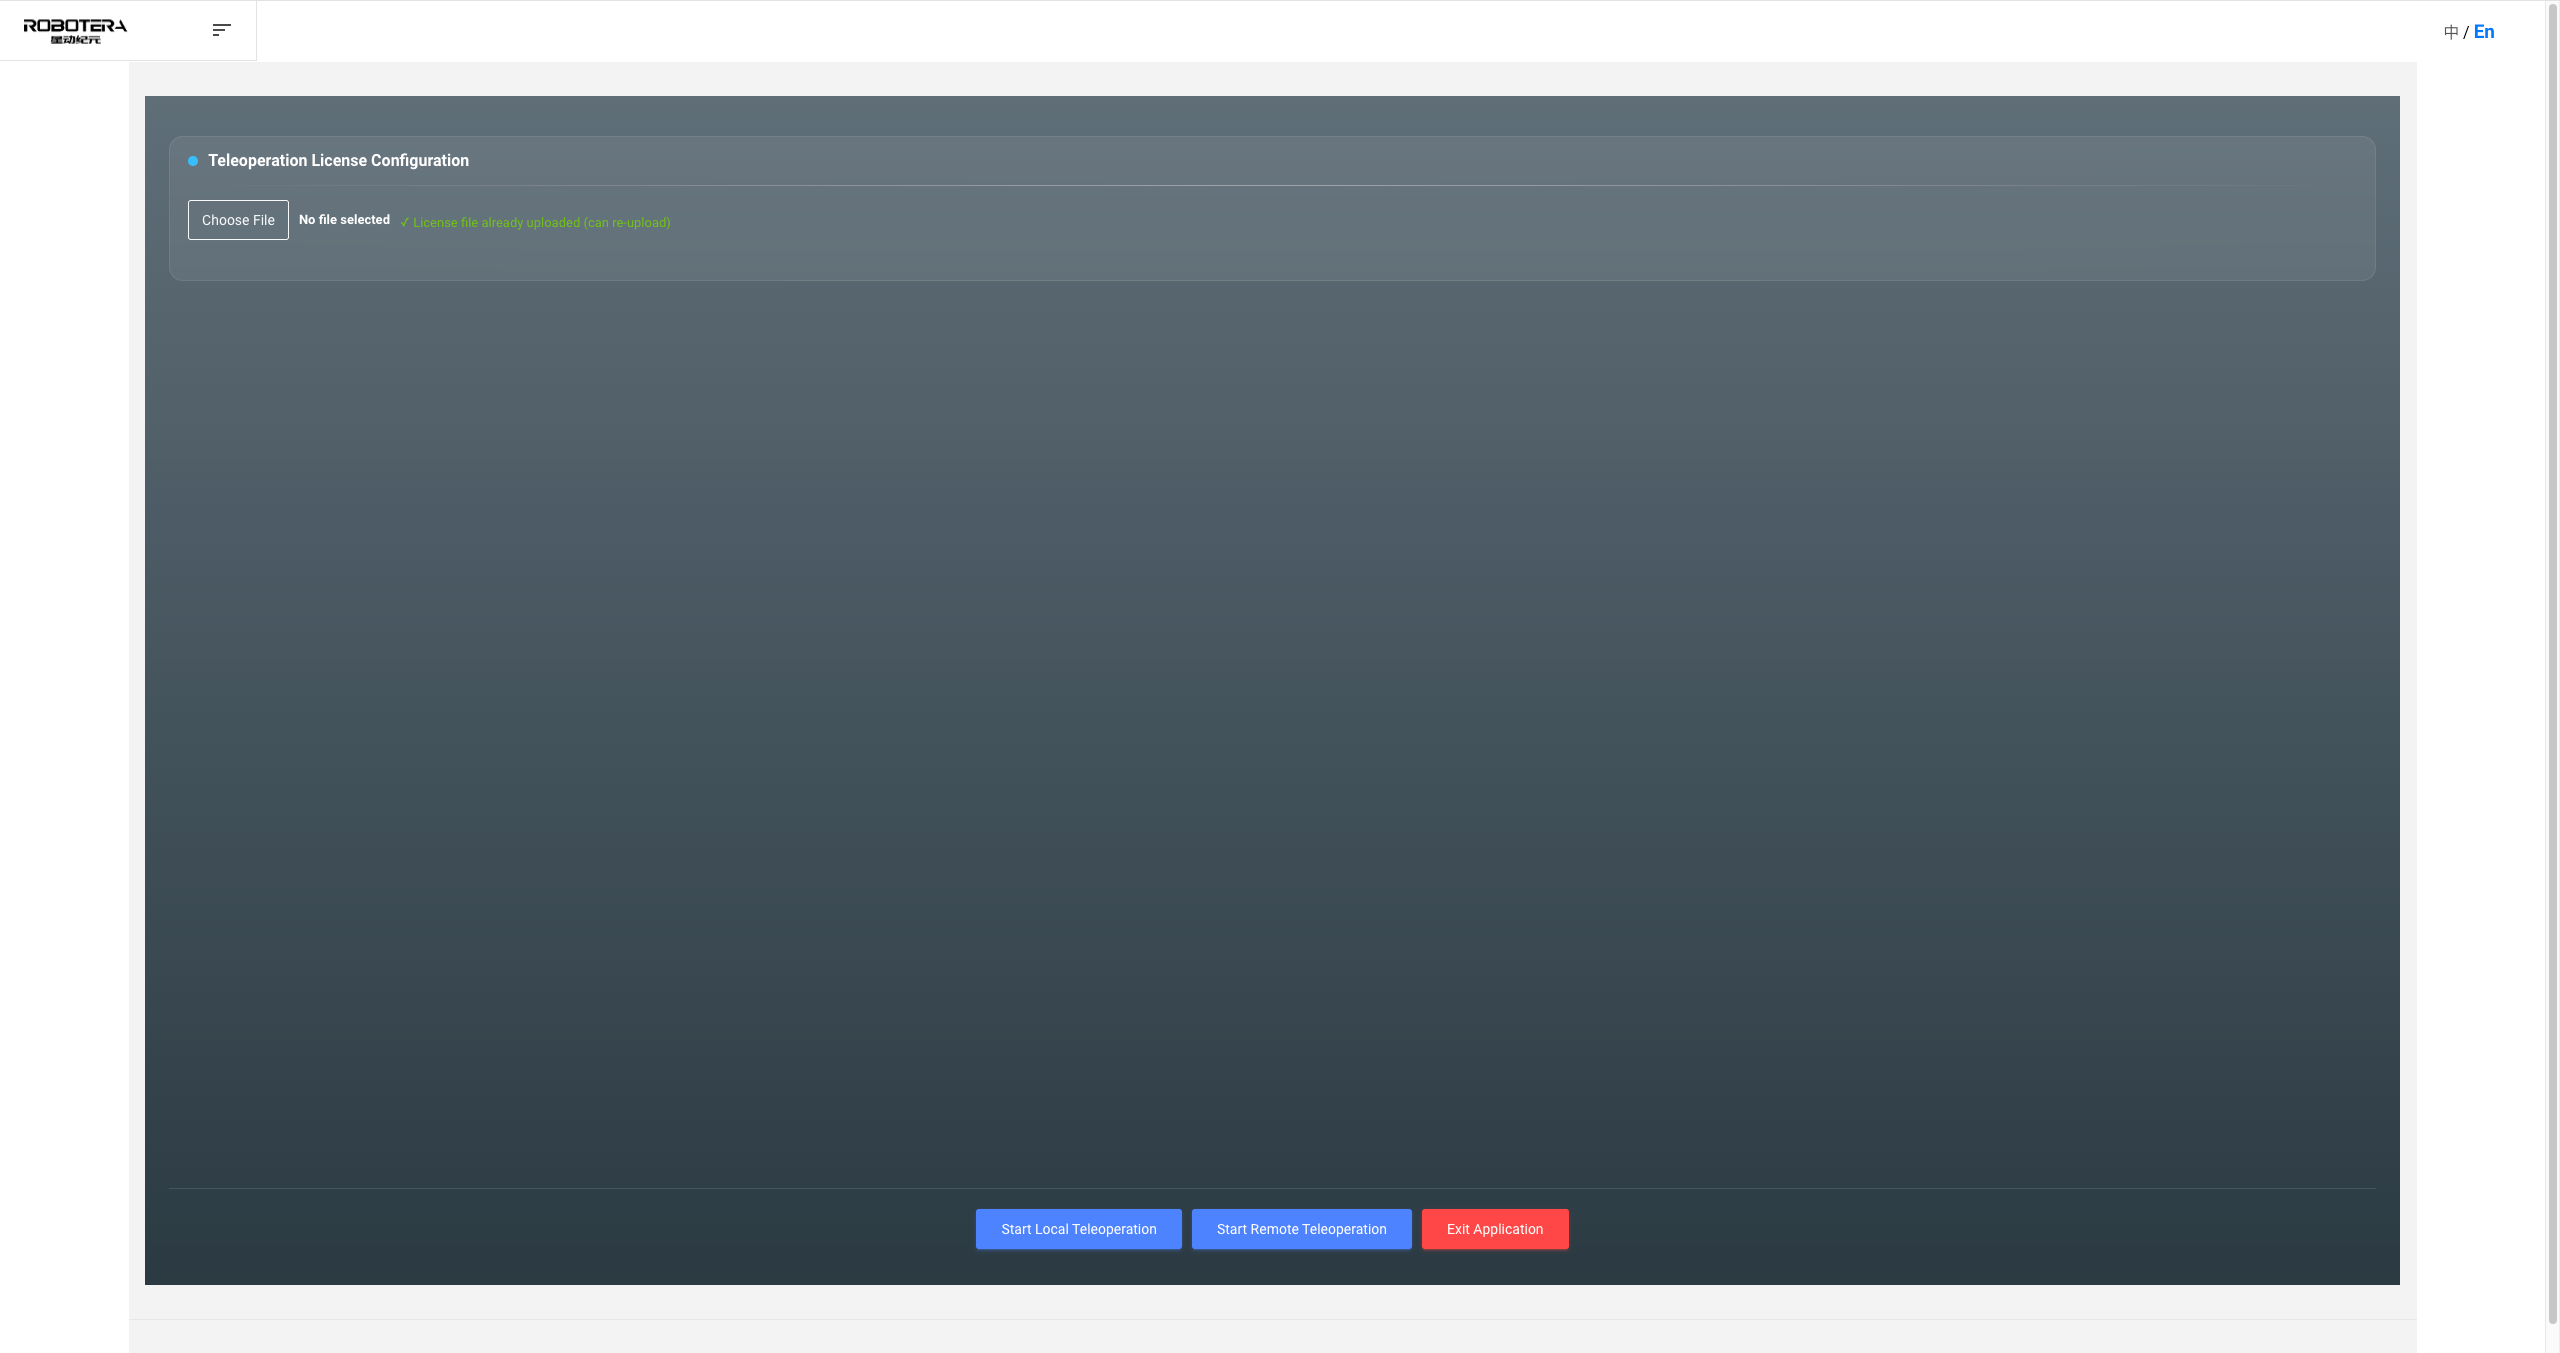
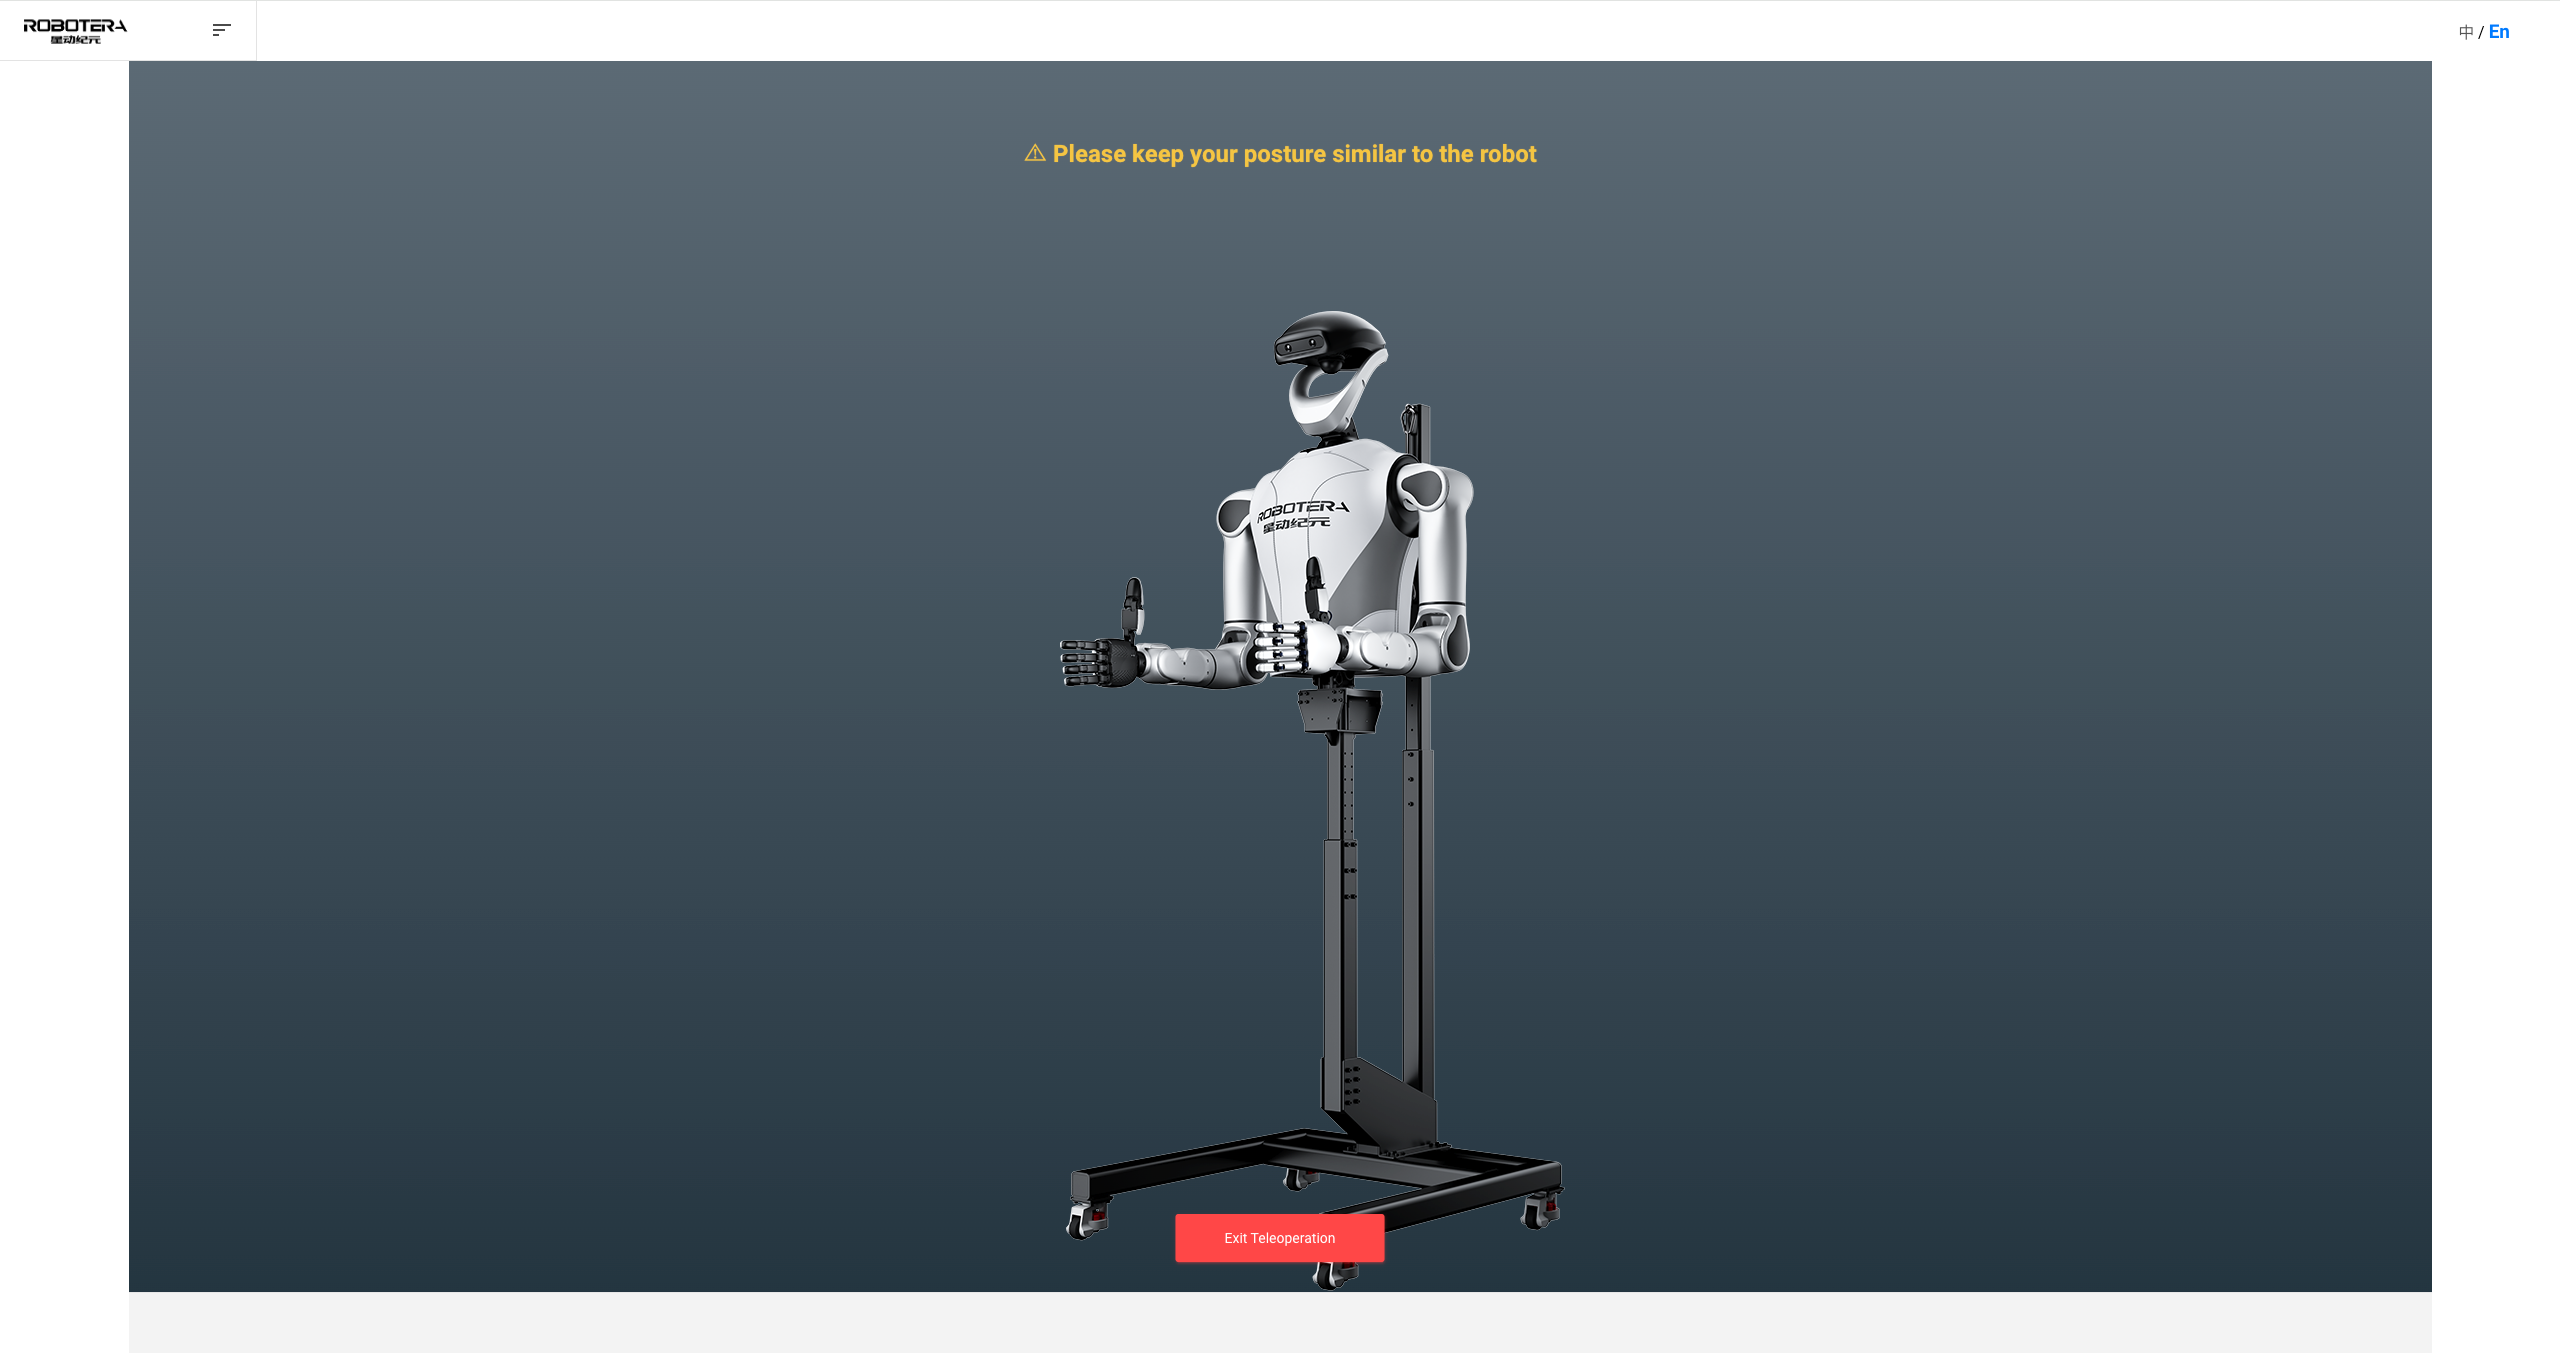
Open the remote operation app
- Open the teleoperation app and enter the main page. The robot will start up, raises both arms after startup is completed, and enters the state of waiting to connect to VR devices.
- After the VR device is successfully connected, start remote operation via the Xingyao App.
- Click to exit remote operation, the page will return to xos, and the robot will exit the remote operation state.
Connect to MetaQuest
- Turn on the Meta Quest device and enter the system settings.
- Select the network connection method:
Wired Connection: Directly connect the Meta Quest to the robot via a data cable.
WiFi Connection: Find the WiFi corresponding to the robot, enter the password, and complete the connection.
- Find the "Xingyao App" icon in the Meta Quest app list, and click it to launch.
For detailed usage, refer to:星遥App软件使用说明
Robot Data Acquisition
星动数据管理平台使用说明
Emergency Stop
M7 provides an emergency stop remote control to promptly cut off power in case of unexpected situations, ensuring safety.
The following figure shows the emergency stop remote control:
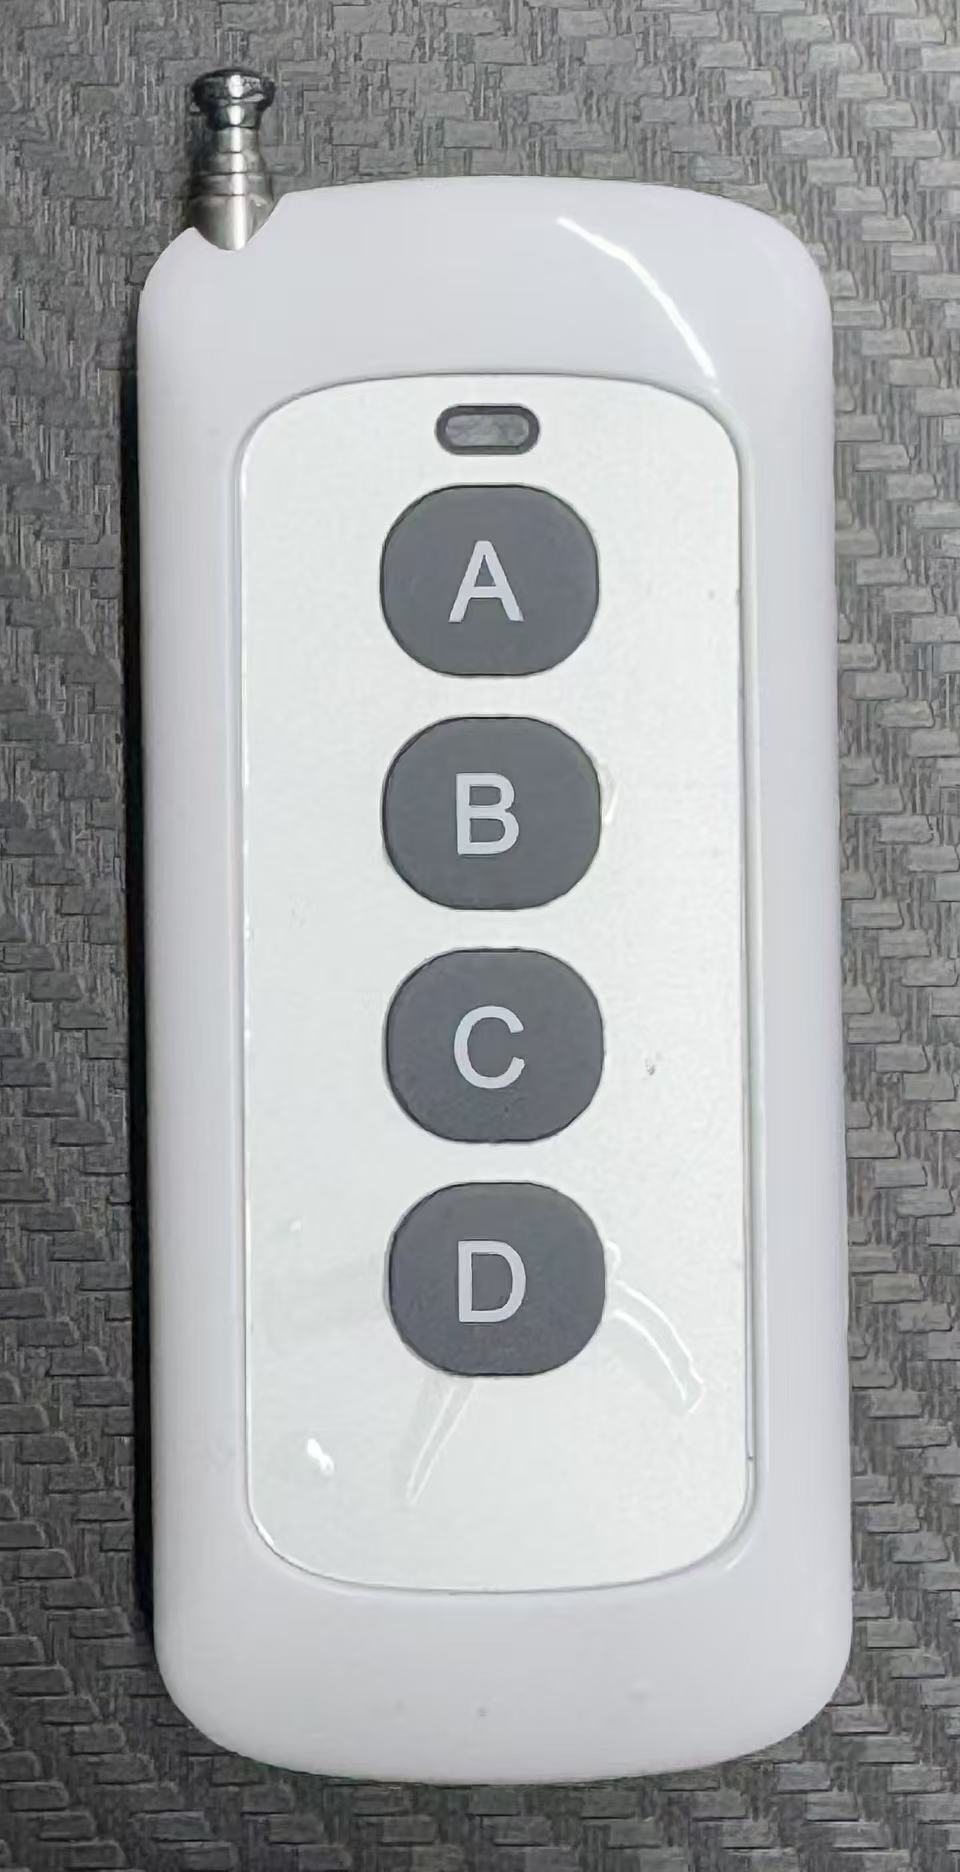
Pressing the A button once will turn off the power of the onboard computer, and pressing it again will restore it.
Pressing the D button once will turn off the power supply of the joint motor, and pressing it again will restore it.
exclamation Important: Please ensure that the emergency stop remote control is ready during debugging. In an emergency, press the D button to cut power to the joint motors.
Packing
Development Guide
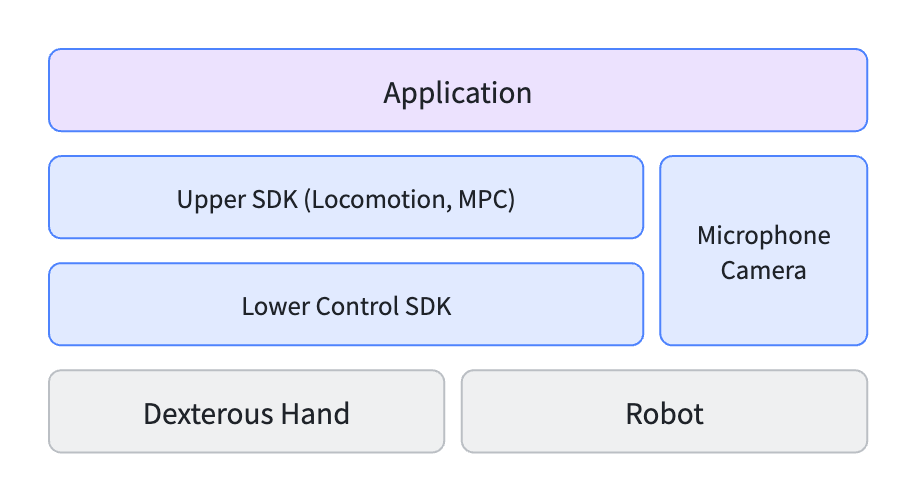
Overall robot software architecture
Joint Axis
SDK Call Instructions
M7 uses ROS2 Humble to interact with the entire robot. Developers can connect to the robot via wired/wireless networks, or communicate with the host system by logging into the developer container to write and run programs.
Ros2 domain: 211
If you wish to connect to the robot via another host for control:
- Connect to the robot via a wired connection or directly connect to the robot's WIFI
- Prerequisite: The host has a ros-humble + cyclonedds environment
- Messages used by the robot need to be deployed on its own host
git clone https://github.com/roboterax/teleop_client.git
cd teleop_client
colcon build
source install/setup.bash- Set environment variables
export ROS_DOMAIN_ID=211
export RMW_IMPLEMENTATION=rmw_cyclonedds_cpp- Configure unicast, and directly execute the following command on the host:
sudo mkdir /etc/xbot/
sudo tee /etc/xbot/cyclonedds.xml > /dev/null << 'EOF'
<?xml version="1.0"?>
<CycloneDDS xmlns="https://cdds.io/config">
  <Domain id="211">
    <General>
      <AllowMulticast>false</AllowMulticast>
    </General>
    <Discovery>
      <Peers>
        <Peer address="127.0.0.1"/>
        <Peer address="192.168.8.100"/>
      </Peers>
      <ParticipantIndex>auto</ParticipantIndex>
      <MaxAutoParticipantIndex>300</MaxAutoParticipantIndex>
    </Discovery>
  </Domain>
</CycloneDDS>
EOF

export CYCLONEDDS_URI=file:///etc/xbot/cyclonedds.xml
ros2 daemon stop
ros2 daemon start- Set the ROSIP allowlist on Robot-XOSROSIP设置说明文档
- Simply add the host IP to the xos ros allowlist
- Jump directly to the
**Underlying Joint Control SDK **section
Robot Port Usage Specification
Port Usage Prohibited
Commonly used built-in ports for system reserved ports:
tcp dport { 22, 80, 443, 2222 } accept
tcp dport { 5555, 8888, 1688, 1788, 1888, 1988 } accept
tcp dport { 8765, 8080, 8090 } accept
tcp dport 1788-1888 accept
Developer Available Ports
Only:1024 ~ 65535
Enter the developer container
Username: developer
Initial Password: developer
Port Number: 2222
ssh developer@192.168.8.100 -p 2222 #SSH into the robot backend and enter the workspace.肯定;l'k'fUnderlying Joint Control SDK
Joint Control Process
flowchart TD
    A[Check robot hardware status<br>(Confirm EtherCAT connection, joint power-on,<br>green power light is on)] --> B{Select mode}
    B -->|Full-body mode (with XHAND)| C[Start low-level joint control service<br>/dynamic_launch<br>launch_mode: 'pos']
    B -->|Full-body mode(without XHAND)| C2[Start low-level joint control service<br>/dynamic_launch<br>launch_mode: 'no_hand_pos']
    C & C2 --> D[Initialize joint control service<br>/ready_service<br>(Wait about 20 seconds, interface returns success)]
    D --> E[Move joints to standard start position<br>/simple_trajectory]
    E -->|Enable control| G1[Enable control<br>/activate_service]
    G1 --> H[Send joint control command<br>]
    H --> I[Stop low-level joint control service<br>/stop_launch]
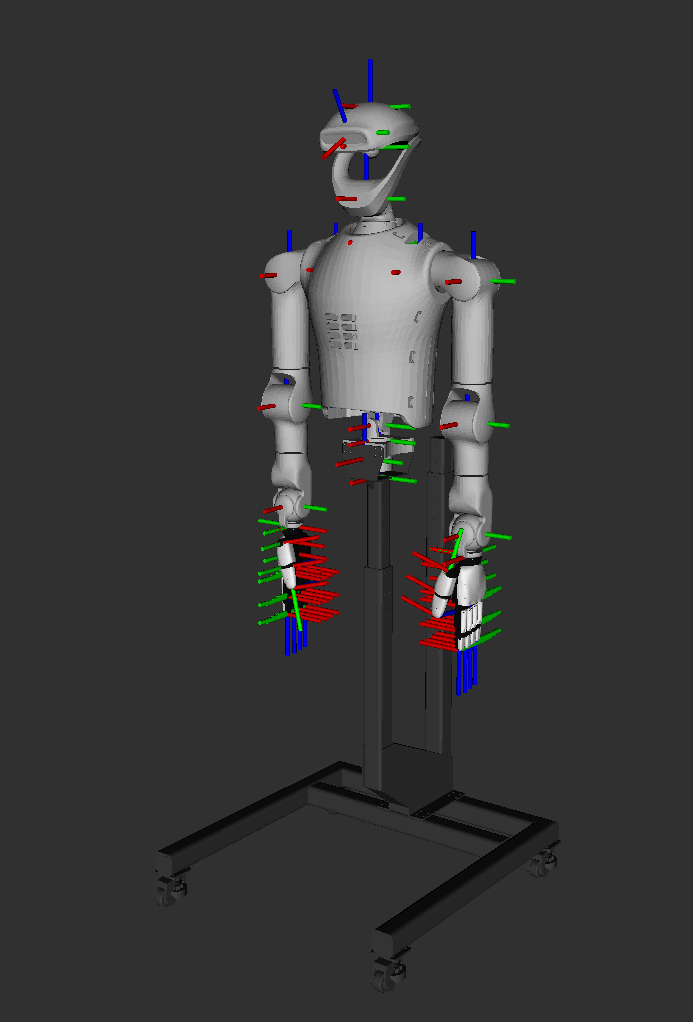
Overall Robot Joint Name
The joint list is as follows, and the overall structure refers to the product structure diagram
Joint Name
- left_shoulder_pitch_joint
- left_shoulder_roll_joint
- left_arm_yaw_joint
- left_elbow_pitch_joint
- left_elbow_yaw_joint
- left_wrist_pitch_joint
- left_wrist_roll_joint
- neck_yaw_joint
- neck_pitch_joint
- right_shoulder_pitch_joint
- right_shoulder_roll_joint
- right_arm_yaw_joint
- right_elbow_pitch_joint
- right_elbow_yaw_joint
- right_wrist_pitch_joint
- right_wrist_roll_joint
- waist_pitch_joint
- waist_roll_joint
- waist_yaw_joint
XHand Joint Name
- left_hand_thumb_bend_joint
- left_hand_thumb_rota_joint1
- left_hand_thumb_rota_joint2
- left_hand_index_bend_joint
- left_hand_index_joint1
- left_hand_index_joint2
- left_hand_mid_joint1
- left_hand_mid_joint2
- left_hand_ring_joint1
- left_hand_ring_joint2
- left_hand_pinky_joint1
- left_hand_pinky_joint2
- right_hand_thumb_bend_joint
- right_hand_thumb_rota_joint1
- right_hand_thumb_rota_joint2
- right_hand_index_bend_joint
- right_hand_index_joint1
- right_hand_index_joint2
- right_hand_mid_joint1
- right_hand_mid_joint2
- right_hand_ring_joint1
- right_hand_ring_joint2
- right_hand_pinky_joint1
- right_hand_pinky_joint2
XHand Pro Joint Name
- left_hand_thumb_bend_joint
- left_hand_thumb_rota_joint1
- left_hand_thumb_rota_joint2
- left_hand_thumb_rota_joint3
- left_hand_index_bend_joint
- left_hand_index_rota_joint1
- left_hand_index_rota_joint2
- left_hand_index_rota_joint3
- left_hand_mid_bend_joint
- left_hand_mid_rota_joint1
- left_hand_mid_rota_joint2
- left_hand_mid_rota_joint3
- left_hand_ring_bend_joint
- left_hand_ring_rota_joint1
- left_hand_ring_rota_joint2
- left_hand_ring_rota_joint3
- left_hand_pinky_bend_joint
- left_hand_pinky_rota_joint1
- left_hand_pinky_rota_joint2
- left_hand_pinky_rota_joint3
- left_hand_ltspalm_joint
- right_hand_thumb_bend_joint
- right_hand_thumb_rota_joint1
- right_hand_thumb_rota_joint2
- right_hand_thumb_rota_joint3
- right_hand_index_bend_joint
- right_hand_index_rota_joint1
- right_hand_index_rota_joint2
- right_hand_index_rota_joint3
- right_hand_mid_bend_joint
- right_hand_mid_rota_joint1
- right_hand_mid_rota_joint2
- right_hand_mid_rota_joint3
- right_hand_ring_bend_joint
- right_hand_ring_rota_joint1
- right_hand_ring_rota_joint2
- right_hand_ring_rota_joint3
- right_hand_pinky_bend_joint
- right_hand_pinky_rota_joint1
- right_hand_pinky_rota_joint2
- right_hand_pinky_rota_joint3
- right_hand_ltspalm_joint
Note: The KP and KD values vary by hand type. Please refer to the relevant hand documentation.
Joint Control Instructions
Control Mode
The M7 system does not have lower limb, upper limb support including the waist torque control mode and position control mode. Differentiated by different startup methods
Under different startup modes
- For joints with torque control, only the following parameters can be set:
- velocity: Joint target velocity
- position: Joint target position
- feedforward: Feedforward force
- kp: Proportional Gain
- kd: Differential Gain
- For joints with position control, only the position (target position of each joint) parameter needs to be set. The remaining parameters include:
- velocity: Joint target velocity
- feedforward: feedforward force or torque
- kp: Proportional Gain
- kd: Differential Gain
The above parameters do not take effect in position control mode. Please ensure that only the position field is filled to avoid redundant data or misuse of the interface.
Control Frequency
The joint control frequency of L3 can reach 500Hz, and the control frequency of the dexterous hand is 83Hz (serial data)
Underlying joint control interface
1. Joint Control Command Interface
| Interface Name | Type | Function Description | Message Type |
|---|---|---|---|
/hybrid_body_controller/commands | ROS2 Topic | Issue joint control commands | xbot_common_interfaces/msg/HybridJointCommand |
xbot_common_interfaces/msg/HybridJointCommandParameter Description:- header: Standard message header (including timestamp and frame_id)
- joint_name: string[], list of joint names, corresponding to each control joint
- position: float64[], target position (rad) of each joint
- velocity: float64[], target velocity (rad/s) for each joint
- feedforward: float64[], feedforward force or torque (N·m)
- kp: float64[], proportional gain for each joint
- kd: float64[], current force/torque of differential gain for each joint
2. Hand Joint Control Command Interface
| Interface Name | Type | Function Description | Message Type |
|---|---|---|---|
/hand_controller/commands | ROS2 Topic | Issue joint control commands | xbot_common_interfaces/msg/HybridJointCommand |
xbot_common_interfaces/msg/HybridJointCommandParameter Description:- header: Standard message header (including timestamp and frame_id)
- joint_name: string[], list of joint names, corresponding to each control joint
- position: float64[], target position (rad) of each joint
- velocity: float64[],target velocity (rad/s) for each joint
- feedforward: float64[], feedforward force or torque (N·m)
- kp: float64[], proportional gain for each joint
- kd: float64[], current force/torque of differential gain for each joint
3. Joint Status Interface
| Interface Name | Type | Function Description | Message Type |
|---|---|---|---|
/joint_states | ROS2 Topic | Publish joint state command | sensor_msgs/msg/JointState |
sensor_msgs/msg/JointStateParameter Description:- header: Standard message header (including timestamp and frame_id)
- name: string[], all joint names
- position: float64[], target position (rad) of each joint
- velocity: float64[],target velocity (rad/s) for each joint
- effort: float64[], joint torque (N·m)
Example of Low-Level Joint Control
Control via the command line
The joints of the M7 robot use EtherCAT for communication, so please confirm the robot's hardware status before starting. Currently, the M7 supports the following modes:
# Full-body configuration with XHAND on both left and right hands, position mode
launch_mode: 'pos'

# Full-body configuration without XHAND installed, position mode
launch_mode: 'no_hand_pos'

# Full-body configuration with XHAND on both left and right hands, torque mode
launch_mode: 'pd'

# Full-body configuration without XHAND installed, torque mode
launch_mode: 'no_hand_pd'
Taking the example of starting a full-body form with two XHANDs (left and right), the startup script is as follows:
# SSH into robot backend, enter workspace
ssh developer@192.168.8.100 -p 2222

# source message definitions
git clone https://github.com/roboterax/teleop_client.git
cd teleop_client
colcon build
source install/setup.bash

# Start joint service
ros2  service call /dynamic_launch xbot_common_interfaces/srv/DynamicLaunch "app_name: ''
sync_control: false
launch_mode: 'pos'"

# Initialize joint modules; this process takes about 20 seconds (M7 whole-body joints use Et)
ros2  service call /ready_service std_srvs/srv/Trigger {}

# Move joints to standard starting position; this takes about 4 seconds
ros2 action send_goal /simple_actions xbot_common_interfaces/action/SimpleActions "{action_name: 'initpose_handsdown', time_cost: 4.0}"

# Raise forearms
ros2 action send_goal /simple_actions xbot_common_interfaces/action/SimpleActions "{action_name: 'lift_up', time_cost: 4.0}"

# XHand: both hands slightly grasp (note: the previous step must be executed first to raise the arms)
ros2 topic pub /hand_controller/commands xbot_common_interfaces/msg/HybridJointCommand "header:
  stamp:
    sec: 0
    nanosec: 0
  frame_id: ''
joint_name: ['left_hand_thumb_bend_joint', 'left_hand_thumb_rota_joint1', 'left_hand_thumb_rota_joint2', 'left_hand_index_bend_joint', 'left_hand_index_joint1', 'left_hand_index_joint2',
             'left_hand_mid_joint1', 'left_hand_mid_joint2', 'left_hand_ring_joint1', 'left_hand_ring_joint2', 'left_hand_pinky_joint1', 'left_hand_pinky_joint2',
             'right_hand_thumb_bend_joint', 'right_hand_thumb_rota_joint1', 'right_hand_thumb_rota_joint2', 'right_hand_index_bend_joint', 'right_hand_index_joint1', 'right_hand_index_joint2',
             'right_hand_mid_joint1', 'right_hand_mid_joint2', 'right_hand_ring_joint1', 'right_hand_ring_joint2', 'right_hand_pinky_joint1', 'right_hand_pinky_joint2']
position: [0.5, 0.5, 1.0, 0.3, 1.0, 1.0, 1.0, 1.0, 1.0, 1.0, 1.0, 1.0,
           0.5, 0.5, 1.0, 0.3, 1.0, 1.0, 1.0, 1.0, 1.0, 1.0, 1.0, 1.0]
velocity: [0.0, 0.0, 0.0, 0.0, 0.0, 0.0, 0.0, 0.0, 0.0, 0.0, 0.0, 0.0,
           0.0, 0.0, 0.0, 0.0, 0.0, 0.0, 0.0, 0.0, 0.0, 0.0, 0.0, 0.0]
feedforward: [350.0, 350.0, 350.0, 350.0, 350.0, 350.0, 350.0, 350.0, 350.0, 350.0, 350.0, 350.0,
              350.0, 350.0, 350.0, 350.0, 350.0, 350.0, 350.0, 350.0, 350.0, 350.0, 350.0, 350.0]
kp: [100.0, 100.0, 100.0, 100.0, 100.0, 100.0, 100.0, 100.0, 100.0, 100.0, 100.0, 100.0,
      100.0, 100.0, 100.0, 100.0, 100.0, 100.0, 100.0, 100.0, 100.0, 100.0, 100.0, 100.0]
kd: [0.0, 0.0, 0.0, 0.0, 0.0, 0.0, 0.0, 0.0, 0.0, 0.0, 0.0, 0.0,
      0.0, 0.0, 0.0, 0.0, 0.0, 0.0, 0.0, 0.0, 0.0, 0.0, 0.0, 0.0]"

# Enable algorithm control permission
ros2 service call /activate_service std_srvs/srv/Trigger {}

# Read joint information
ros2 topic echo /joint_states --once

# Stop low-level joint control service
ros2 service call /stop_launch std_srvs/srv/Trigger {}
Python example code:
import rclpy
from rclpy.node import Node
from xbot_common_interfaces.srv import DynamicLaunch, SwitchController
from std_srvs.srv import Trigger
from xbot_common_interfaces.action import SimpleActions
from rclpy.action import ActionClient
from sensor_msgs.msg import JointState
from xbot_common_interfaces.msg import Imu

import time

class RobotStartupDemo(Node):
    def __init__(self):
        super().__init__('robot_startup_demo')

        # Service clients
        self.dynamic_launch_cli = self.create_client(DynamicLaunch, '/dynamic_launch')
        self.ready_service_cli = self.create_client(Trigger, '/ready_service')
        self.activate_cli = self.create_client(Trigger, '/activate_service')
        self.stop_launch_cli = self.create_client(Trigger, '/stop_launch')

        # Action client
        self.simple_actions_client = ActionClient(self, SimpleActions, '/simple_actions')

        # State reading related
        self.joint_state_sub = None
        self.imu_sub = None
        self.joint_state_msg = None
        self.imu_msg = None

    def call_service(self, client, request):
        future = client.call_async(request)
        rclpy.spin_until_future_complete(self, future)
        return future.result()

    def wait_for_services(self):
        self.get_logger().info('Waiting for services...')
        self.dynamic_launch_cli.wait_for_service()
        self.ready_service_cli.wait_for_service()
        self.activate_cli.wait_for_service()
        self.stop_launch_cli.wait_for_service()

    def send_simple_action_goal(self, action_name: str, time_cost: float) -> bool:
        goal_msg = SimpleActions.Goal()
        goal_msg.action_name = action_name
        goal_msg.time_cost = time_cost

        self.simple_actions_client.wait_for_server()
        send_goal_future = self.simple_actions_client.send_goal_async(goal_msg)
        rclpy.spin_until_future_complete(self, send_goal_future)
        goal_handle = send_goal_future.result()
        if not goal_handle or not goal_handle.accepted:
            self.get_logger().error(f'SimpleActions goal was not accepted: {action_name}')
            return False

        get_result_future = goal_handle.get_result_async()
        rclpy.spin_until_future_complete(self, get_result_future)
        return True

    def run_startup_sequence(self):
        self.wait_for_services()

        # 1. Start joint service
        self.get_logger().info('Starting joint service...')
        dyn_launch_req = DynamicLaunch.Request()
        dyn_launch_req.app_name = ''
        dyn_launch_req.sync_control = False
        dyn_launch_req.launch_mode = 'pos'
        self.call_service(self.dynamic_launch_cli, dyn_launch_req)

        # 2. Initialize joint modules
        self.get_logger().info('Initializing joint modules...')
        self.call_service(self.ready_service_cli, Trigger.Request())
        time.sleep(20)  # As suggested in docs; can be optimized in production

        # 3. Move joints to standard initial position; takes about 4 seconds
        self.get_logger().info('Sending SimpleActions: initpose_handsdown')
        if not self.send_simple_action_goal('initpose_handsdown', 4.0):
            return

        # 4. Enable algorithm control permission
        self.call_service(self.activate_cli, Trigger.Request())

        # 5. Read joint information
        self.get_logger().info('Reading one joint state...')
        self.joint_state_msg = None
        self.joint_state_sub = self.create_subscription(
            JointState, '/joint_states', self.joint_state_callback, 10
        )
        self.wait_for_msg('joint_state_msg')

        # 6. Read IMU information
        self.get_logger().info('Reading one IMU state...')
        self.imu_msg = None
        self.imu_sub = self.create_subscription(
            Imu, '/imu_feedback', self.imu_callback, 10
        )
        self.wait_for_msg('imu_msg')

        # 7. Stop low-level joint control service
        self.get_logger().info('Stopping low-level joint control service...')
        self.call_service(self.stop_launch_cli, Trigger.Request())
        self.get_logger().info('Process finished.')

    def joint_state_callback(self, msg):
        if self.joint_state_msg is None:
            self.joint_state_msg = msg
            self.get_logger().info(f'Received joint state: {msg}')
            self.joint_state_sub.destroy()

    def imu_callback(self, msg):
        if self.imu_msg is None:
            self.imu_msg = msg
            self.get_logger().info(f'Received IMU state: {msg}')
            self.imu_sub.destroy()

    def wait_for_msg(self, attr_name, timeout=5.0):
        start = time.time()
        while getattr(self, attr_name) is None and rclpy.ok():
            if time.time() - start > timeout:
                self.get_logger().warning(f'Timeout getting {attr_name}')
                break
            rclpy.spin_once(self, timeout_sec=0.1)

def main(args=None):
    rclpy.init(args=args)
    node = RobotStartupDemo()
    node.run_startup_sequence()
    node.destroy_node()
    rclpy.shutdown()

if __name__ == '__main__':
    main()
Machine Zeroing
- Remove the calibration tooling and secure the machine to the calibration tooling according to the calibration tooling specification
- After confirming the completion of the robot installation on the calibration fixture, start the machine e
# SSH into robot backend, enter workspace
ssh developer@192.168.8.100 -p 2222

# Start joint service in PD mode
ros2  service call /dynamic_launch xbot_common_interfaces/srv/DynamicLaunch "app_name: ''
sync_control: false
launch_mode: 'pd'"

# Initialize joint modules; this process takes about 20 seconds
ros2  service call /ready_service std_srvs/srv/Trigger {}

# Call zero-position service
ros2 service call /set_zero_pos std_srvs/srv/Trigger {}

# After returning True, stop the low-level joint control service
ros2 service call /stop_launch std_srvs/srv/Trigger {}

# Use the emergency stop remote controller, press "D" twice to power-cycle the joints

# Start joint service again
ros2  service call /dynamic_launch xbot_common_interfaces/srv/DynamicLaunch "app_name: ''
sync_control: false
launch_mode: 'pd'"

# Initialize joint modules; this process takes about 20 seconds
ros2  service call /ready_service std_srvs/srv/Trigger {}

# Calibration result verification
ros2 topic echo /joint_states

# Check the position values; if the absolute value is below 0.02, calibration is successful.
# Otherwise, check whether the joints are properly positioned, and repeat the above steps after ensuring correct positioning
Upper-level Control SDK
Note: The operation of the upper-level control SDK depends on the lower-level control. Please complete the underlying joint control service first before invoking the upper-level control.
MPC Interface Description
exclamation When using this interface, please follow the following steps and precautions to ensure the stability and security of the operation:
- Read the current pose: Before sending control commands, the current pose of the robotic arm should be read first to serve as the starting point for trajectory control.
- Gradually approach the target: It is recommended tocontinuously send target poses in small incrementsto gradually guide the robotic arm to the target position.
- Avoid sudden movements: Please avoid sending large pose changes at once. Rapid or large-scale movements may cause instability in the robotic arm's motion or safety risks related to robot posture or motion.
- It is recommended to combine with trajectory planning: This interface is suitable for continuous control. It is recommended to combine with an external trajectory generator or smoothing algorithm to improve control accuracy and safety.
1. servoPose Interface
| Interface Name | Type | Function Description | Message Type |
|---|---|---|---|
/servo_poses | ROS2 Topic | Control the target poses of the left and right hands | xbot_common_interfaces/msg/ServoPose |
ServoPose.msgincludes three fields:- geometry_msgs/PoseStamped left_pose
- geometry_msgs/PoseStamped right_pose
- geometry_msgs/PoseStamped head_pose
geometry_msgs/PoseStampedStructure:- std_msgs/Header header
- geometry_msgs/Pose pose
2. getPose Interface
| Interface Name | Type | Function Description | Message Type |
|---|---|---|---|
/get_pose | ROS2 Topic | Get the current poses of the left and right hands | xbot_common_interfaces/msg/ServoPose |
ServoPose.msgincludes two fields:- geometry_msgs/PoseStamped left_pose
- geometry_msgs/PoseStamped right_pose
- geometry_msgs/PoseStamped head_pose
geometry_msgs/PoseStampedStructure:- std_msgs/Header header
- geometry_msgs/Pose pose
Use MPC
exclamation Upper limb control is a control program designed for operations on the waist, head, and both arms, precisely controlling the arm end-effector to a set position through dynamic means. If you need to use it, please first start the robot up to the step of "initializing joint modules" and then continue.
Use via command line
# SSH into the robot backend, enter workspace
ssh developer@192.168.8.100 -p 2222

# Start robot joint motors via the lower-level SDK
# Move the robot to zero position
# Omitted here, please refer to the low-level joint control section

# Enable algorithm control permission
ros2 service call /activate_service std_srvs/srv/Trigger {}

# Source message definitions
git clone https://github.com/roboterax/teleop_client.git
cd teleop_client
colcon build
source install/setup.bash

# Start MPC algorithm
ros2 service call /teleoperation/service xbot_common_interfaces/srv/StringMessage \
'data: "{\"type\":\"mpc\",\"message\":{\"command\":\"start\"}}"'

# Check MPC status; status=1 means started, 0 means not started
ros2 service call /teleoperation/service xbot_common_interfaces/srv/StringMessage \
'data: "{\"type\":\"mpc\",\"message\":{\"command\":\"query\"}}"'

# Reset MPC; mode 0 lifts the arms
# mode 0 is also the robot's initial position after enabling MPC
ros2 service call /teleoperation/service xbot_common_interfaces/srv/StringMessage \
'data: "{\"type\":\"mpc\",\"message\":{\"command\":\"reset\",\"mode\":0}}"'

# Control arm lifting using ROS command only. The value after -r indicates the publishing frequency;
# -r 100 means 100Hz, which controls the motion speed
ros2 topic pub -r 20 /servo_poses xbot_common_interfaces/msg/ServoPose "{
  left_pose: {
    header: {frame_id: 'base_link'},
    pose: {position: {x: 0.425, y: 0.3, z: 0.292}, orientation: {x: 0.612, y: -0.016, z: 0.79, w: -0.006}}
  },
  right_pose: {
    header: {frame_id: 'base_link'},
    pose: {position: {x: 0.417, y: -0.146, z: 0.382}, orientation: {x: 0.521, y: 0.1, z: 0.842, w: -0.096}}
  },
  head_pose: {
    header: {frame_id: 'base_link'},
    pose: {position: {x: 0.0, y: 0.0, z: 0.0}, orientation: {x: 0.0, y: 0.0, z: 0.0, w: 1.0}}
  }
}"

# Stop MPC algorithm
ros2 service call /teleoperation/service xbot_common_interfaces/srv/StringMessage \
'data: "{\"type\":\"mpc\",\"message\":{\"command\":\"stop\"}}"'

# Disable algorithm control permission
ros2 service call /deactivate_service std_srvs/srv/Trigger {}
Python code example
import rclpy
from rclpy.node import Node
from std_srvs.srv import Trigger
from xbot_common_interfaces.srv import StringMessage
import subprocess
import time
import textwrap

class MPCStartupDemo(Node):
    def __init__(self):
        super().__init__('mpc_startup_demo')
        self.cli_activate = self.create_client(Trigger, '/activate_service')
        self.cli_teleoperation = self.create_client(StringMessage, '/teleoperation/service')
        self.cli_activate.wait_for_service()
        self.cli_teleoperation.wait_for_service()

    def call_activate_service(self):
        self.get_logger().info('Enabling algorithm control permission...')
        req = Trigger.Request()
        future = self.cli_activate.call_async(req)
        rclpy.spin_until_future_complete(self, future)
        resp = future.result()
        if resp.success:
            self.get_logger().info('Algorithm control permission enabled successfully')
        else:
            self.get_logger().error(f'Failed to enable: {resp.message}')

    def launch_mpc(self):
        self.get_logger().info('Starting MPC algorithm...')
        req = StringMessage.Request()
        req.data = '{"type":"mpc","message":{"command":"start"}}'
        future = self.cli_teleoperation.call_async(req)
        rclpy.spin_until_future_complete(self, future)
        resp = future.result()
        if resp.result:
            self.get_logger().info('MPC algorithm started')
        else:
            self.get_logger().error(f'Failed to start MPC algorithm: {resp.message}')

    def stop_mpc(self):
        self.get_logger().info('Stopping MPC algorithm...')
        req = StringMessage.Request()
        req.data = '{"type":"mpc","message":{"command":"stop"}}'
        future = self.cli_teleoperation.call_async(req)
        rclpy.spin_until_future_complete(self, future)
        resp = future.result()
        if resp.result:
            self.get_logger().info('MPC algorithm stopped')
        else:
            self.get_logger().error(f'Failed to stop MPC algorithm: {resp.message}')

    def publish_servo_pose_rate(self, rate_hz: int = 10):
        """Continuously publish arm-lift pose to /servo_poses at specified frequency (default 10Hz)"""
        message = textwrap.dedent(
            """
            {
              left_pose: {
                header: {frame_id: 'base_link'},
                pose: {position: {x: 0.425, y: 0.3, z: 0.292}, orientation: {x: 0.612, y: -0.016, z: 0.79, w: -0.006}}
              },
              right_pose: {
                header: {frame_id: 'base_link'},
                pose: {position: {x: 0.417, y: -0.146, z: 0.382}, orientation: {x: 0.521, y: 0.1, z: 0.842, w: -0.096}}
              },
              head_pose: {
                header: {frame_id: 'base_link'},
                pose: {position: {x: 0.0, y: 0.0, z: 0.0}, orientation: {x: 0.0, y: 0.0, z: 0.0, w: 1.0}}
              }
            }
            """
        ).strip()
        self.get_logger().info(f'Publishing /servo_poses arm-lift command at {rate_hz}Hz...')
        subprocess.run([
            'ros2', 'topic', 'pub', '-r', str(rate_hz),
            '/servo_poses', 'xbot_common_interfaces/msg/ServoPose',
            message
        ], check=True)

def main(args=None):
    rclpy.init(args=args)
    node = MPCStartupDemo()
    node.call_activate_service()
    # Wait 1 second to ensure the service takes effect
    time.sleep(1)
    node.launch_mpc()
    node.publish_servo_pose_rate()
    node.stop_mpc()
    node.destroy_node()
    rclpy.spin(node)
    rclpy.shutdown()

if __name__ == '__main__':
    main()
Directly use audio devices in the developer environment
The robot integrates a microphone and a speaker, which can be directly used in the system
Usage Instructions
Test whether the device is functioning properly via the command line
# Log into developer environment (password: developer)
ssh developer@192.168.8.100 -p 2222      # SSH into robot backend, enter workspace

# Install audio libraries
sudo apt update
sudo apt install libportaudio2 python3-pyaudio portaudio19-dev

# Install virtual environment tools
curl -L -A "Mozilla/5.0 (X11; Linux x86_64) AppleWebKit/537.36" \
  -o python3-pip-whl_22.0.2+dfsg-1_all.deb \
  "https://mirrors.ustc.edu.cn/ubuntu/pool/universe/p/python-pip/python3-pip-whl_22.0.2+dfsg-1_all.deb"
sudo dpkg -i python3-pip-whl_22.0.2+dfsg-1_all.deb
sudo apt-get install --fix-broken python3.10-venv

# Create virtual environment
python3 -m venv venv
source venv/bin/activate

# Install dependencies (if installation fails, specify a mirror)
# Aliyun mirror example: pip install sounddevice scipy -i https://mirrors.aliyun.com/pypi/simple/
# Tsinghua mirror example: pip install sounddevice scipy -i https://pypi.tuna.tsinghua.edu.cn/simple/ --trusted-host pypi.tuna.tsinghua.edu.cn
pip install sounddevice scipy --timeout=1000

# Grant permissions to sound devices to avoid issues
sudo chmod 777 /dev/snd/*

# Query sound card information:
python3 -c "import sounddevice as sd; print(sd.query_devices())"

# If successful, you should see output similar to:
developer@xbot-NUC:~$ python3 -c "import sounddevice as sd; print(sd.query_devices())"
< 0 HD-Audio Generic: HDMI 0 (hw:0,3), ALSA (0 in, 8 out)
  1 HD-Audio Generic: HDMI 1 (hw:0,7), ALSA (0 in, 8 out)
  2 HD-Audio Generic: HDMI 2 (hw:0,8), ALSA (0 in, 8 out)
  3 HD-Audio Generic: HDMI 3 (hw:0,9), ALSA (0 in, 8 out)
> 4 POROSVOC: USB Audio (hw:1,0), ALSA (1 in, 0 out)
  5 HD-Audio Generic: ALC897 Analog (hw:2,0), ALSA (2 in, 2 out)
  6 USB Audio Device: - (hw:3,0), ALSA (1 in, 2 out)
  7 hdmi, ALSA (0 in, 8 out)

# Exit virtual environment
deactivate
Python code example
import sounddevice as sd
import numpy as np
from scipy.signal import resample

duration = 2.0  # seconds

# Adjust input and output devices as needed
sd.default.device = (6, 6)  # M7 default audio device is 6

# Get default device indices
input_device, output_device = sd.default.device

# Query device parameters
input_info = sd.query_devices(input_device)
output_info = sd.query_devices(output_device)

input_samplerate = int(input_info['default_samplerate'])
output_samplerate = int(output_info['default_samplerate'])
channels = input_info['max_input_channels']

print(f"🎤 Recording from default input device (device {input_device}) for {duration} seconds @ {input_samplerate} Hz, channels: {channels}")

sd.default.device = (input_device, output_device)

# Record audio
recording = sd.rec(int(input_samplerate * duration), samplerate=input_samplerate, channels=channels, dtype='int16')
sd.wait()

# Amplify volume (adjust as needed)
amplified = recording * 1
amplified = np.clip(amplified, -32768, 32767).astype(np.int16)

# Resample if input and output sample rates differ
if input_samplerate != output_samplerate:
    print(f"🔁 Resampling from {input_samplerate} Hz to {output_samplerate} Hz for playback")
    num_samples = int(output_samplerate * duration)
    amplified = resample(amplified, num_samples).astype(np.int16)

print(f"🔊 Playing back on default output device (device {output_device})...")
sd.play(amplified, samplerate=output_samplerate)
sd.wait()

print("✅ Playback finished")
Get battery information in the developer environment
The robot is installed with a battery, and battery information can be viewed in the system
Usage Instructions
Obtain battery information via the command line
| Interface Name | Type | Function Description | Message Type |
|---|---|---|---|
/battery_state | ROS2 Topic | Get battery information | sensor_msgs/msg/BatteryState |
BatteryState.msg is a ROS2 standard interface, mainly using the following fields:
voltage: battery voltage, unitVtemperature: battery temperature, unit℃current: battery current, unitAcharge: current battery capacity, unitAhdesign_capacity: Battery rated capacity, unitAhpercentage: current battery level, unit%power_supply_status: charging status,0=standby, 1=charging, 2=discharging
ros2 topic echo --once /battery_stateCamera Data
The M7 robot is equipped with a head camera by default, which publishes head image-related topics after startup. The left and right hand cameras need to be connected and enabled separately before their corresponding topics are published. Use ros2 topic list to view camera-related topics.
| Position | Topic Name | Data Type | Meaning |
|---|---|---|---|
| Head (default) | /head/camera_info | sensor_msgs/msg/CameraInfo | Camera intrinsic parameters (K matrix, distortion parameters, etc.) |
| Head (default) | /head/image_raw | sensor_msgs/msg/Image | RGB image raw data |
| Head (default) | /head/image_raw/compressed | sensor_msgs/msg/CompressedImage | RGB image compressed data |
| Left hand (requires connection) | /left/camera_info | sensor_msgs/msg/CameraInfo | Camera intrinsic parameters (K matrix, distortion parameters, etc.) |
| Left hand (requires connection) | /left/image_raw | sensor_msgs/msg/Image | RGB image raw data |
| Left hand (requires connection) | /left/image_raw/compressed | sensor_msgs/msg/CompressedImage | RGB image compressed data |
| Right hand (requires connection) | /right/camera_info | sensor_msgs/msg/CameraInfo | Camera intrinsic parameters (K matrix, distortion parameters, etc.) |
| Right hand (requires connection) | /right/image_raw | sensor_msgs/msg/Image | RGB image raw data |
| Right hand (requires connection) | /right/image_raw/compressed | sensor_msgs/msg/CompressedImage | RGB image compressed data |
View topic information examples:
ros2 topic info /head/camera_info
ros2 topic info /left/image_raw
ros2 topic info /right/image_raw/compressed
Recording and playback of robot actions in the developer environment
Start remote operation
exclamation Teleoperation requires two people to cooperate simultaneously. Before stopping the MPC, the head-mounted display operator must not move unexpectedly.
Reference: Operation Guide: Robot Teleoperation and Development Guide: Using Teleoperation in the Developer Environment
Record robot actions
exclamation Note:Remote operation can only be initiated after ensuring that human movements are consistent with the robot's movements.
# Enter developer environment
ssh developer@192.168.8.100 -p 2222 # password: developer

# If teleop_client has already been cloned
cd teleop_client
colcon build
source install/setup.bash
# If the teleop_client directory does not exist, please execute step 1 in the teleoperation service startup guide

# Recording
ros2 bag record /hand_controller/commands /servo_poses -o [bag package name]
# -o defines the output bag name

# Save recording: press Ctrl+C in the terminal where the robot motion is being recorded to stop recording
Play robot actions
Play in the developer container
# Start SDK (do not restart if already running)
ros2 service call /dynamic_launch xbot_common_interfaces/srv/DynamicLaunch "app_name: ''
sync_control: false
launch_mode: 'pos'"

# Start MPC algorithm
ros2 service call /teleoperation/service xbot_common_interfaces/srv/StringMessage \
'data: "{\"type\":\"mpc\",\"message\":{\"command\":\"start\"}}"'

# Play
ros2 bag play [bag package name]
# [bag package name] contains the recorded robot motions

# Stop MPC algorithm
ros2 service call /teleoperation/service xbot_common_interfaces/srv/StringMessage \
'data: "{\"type\":\"mpc\",\"message\":{\"command\":\"stop\"}}"'

# Stop SDK
ros2 service call /stop_launch std_srvs/srv/Trigger {}
Maintenance and Upkeep
Battery Charging and Replacement
To ensure the battery performance and service life of the robot, please charge and use it at an appropriate temperature, avoid overcharging and over-discharging, and conduct regular inspections and maintenance. The battery should be stored in a dry and well-ventilated environment, avoiding direct sunlight and extreme temperatures. When a decline in battery performance or damage is detected, it should be replaced promptly. Following these maintenance recommendations can effectively extend the battery's service life and ensure the safety of the robot.
Daily maintenance
Daily maintenance of robot batteries is very important, as it can ensure the normal operation of the robot and extend the battery's service life. The following are some basic maintenance tips and precautions:
- Battery charging: New batteries should be fully charged before first use. Even if not used for a long time, they should be fully charged at least once a month to avoid battery aging;
- Battery Replacement: The backup battery of the robot should be replaced regularly. For example, the maintenance cycle of the robot can be one and a half years, and it should also be replaced promptly when the battery voltage drop alarm is triggered;
- Battery Usage: Battery charging usually takes only 3 - 4 hours, and the usage time can vary from 45 minutes to 4 hours depending on usage. It is recommended to keep the battery charge level between 30% and 70 - 80%, avoiding maintaining 100% charge or a charge level below 30% for an extended period, as this will accelerate battery aging;
- Battery Storage: If the robot is not used for an extended period, the battery should be stored under appropriate conditions to avoid deep discharge and charged at least once every month;
- Battery Maintenance: During daily maintenance, attention should be paid to checking the battery voltage, promptly replacing batteries that show a voltage drop alarm, and ensuring that the power, air pressure, and hydraulic supply of the robot are turned off when replacing batteries;
- Safe Operation: When performing battery replacement or maintenance, ensure that the robot has been powered off and is in a stopped state to avoid accidental injury;
- Environmental Factors: The maintenance and upkeep of batteries should also take into account environmental factors, such as temperature and humidity, to ensure the stability and safety of battery performance;